You need:
- several colours construction paper
- black cardboard 20 by 20 cm
- coloured cardboard 20 by 20 cm
- scissors
- glue
- black thick marker
Burton Morris (Pittsburgh, 1964) is an American pop-art artist. He is influenced by pop-art artists from the 60's and 70's, like Warhol, Lichtenstein and Haring. Now he is one of the most famous modern post pop-art artist. Morris's work shows a contemporary twist to traditional pop-art. His work is cheerful, energetic and colourful. His characteristic lines with the bright colours give his work a fantastic energy. Morris's work is known of tv-series like Friends and also appears in major advertising campaigns by U.S. companies like AT & T, Pepsi and Heinz.
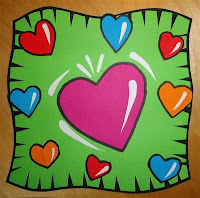
Show artwork of Morris on the digital board. Discuss the features: bright colours, black outlines, little detail, movement by little lines, white lines that suggest light and the distinctive black star shape around or in much of his work. Students are going to make an artwork in the style of Burton Morris with the subject: Valentine's Day.
Step 1. Take two colours cardboard: black for the edge and one colour for the background. take a construction paper for the big heart.
Step 2. Cut the edges of the background cardboard sloping away, to make a sort of rug. You have to cut at least 1 cm around.
Step 3. Cut a large heart from the second coloured cardboard. Cut white 'light lines' from a white sheet for on and around the big heart.
Step 4. Cut some smaller hearts from several colours of construction paper. Cut white 'light lines' and paste them on the little hearts; all on the same side.
Step 5. Paste the big heart on the coloured cardboard. Paste the light lines on the heart and around it.
Step 6. Cut long triangles from the sides of the rug, the 'flashy stripes'. Paste the rug on the black cardboard.
Step 7. Paste the small hearts around the big heart; you may k de kleine hartjes rondom het grote hart, where you can go over the triangles. Outline the small hearts with a black marker.
Step 8. Cut the black background away, leaving about 2 mm on the edges.
Step 9. Paste the work on a coloured sheet (A4 size) and cut it into a square.
Made by students of grade 4 and 5


Just a quick note to let you know that a link to this post will be placed on CraftCrave today [03 Feb 12:00am GMT]. Thanks, Maria
BeantwoordenVerwijderenThanks for introducing a new artist to my repertoire - great ideas!
BeantwoordenVerwijderenLove this idea! Thanks for sharing.
BeantwoordenVerwijderenWhat a wonderful idea--I love it!! Thank you for sharing.
BeantwoordenVerwijderenI really love this! Awesome results!
BeantwoordenVerwijderenthank you!!!
BeantwoordenVerwijderenZo leuk! Ook een interessante artiest! Ik probeer dit vandaag uit :-)
BeantwoordenVerwijderenThank you for this great project. I will be doing this with my older group tomorrow
BeantwoordenVerwijderenA lovely project which my class thoroughly enjoyed - we credited you! http://aroomwithaview.edublogs.org
BeantwoordenVerwijderenThank you for the great lesson. I did it in 5th grade today and it was a huge hit!
BeantwoordenVerwijderenThank you! My students loved this and we are the talk of the school!
BeantwoordenVerwijderen