Posts tonen met het label portraits. Alle posts tonen

woensdag 28 oktober 2009

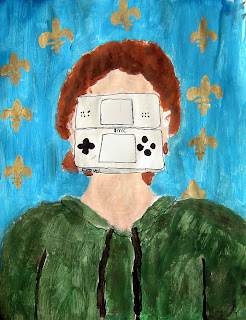
In the style of René Magritte

Made by Nikki, 11 years old

Rene Magritte is born in 1898 in Belgium. When Magritte is 13 years old, his mother commits suicide. She jumps in the river Samber and is found with her dress covering her face. This image has been suggested as the source of several paintings from Magritte: people hiding their faces with several objects.

In 1924 Magritte became friends with members of a surrealism group in Brussels: André Breton, Joan Miró and Salvador Dalí. These artists influence Magritte's work. In the end Magritte became famous with surrealistic paintings.

Magritte gave his paintings a realistic effect of surrealism. He painted simple objects, like a shoe, an apple, a pipe or a tree. Magritte took these things out of their ordinary environment and placed them in a special surrounding.

One of Magritte's most famous works is "La Trahison des Images" (The Treachery of Images). This is a very realistic painting from a pipe, with the text: Ceci n'est pas une pipe (This is not a pipe). The painting is not a pipe, but rather an image of a pipe. As Magritte himself commented: "The famous pipe. How people reproached me for it! And yet, could you stuff my pipe? No, it's just a representation, is it not? So if I had written on my picture 'This is a pipe,' I'd have been lying!"

By putting us constantly on the wrong track, Magritte forces us to think about art. Magritte thought it the task of an artist to place reality in a different context.

Nikki working on her version of Magritte

You need:
  1. drawing sheets A3 size
  2. brushes and water containers
  3. old newspapers
  4. tempera paint
  5. (black markers)
Show Magritte's work and talk about surrealism. Ask children to tell what they see in those surrealistic paintings. Talk about realism and show realistic paintings. What are the differences between these two styles? How do you recognize surrealistic art? Show the painting The son of man and tell about the covered faces we'll see in a lot of Magritte's paintings.

Made by Kiki, 11 years old

Children sketch a portrait, just like Magritte did. It doesn't have to be someone special, just a person. Instead of an apple, they choose a present-day object to cover the face. This object has to be about as large as a face, so a piano or a coin can't be used! Options: an Ipod, cell phone, candy or something. When sketching is finished, the drawing has to be painted. When necessary, students can outline the covering object with a fineliner.

Made by Jetse, 12 years old

zaterdag 26 september 2009

Mothers finest

You need:
  1. coloured paper A4 size
  2. scissors
  3. glue
  4. leftovers coloured paper
  5. leftovers yarn, wire, pipe cleaner
  6. buttons, feathers etc..
  7. leftovers of cotton

Traditionally, people love to decorate themselves. With what do people decorate themselves? Is this the same in all countries? What kind of decorations can you mention? Discuss decorations and write different kinds of decorations on the blackboard.

Each student gets two coloured sheets of paper; one for the background and one for the face. Fold the sheet for the face lengthwise and draw half a face against the fold. Don't forget the ears! Cut the face and glue it on a background, letting a bit space between face and background. uit en plak het op de achtergrond met een beetje ruimte eronder. So don't glue it flatly. Cut eyes, nose and mouth out of leftover paper and glue them on the face. Decorate the face with different materials. Thing of earrings, glasses, hair, make-up, chain, necktie etc.

(Photographs: Willem Wienholts)

zaterdag 6 juni 2009

Face in the mirror

You need:
  1. coloured construction paper
  2. scissors and glue
  3. cutter and mat
During this lessons children will practice with positive and negative space. Discuss about a face: form, place of ears and eyes (same height), distance between the eyes, hairline (not just on top of the head), the width of the mouth and nose. Every child gets a construction paper and a half construction paper in two contrasting colours. Draw half of a face to the side of the small sheet. This face must be cut and placed at the center line of the whole sheet. Cut parts out of the half face and place them on the other side. When all parts are cut, everything cn be pasted.

maandag 25 mei 2009

It's me in the mirror

You need:

  1. digital photo camera
  2. white drawing sheets
  3. coloured pencils
  4. photograph of back of the head, shoulders and stretching arm
  5. aluminium foil
  6. big mirror on the wall
  7. some hand mirrors
  8. scissors and glue

If you want to see the back of yourself, you'll need two mirrors. By using a hand mirror you can see the back of your head back in a mirror on the wall.

We're going to practice with the mirrors. Children look at their own backs with two mirrors and will discover they nevertheless can see their front also!

All children get two printed photographs of themselves: one with the back of the head/shoulders/stretched hand with handmirror, and one photograph of their face. The 'back'photo has to be used to copy. Draw yourself at the left of the sheet. Copy the stretched hand as well as you can. After this they draw the background: the bathroom or maybe the bedroom. The hand mirror has to be drawn bigger, because the photograph has to fit!

Aluminium foil has to be glued on the handmirror (shining side up). Cut out the photograph of the face, and glue this on the foil.

woensdag 20 mei 2009

Portraits of the past

 
Nice sepia portraits can be painted with instant coffee. Ask students to bring pictures from the past from home, or let them search for those photographs in the internet.
Discuss those photograps. How do you know those portraits are from long time ago? Clothes and hair of course, but look also how people were posing and what colours the pictures have.

You need:
  1. white drawing paper A4 size
  2. instant coffee
  3. saucers
  4. brushes
  5. jars with water
  6. paper towels
  7. gold markers
  8. brown construction paper
  9. glue
  10. scissors
Tell the students they're going to paint with instant coffee. Each child gets a saucer with a teaspoon of coffee grains. Those grains are to be dissolved in water on the saucer bit by bit. The less water you use, the darker the colour will be. Let the students practice this on a scratch sheet.
The portrait has to be drawn with coffee and a brush directly on the sheet. There will be no scetching with a pencil. False lines can be removed with a drop of water on the brush. After painting the contour lines of the portrait, it can be coloured with the instant coffee.
Cut a frame out of brown construction paper. Draw decorations with gold marker. Paste the frame on the paiting.
Made by students of grade 6

dinsdag 19 mei 2009

Self portrait like Modigliani

Amedeo Clemente Modigliani (1884 - 1920) was an Italian painter and sculptor. Modigliani's paintings are included in expressionism. He painted nudes and highly stylized portraits. He used stylized shapes and painted long, oval faces with elongated necks and long limbs, allowing the characters express a melancholy mood. The skin is often rusty and all forms are outlined. Eyes, noses and mouths in the faces are not the 'right' place, but still offer a balanced and credible image.
View with the children a number of paintings by Modigliani and discuss the salient features:
  • faces are elongated
  • faces are often skewed
  • use of warm colours
  • the shapes are outlined in black
You need:
  1. black constructionpaper A4 size
  2. oil pastels
  3. coloured paper for background
The students get a sheet of black paper and divide it into eight sections. First middle vertically, then horizontally through the middle. Then the horizontal halves have to be halved again. Children have to draw an oval, starting at the middle line to slightly above the center of the top section. The neck lines run to the middle bottom section, and from there the shoulder line is drawn. Eyes have to be drawn higher than "normal" portraits and the mouth lower. In between the nose, which is also longer than usual.

After sketching the pencil lines have to be traced with with black oil pastel. Then everything has to be coloured. Watch the black lines: do not touch them with a different colour, it will get messy! Do the colouring carefully, especially in smaller components like eyes and mouth. If a lighter crayon spots black, clean it in a paper towel. Colour the background until you don't see any black. Paste the work on a matching background.


Made by students of grade 5