woensdag 29 september 2010

Fine lines

You need:

  1. black construction paper 20 by 12 cm
  2. coloured construction paper A4 size
  3. pencil
  4. ruler
  5. scissors
  6. cutter and cutting mat
  7. glue

This lesson is about lines. What kind of lines do you know? Straight, wavy, curved, bumpy, broken, spiral, zig-zag. Discuss different types of lines and let students draw examples on the blackboard.

Draw with a pencil nine different lines on the black paper with 2 cm between them. Cut the sheet carefully following the lines and place the individual pieces in cut order on the coloured paper. Draw with a pencil on the left and bottom of the colored sheet lines on 1 cm from the side. Paste the first black strip on the coloured sheet against the drawn lines. Paste the other strips with about a half cm space between them against the pencil line left.

When all stripes are pasted, cut at the top and right the excess coloured paper away leaving a frame of 1 cm.

zondag 26 september 2010

Tumbling blocks

Even though I'm not a fan of colouring pages, this one was a hit in my classroom! You need:
  1. printed sheet with tumbling blocks
  2. markers

I downloaded a sheet with tumbling blocks on Incompetech, a site full of free downloadable graph papers. Students had to choose three colours markers to colour the blocks. When finished, cut the drawing and paste it on a coloured background.

vrijdag 24 september 2010

There's a ghost in my bedroom!

Made by Maarten, 11 years old

You need:

  1. white drawing paper A5 size
  2. indian ink
  3. dip pen
  4. pencil
  5. paper towel
  6. black paper for background

Help, there are ghosts in my bedroom! Behind the wardrobe, Achter de kast, under the bed, under the rug.... Sketch your room with a pencil: bed, wardrobe, toys, window, door. Draw ghosts on several places. Trace the drawing with indian ink. Leave the ghosts white, and fill the rest of the drawing in with various textures. Look for a lesson on texture at this link: Exercise in drawing texture. Paste the drawing on a black sheet.

Made by Floor, 11 years old

donderdag 23 september 2010

Mirror faces

You need:

  1. white drawing paper A4 size
  2. ruler
  3. pencil
  4. markers
Which facial expressions do you know? How do you draw the expression of a face? Talk about faces and emotions and show students with pictures or quick drawings how faces can change with certain emotions. Consider the state of the mouth, eyes and eyebrows. Divide the sheet into four sections by drawing three diagonal lines from top to bottom to bottom. Then draw a diagonal line from about the middle of the short side to the first vertical line. Do the same to the second line, third line and go through to the other short side of the sheet. See picture a.

Picture a.
Then pull vertical diagonal lines from top to bottom; be sure the lines go right through the middle of the sections. See picture b.

Picture b.

Draw the half of a face to the red line of the first upper left section and draw the mirror image on the other side of the red line. Choose two colours markers. Colour the facial parts of one half. Colour the background or the other half, leaving the facial parts white. Draw another face in the section below and colour it as written above, but change coloured in white. See picture c.

Picture c.

Finish the drawing and draw as many facial expressions as you know. Colour everything, alternating white and colour as a checkerboard. See picture d.

Picture d.

zondag 19 september 2010

Magnificent magnifier

You need:

  1. drawing sheet A4 size
  2. colour pencils
  3. coloured paper for background
  4. magnyfying glass

Give students a magnifying glass and send them out to look how things increase looking through it. How does a blade of grass look through the magnifier? Or tree bark? Leaves? Flowers? Insects?

For this lesson children draw something from nature. Part of the drawing has to be seen through a magnifying glass. This magnifying glass will actually be drawn too. That what is seen through the magnifying glass, has obviously to be much more detailed as the environment.

woensdag 15 september 2010

Birds like Corneille (2nd lesson)


This lesson about Corneille is almost the same as the lesson I posted a few days earlier. However, drawings in this lesson are made with oilpastels by students in a lower grade. 

 You need:
  1. white drawing paper A4 size
  2. oil pastels
  3. coloured ink
  4. brushes
  5. jar with water
  6. coloured paper for background
  7. glue or stapler
Life and work of Corneille
See my former lesson for information about the artist. 


What to do?

Show examples of Corneille's work. What subjects do you see in his paintings? What can you tell about his style: bright colours, thick black outlines, few details, painted as if it was made by a child, an image that sometimes is not complete (missing parts at the edges).
 
Draw the outline of a bird with a black crayon. Make surethe bird reaches at three edges of the sheet: it should be big! Colour in bright colours and/or patterns. Paint the background with deluted blue ink. Stick the drawing on a coloured sheet.
 
All artworks made by students of grade 3

zaterdag 11 september 2010

Animals like Corneille

You need:
  1. white drawing paper A3 size
  2. tempera paint
  3. brushes
  4. paper towels
  5. jar with water
  6. coloured paper for background
  7. glue or stapler
Life and work of Corneille
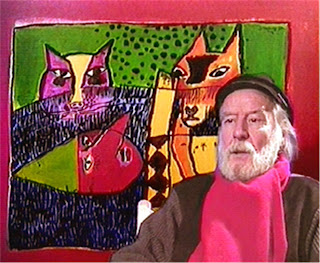
Guillaume Cornelis Beverloo (1922 - 2010), Corneille, was a Dutch artist, born in Belgium and died in France. He is buried on the same cemetery as Vincent van Gogh, a painter he highly admired . 

Corneille was an autodidact. In his early years he painted realistic: still lifes, people and landscapes. In 1948 Corneille was involved in the creation of the CoBrA Group, a group of Danish (Copenhagen), Belgian (Brussels) and Dutch (Amsterdam) artists. Even writers and poets belong to the CoBrA group. The artists' group only existed for three years, but has been very important for Corneille's work. 
According to Corneille, the CoBRA artists want to express themselves on a expressionistic way, like children, by playing open-minded with colours and shapes. Since 1950 Corneille lived and worked in Paris. His paintings are bright and colourful. The sun, women, paradise, trees and birds are recurring elements. He is particularly fond of birds. His artist name Corneille is French for 'crow'.

What to do?
Show examples of Corneille's work. What subjects do you often see in his paintings? What do you notice about his style? Discuss the features: bright colours, thick black outlines, few details, painted as if it was made by a child, an image that sometimes is not complete (missing parts at the edges).
 

In this lesson students have to sketch very briefly (maximum 5 minutes!), to avoid drawing too many details and to force them to work big. Students may  also choose to sketch with a small brush and light yellow paint. This will automatically result in working big with little details. The yellow lines can easily be painted with different colours later.
 
Sketching with yellow paint

Sketch the outline of a cat or bird and make sure this animal reaches at least three edges of the sheet: it should be big! Paint the animal in bright colours and/or patterns. Paint the background too. Leave the work to dry and outline everything using a small brush and black paint. Paint your name in black somewhere at the artwork, like Corneille did. Stick the painting on a coloured sheet.
 
All artworks made by students of 11 years old

dinsdag 7 september 2010

A picture in pieces

In this lesson students have to copy a piece of a very detailed drawing by using a viewing window. The main issue in this lesson is texture. This lesson is a continuation of 'Exercise in drawing texture'.

You need:

  1. detailed pen-and-ink drawing (download)
  2. pencil
  3. ruler
  4. paperclips
  5. drawing paper
  6. indian ink
  7. dip pen
  8. paper towel
  9. coloured cardboard
  10. cutter and cutting mat
  11. glue

Step 1

Give students half A4 sheet of stiff paper. Draw somewhere in the middle of the sheet a square of 5 by 5 cm and cut it out: this is your viewing window. Measure securely! The square doesn't necessarely have to come in the middle of the sheet, because it will only be used as a viewing window.

Step 2

Give students a sheet of white paper and tell them to draw two or three squares of 5 by 5 cm with some space between them. Students can use the mold from step 1, but measuring and drawing may be a good exercise too. (The squares will be cut at the end of the lesson, so the space between them is not so important.)

Detailed pen-and-ink drawing, click to enlarge

Step 3

Now each student has a viewing window and a drawing sheet with two or three squares on it. Give stuents a copy of the detailed house drawing (or search another drawing yourself) and two paperclips. The mission is: search with the viewing window a piece of the drawing you like most. Fix the viewing window with paperclips on the pen drawing and copy that piece as accurately as possible with indian ink in a square on the drawing sheet. Than copy one or two other pieces.

Step 4

Cut the drawings and paste them on one or more layers of coloured cardboard.

Made by children of 11/12 years old

maandag 6 september 2010

Exercise in drawing texture

You need:

  1. white drawing paper
  2. ruler
  3. pencil
  4. indian ink
  5. dip pen
  6. coloured paper
  7. glue

Tell students about texture: the way something is made, how the surface feels and what structure looks like. Let them feel several textures: the wall, an orange, stuffed animal etc. Discuss how texture can be drawn. A wall is not so difficult, but how do you draw texture in an orange? And how would you draw texture in a stuff animal?

Students draw six squares from 5 by 5 cm on their sheet using a ruler and pencil. Draw with indian ink six different textures in the squares. Cut the squares and make a composition of them on a coloured paper.

zaterdag 4 september 2010

Exercise in colour mixing

You need:

  1. white drawing sheet A3 size
  2. yellow, red and blue tempera paint
  3. brushes
  4. pencil
  5. ruler

Purpose of this lesson to learn students how to make secondary colours. Show Itten's colour circle and discuss it. Tell about primary and secundary colours and show how to make the secundary colours.

Students make a simple drawing on their sheet. In this lesson is chosen for a still life of vases , but you can also opt for houses. After this a 5 cm grid has to be drawn using pencil and ruler. The squares of the objects are painted with primary colours red, yellow and blue; be sure there is never the same color next to each other. The background squares are painted with the secondary colours orange, purple and green. Again: alternate, not the same colour next to each other. To avoid errors, it is useful to write the first letter of the colours in the squares before painting.