Posts tonen met het label collage. Alle posts tonen

maandag 24 november 2025

Colorful Christmas trees

This lesson is seen more than 143,000 times since the first day I posted it in 2010. If you use it on your own website, please mention your source: kidsartists.blogspot.com
And if you want to make money out of this lesson, realise it's my work. 
So ask me before sending it to Teachers pay teachers, Twinkle and all that other sites. 

What do you need?
  • two white drawing sheets A4 size
  • water color paint
  • brushes
  • jar with water
  • tissue paper
  • scissors and glue
  • ruler
  • pencil
  • gold or silver marker
  • white correction marker
  • glitter
What should you do?
  1. Paint a background on the first white sheet with water color paint. Use different colors and let them blend into each other. Use plenty of water for nice bright colors.
  2. Choose three colors tissue paper. Fold the sheets several times and cut triangles. 
  3. Wet the second white sheet with a brush. 
  4. Place the triangles on it and leave it to dry. 
  5. Cut long triangles. You may use the schedule. Cut a piece from the bottom of the triangles if you want trees of various heights. Cut some smaller triangles from the left overs if you want more trees.
  6. Paste the triangles with overlap on the colored background. 
  7. Outline with silver or gold marker and draw a simple branche stucture.
  8. Draw snowflakes with a white marker or use chips from the hole punch. 
  9. Sprinkle some glitter on the forest floor.
  10. Paste the artwork on a colored background.
Works of art made by students of grade 7. 

woensdag 19 november 2025

Dutch December skyline

The Dutch website juf Lisette has a lesson we do every year: the December skyline! 5 December is the day Sinterklaas visits all Dutch children to give them presents. You can read more about Sinterklaas and his Petes in the category Typical Dutch.

What do you need?

  1. construction paper in dark blue, yellow and black
  2. paperclips
  3. scissors
  4. cutting knife
  5. cutting blade
  6. glue

What should you do?

Draw the skyline of a street on the black paper. Add a tree if you want to, or draw a Pete near the chimney.

Put the black sheet on the yellow one and attach them to each other with four paperclips. Cut out the skyline; you'll cut two sheets at the same time. When ready, remove the paperclips and cut some windows out of the black sheet.

Cut a moon out of the rest of the yellow sheet.
Stick the black and yellow skyline together and slide the black sheet one millimeter so you see the yellow edges.
Look to the position of the moon: the yellow edges are there where the moon shines.
Stick the moon on the blue sheet and stick the skyline below. 

dinsdag 11 november 2025

Owls in the tree

You need:
  1. grey construction paper
  2. two thick and large white drawing sheets
  3. brushes
  4. scissors and glue
  5. linoleum 12 by12 cm *
  6. lino knives
  7. flat piece of glass
  8. block printing ink
  9. lino press
  10. linoleum roller
* Or use foam to make the prints.
Before the lesson: 
  • Have two students paint a large sheet of thick white paper with brown tempera and accents in yellow and red to create a wood structure. 
  • Let them paint another large sheet in warm autumn colours.
This painted sheets can be used by all students for tearing branches and tree trunks and cutting leaves.   

What should you do? Lesson one: 
  1. Draw an owl on linoleum. 
  2. Cut the outlines, wings, eyes, claws and beak. 
  3. Decorate with small patterns. 
  4. Print the owl several times in two colors and let dry.
Lesson two: 
  1. Tear a tree trunk and branches from the brown painted paper. 
  2. Cut leaves from the autumn sheet. 
  3. When dry: cut the printed owls with a little edge (1 or 2 mm). 
  4. Look for a great composition and paste everything on a grey sheet. 
Works of art made by students of grade 7. 

donderdag 6 november 2025

Building sandwiches


Texture, balance and variety were elements students concentrated on as they created this collage of a big sandwich! 

What do you need?
  1. colored card board 
  2. ribbed cardboard
  3. leftovers of colored paper
  4. yarn leftovers
  5. fabric leftovers
  6. pasta in different shapes
  7. seeds and/or rice
  8. scissors and glue

Discuss what kind of food students like on their sandwich and how to represent this. Examples: yellow paper with holes in it will represent cheese; red yarn can be ketchup and an enrolled piece of pink cotton is a slice of ham.
The artwork must partly be 3D, so do not paste everything just flat, but try to work spatial and let things overlap. 
What should you do?
  1. Create a table cloth from leftovers of cotton or paper. 
  2. Cut a plate and paste it on the table.
  3. Cut two parts of a hamburger bun of ribbed cardboard. 
  4. Now building can start!
  5. Is there enough food on the sandwich? Close it with  the second piece of ribbed cardboard.
Works of art made in grade 4, 5 and 6. 

vrijdag 15 augustus 2025

The vase of Kandinsky


You need
:

  1. colored cardboard A3 size
  2. sponges
  3. paint rollers 
  4. strips of  ribbed cardboard
  5. bubble wrap
  6. tempera paint
  7. brushes
  8. scissors  
  9. glue
Read here about Kandinsky's concentred circles. 


Organisation
Divide this lesson in two moments. For lesson 1 (step 1-4) create four table groups where students can print. Divide students among these four groups. When someone is ready, he can go to the next group. In this way students rotate between the groups. In lesson 2 (step 5) the individual parts are combined into a work of art and students sit in their own place in the classroom.  

Group A: printing with sponges. One sponge per color. Some paper plates with tempera paint and a paint roller on each plate. 

Group B: printing with cardboard. Lay out cardboard strips  about the width of a ruler. Spray s few colors of tempera paint on paper plates. Students smear the head side of the cardboard with a brush, see picture. 

Group C: printing with bubble wrap. Lay out A4 drawing sheets and pieces of bubble wrat. Students roll in the bubble wrap with a paint roller and print it on a sheet. 

Group D: painting concentric circles. Place thick drawing paper, tempera paint and paper plates here. 

What should you do? 
Step 1: Place the cardboard upright in front of you. Stamp approximately 1/3 of the bottom full with a sponge and paint. Don't rub, stamp!  

Step 2: Stamp with the cardboard strips horizontal and vertical stripes above the sponge strips. 


Step 3: Use a paint roller to roll a piece of bubble plastic with tempera paint and print it on a white sheet. Let dry. 


Step 4: Fold a white A4 sheet into 6 squares. Paint 6 different concentric circles in each square like Kandinsky did. Each circle has 3 colors. Let dry.  


Step 5: Cut the circles. Draw a symmetric vase on the back side of the bubble plastic print and cut out. Paste vase and flowers on the colored cardboard. 

all works of art are made by students of grade 3 

Elements of art: color, nuance, shape, line
Techniques: printing with different materials, painting, cutting, pasting.  

zondag 21 juli 2024

Olympic athletes

You need:
  1. scissors
  2. glue
  3. white drawing paper A1 size
  4. cardboard in Olympic colors
  5. compasses
Start this lesson with the symbol of the Olympics: the colored rings. What do these rings mean? What colors do they have? How are they placed together? Ask one or two children to take the position of an athlete. What is the position of the legs, arms and body? Ask another student to show another position and discuss it again.
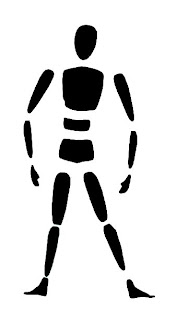
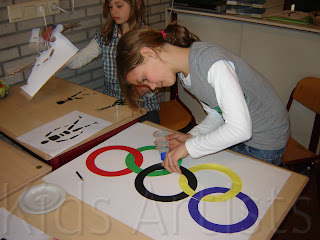
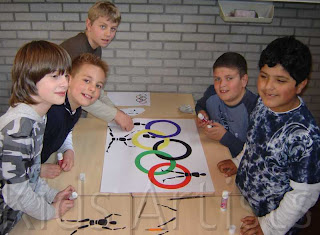
This is a group work for five students. Every group gets a big white sheet, five sheets of colored cardboard (colors of the rings: black, yellow, red, blue, green) and at least five copies of the athlete.
Step one: each group member cuts an Olympic ring, using compasses and scissors. Paste this five rings on the big white sheet. Look carefully which ring has to be pasted in front or back, and which ones have to be pasted through each other. Be sure the little cutting line is pasted underneath another ring.

  Step two: Every student takes a copy of the body and cuts every part of it. Then these bodyparts have to be pasted around, in, behind and in front of the Olympic rings.

donderdag 7 maart 2024

Mix and match with Mondrian

 by students of grade 3

You need:

  1. white sheets 21 by 21 cm
  2. black sheet 23 bij cm
  3. paper strips 3 by 6 cm in yellow, red and blue
  4. black squares 3 by 3 cm
  5. glue
Discuss life and work of Mondrian and the art movement De Stijl.  

I did this lesson in grade 5, students worked in  pairs. The figures are cut  before class. Per art work you need 4 black squares and 16 colored rectangles 


The assignment is:  
  • make a composition of 4 squares, each consisting of 4 colored rectangles and a black square in the middle. Make sure there are no 2 of the same colors next to each other
  • paste the composition on the white sheet, keeping a small white edge visible around each shape. 
  • finally paste the art work on a black surface 
Students from higher groups can measure and cut the figures themselves. 

Difficult assigment and not everyone succeeded! 


Elements of art: shape, color, line. 

dinsdag 28 maart 2023

Athletes in motion


You need:

  1. colored construction paper
  2. white drawing sheet 
  3. paperclips
  4. scissors
  5. cutting mat and cutting knife
  6. glue
  7. marker
  8. photo of an athlete 
Print a silhouette of an athlete. Put the colored sheets together with the printed athlete on top. Fix with paper clips. 
Cut out the athlete, and the colored sheets at the same time. Keep moving the paperclips to be sure the four sheets stay together. Use a cutting knife for areas the scissors can't reach.
Make a composition that suggests movement and stick the athletes on the white sheet. Use an marker to fill the background with patterns. 


Thanks to A faithfull attempt for this great lesson. 

donderdag 2 februari 2023

Art Nouveau flower tiles


Art Nouveau or Jugendstil is an art style that was practiced from 1890 and abruptly stopped with the start of World War 1 in 1914.  t die werd beoefend vanaf circa 1890 en abrupt stopte met de start van WO1 in 1914. 

Art Noveau was mainly applied to everyday products (for emample furniture, glassware, jewellery), in architecture, graphic art and painting. Artists were inspired by nature: patterns with birds, flowers, plants. clouds, rocks, women.  Graceful moving lines express emotion. 

Famous Art Nouveau artists are Alphonse Mucha,  Gustav Klimt, Gaudi, Berlage. 

You need:

  1. folding sheets 10 by 10 cm in several colors
  2. pencil
  3. scissors
  4. glue
  5. colored construction paper 30 by 20 cm

Show pictures of  Art Nouveau tiles: organic shapes of flowers and plants. 

Tell students they are going to build a litte wall of tiles in Art Nouveau style.  Every wall has six tiles. Flowers have to be cut out of the folding sheets. Try to use as much as possible of those sheets, so what you cut you glue on the wall. 

Artworks made by students of grade 2 

maandag 28 maart 2022

Matisse meets Haring


In this lesson we combine Keith Haring and Henri Matisse.

Benodigdheden:

  1. white drawing sheet
  2. colored construction paper
  3. black construction paper
  4. scissors
  5. glue
Show some of the later artwork from Matisse (fauvism, 1869-1954), his cut-outs and discuss them. What do you see? What shapes did Matisse use? What are the organic shapes? And the geometric shapes? What's the difference between them? What colors do you see?

Look at the human figures in Keith Harings artwork (popart, 1958-1990). What stands out? How are human beings drawn? Which parts of the body do you see, which parts nog? How do you see that people are moving?

What to do? 

  1. Cut organic and geometric shapes from colored paper.  
  2. Cut a human figure from black paper,  (do not draw first!). Be sure you can clearly see he's moving.  
  3. Arrange the geometric and organic shapes on the white sheet. Overlap is allowed.   
  4. Search for a good place where the human figure fits well and where you can see he's moving, for example because he steps on a geometric shape or dances between the organic shapes. 
  5. Satisfied about your composition? Then glue on all the cut out shapes .

donderdag 21 oktober 2021

Painting with scissors like Matisse

made by students of grade 4

You need per student:

  1. 1 sheet white drawing paper
  2. 1 sheet colored construction paper 
  3. 1 sheet colored construction paper from which you cut 7 cm 
  4. 1 sheet blue construction paper 
  5. leftovers of colored paper
  6. glue
  7. scissors
  8. black marker

Who is Matisse?

Matisse (1869 –1954) was a French artist, known for both his use of colour and his fluid and original draughtsmanship. He was primarily known as a painter.

Matisse didn't care if stones were blue, he just chose the colors he liked. Some people thought is art was very ugly: someone who paints blue faces and green noses is a fool and Matisse was called 'Fauve', which means: wild. This is how the word Fauvism came into being for this art movement, art with bold colors. 

After a surgery Matisse spent the rest of his life in a wheelchair. He wasn't able to paint anymore, but could still paint with his scissors.

View various artworks of Matisse. 


Then few the artwork Oasis. What stands out? 

  • no straigh lines 
  • organic shapes
  • bright colors
  • What is an oasis and why is this artwork called so?  
How to make it 

Step 1
Take the two colored sheets: a whole one and one with 7 cm cut off. Paste the smaller sheet on the large one. The strip at the bottom is the table for the fishbowl. 

Step 2
Cut Matisse shapes and glue them on the small sheet. Let them fall of the sheet and cut away the outer pieces.

Step 3
Fold a white sheet in half on the long side and cut out a fishbowl. The center line of the bowl is the fold of the sheet. Trace around the bowl with a thick black marker.   

Step 4
Cut 'water' out of the blue sheet, slightly smaller than the bowl. Paste it in the bowl. Paste the bowl on the colored sheet with organic shapes. 

Step 5
Cut two or three fishes and some water plants and paste them in the bowl.


Elements of art: shape, color. 


vrijdag 6 augustus 2021

Sail with the VOC

 
by students of grade 6

 You need:

  1. drawing sheet A3 size
  2. drawing sheet A4 size
  3. liquid water color
  4. brush
  5. oil pastel crayons
  6. scissors and glue
  7. ice cream sticks
  8. boxcutter
  9. cutting plate
  10. newspapers 
  11. paper towels
Towards the end of the Golden Age, the Netherlands are at war with England, a battle that is being fought at sea. 
In this lesson students draw a sea ship from that time. 

Study paintings of ships in a battle. What stands out? How do you recognize the Dutch and English ships? Which flags do you see more? What do you see in the foreground of the first painting? What can you tell about the sails? How can you see those ships are in combat? 

Naval battle Anglo-Dutch war(1666). Painter: Abraham Storck

Burning of a part of the English fleet (1667). 
Painter: Pieter van de Velde 

What should you do?
Step 1
First you paint the background on the largest sheet with liquid water color paint. At the bottom (near by) the water is dark, further away it becomes lighter (add water). 

Step 2
Draw on the A4 sheet a VOC-ship with oil pastel and color it. Draw and color extra things which you also see in the water during a naval battle, such as fire,, aa life boat, an anchor etc. Do not forget tho color the sails white!


Step 3
Paint your drawing with blue water color paint. Wipe the excess paint off the white sails with a paper towel. Let dry. 

Step 4
Cut out all parts, leaving a blue edge. Stick ice cream sticks behind the loose parts. Take the large blue painted sheet and decide where you want hour ship and the other things. Cut slices of about 3 cm in this sheet. Insert the sticks into the background and the artwork is done. 

Source: Laatmaarleren.nl 

donderdag 8 juli 2021

Fun flowers


You need:
  1. white or colored drawing sheet
  2. scraps of colored paper 
  3. scissors
  4. glue
  5. black markers

Cut several circles from scraps of colored paper and paste them om the drawing sheet. Paste smaller circles on the bigger ones. Draw petals using several black markers in several thicknesses.   

Source: Krokotak.com

donderdag 21 januari 2021

Collage in one color

 You need:

  1. several things in one color 
  2. camera


This is a homeschooling assignment. 
1. Collect small items of the same color in your house. The more, the better!
2. Place them on a white surface. 
3. Your items may touch each other, but don't have to. 
4. Make sure the edges are straight.
5. Take a picture of your collage.
6. Send the photo to your teacher. 
 
Elements of art: space, color. 

The photo's and collages are made by students of grade 2.