woensdag 30 november 2016

Landscape with chalk pastels

Made by students of grade 5

You need:
  1. black construction paper
  2. black oil pastels
  3. soft pastels
  4. hairspray
Show several hillsides and discuss what you see:  light/shadow, depth, overlapping, colours, pointed/rolling. 

Students draw with pencil a simplified hillside on the black sheet. In the blogpost 'Peaks and Valleys' a step by step explanation how to draw this. Give students a maximum of 5 minutes for this part of the lesson, to prevent them of drawing all kinds of details.

Trace the pencil lines with black oil pastel. Colour the hills and sky using chalk pastels. Color and mix, smear and blend until you're satisfied. Be sure the difference can be seen between the light-iluminated parts of the hills and the parts that are in shadow. 
Trace after coloring the black lines again if necessary. Fix the artwork with hairspray. 

maandag 21 november 2016

Tea light holder The Style

Made by a student of grade 4

You need:
  1. black construction paper  41 by 12 cm 
  2. wax paper in red, blue and yellow
  3. cutting mat and cutter
  4. glue
Tell students about art the movement The Style and two of its most famous contributors Piet Mondriaan and Theo van Doesburg. 

Draw 4 lines with 10 cm between them from bottom to the top of the black sheet. The last strip (1 cm) is the glue strip. 
Draw four squares or rectangles on the black sheet. Then draw lines from about 1 cm wide. Cut the spaces between the lines and paste wax paper behind them. 
Finish the lantern by folding the four lines and pasting it. 

maandag 14 november 2016

Moon behind tree

Made by a student of grade 6
You need:
  1. white drawing sheet 
  2. charcoal
  3. chalk pastels 
  4. indian ink
  5. brush 
Use a saucer to draw a moon in the center of the sheet. Colour it with yellow chalk pastel. Colour the rest of the sheet grey using charcoal: around the moon it's brighter than further away.
Draw a branch and paint it with Indian ink.

zaterdag 5 november 2016

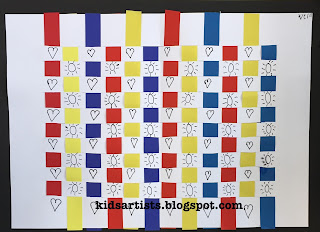
Weaving like Mondriaan

Made by a student of grade 2

You need:
  1. white sheet A4 size
  2. colored paper strips in primary colours
  3. scissors
  4. glue
  5. black fineliner 
Fold the white sheet in half.
Cut evenly-spaced slits starting from the folded edge and continuing up to about a half inch from the opposite. Open up the paper.
Take one paper strip and weave it across the slits, going over and under them. Push the strip to the top and start with another one. The second strip should be woven in an opposite pattern as the first one. If the first strip goes over and under across the slits, the second one should go under and over the slits.
Continue weaving until the white sheet is full. Paste the ends of the strips on the white sheet.
Create a frame by pasting the artwork on black construction paper. Draw small patters on the white strips using a fine black marker.