Posts tonen met het label printing. Alle posts tonen

donderdag 28 april 2011

Printed birds

You need:
  1. white drawing sheet A4 size
  2. two potatoes, middle and small size
  3. knife
  4. sauzer
  5. tempera paint
  6. piece of corrugated box cardboard  
  7. paper towel
  8. fine black marker
  9. brush
  10. watercolour paint
In 'The Usborne Complete Book of Art Ideas' I found this great lesson.
Place a paper towel on a saucer and spray a stripe of brown paint on it. Use the side of a piece of corrugated cardboard of about 7 cm to stamp branches.
Cut the medium potato in half and cut this half again. Stamp the bodies of the birds using red tempera.
Cut the half potato in two pieces. Use the quarter to stamp the tails.
Cut the small potato in half and stamp the faces of the birds.
Clean this half potato with a tissue and cut it in two. Stamp the wings.
Paint beaks, eyes and legs. Leave the work to dry. Paint the background with watercolour paint. Outline the birds with a fine black marker.
To make spring art work, you can add leaves by stamping them, cutting them out of green paper, using real dried leaves or .....use Paint shop pro, like I did!

dinsdag 12 april 2011

Printed tulips

 
You need:
  1. cardboard of a box
  2. scissors
  3. block printing ink
  4. flat piece of glass
  5. linoleum roller
  6. white or coloured sheets A4 size
Draw two or three tulips in different sizes on a cardboard box. Cut them. Shake the bottle of blockprint carefully to be sure oil will mix with the rest. Drip some paint on the glass and roll it out with the lino roller. Roll the paint on the tulips and press them on a white or coloured sheet, using a book. Remove the tulips of the sheet and roll them again. Add white to the colour on the glass for a lighter colour. Place the tulips tulips partly overlapping the first, and press again with a book.

vrijdag 8 april 2011

Scenes from a fairy tale

Hansel and Gretel, made by students of grade 6
You need:
  1. piece of linoleum of 15 by 15 cm
  2. drawing sheets A4 size
  3. lino knives
  4. block printing ink
  5. flat piece of glass
  6. linoleum roller
  7. lino press
  8. white paper A2 size
  9. scissors
  10. glue
I got the idea for this lesson from Artlessons from Belgium. This is a group assignment for four students.
Every group of students chooses a fairytale that has to be represented in images. They discuss the most important parts and each students cuts one scene out of linoleum. After printing the scenes, they paste them in the right order to create a fairytale cartoon. Use letter stamps to print the name of the story above.

I chose to let all students print their part of the fairytale four times. The best print is for yourself. Each student gets one print of the other three group members, so every student has his own cartoon.

The princess on the pea

zaterdag 26 februari 2011

Longing for spring: printing flowers!

You need:

  1. piece of linoleum of 12 by 12 cm
  2. several sorts of paper
  3. lino knives
  4. block printing ink
  5. flat piece of glass
  6. linoleum roller
  7. lino press
  8. coloured cardboard 34 by 12 cm
  9. scissors
  10. glue or stapler

Students draw one or more flowers on their piece of linoleum and cut it out. Then the flower has to be printed on three different sorts of paper. In this lesson I choose for coloured construction paper, a brown paper bag and white white woven towels from the dispenser. Cut the prints with 1 cm around. Paste or staple them on coloured cardboard. Spring can come!

Both artworks are made by students of grade 4

dinsdag 15 februari 2011

Wild flowers

You need:

  1. black construction paper 20 by 8 cm
  2. colour pencils
  3. tempera paint
  4. q-tips
  5. saucer
A short lesson with great results! Draw a lot of flower stems on the black paper with several colours green. Stamp the petals above and between the stems, using tempera and q-tips.

zaterdag 8 januari 2011

Stamped snowmen

You need:

  1. coloured construction paper A3 size
  2. white and black tempera
  3. saucer
  4. brush
  5. wine bottle corks

Give all students a sheet of coloured construction paper. Give a saucer with white paint and a little black paint for every two students. Children have to use a cork to stamp a snowman. Knots, eyes and mouth have to be made by finger printing. Only a hat or broom may be painted with a brush.

By students of grade 1

zaterdag 25 december 2010

Owls in the night

You need:

  1. blue construction paper 15 by 20 cm
  2. white tempera paint
  3. piece of cardboard
  4. brush
  5. saucer
  6. paper towel
  7. fine black marker
  8. yellow pencil

Draw a moon and colour it with yellow pencil. Paint the bottom of the blue sheet white with tempera paint.

Put a paper towel on a saucer. Put a stripe of white tempera paint on the towel. The paper towel will function as a stamp pad. Dip the edge of a piece of cardboard into the white paint and print a trunk. Drag the cardboard a bit to create a thicker trunk. Print several branches. Be sure to leave some space between the branches for the owls.

Use a fingertop and white paint to print the body of the owls. Leave the work to dry.

Draw eyes with a yellow pencil. Outline the eyes with a fine black marker. Draw details like feathers, beak and legs.

Print snow flakes using a q-tip or the end of a brush.

dinsdag 14 december 2010

Let it snow!

You need:
  1. black construction paper 20 by 20 cm
  2. white tempera paint
  3. saucer
  4. paper towel
  5. fine markers in black and white
  6. metallic gel pens

I found the idea of printed snowmen in one of Usborne's activity books. With music lines, I made my own lesson of it.

Draw curved music lines with a white or silver pen on the black sheet. Put a piece of paper towel on a saucer so it can serve as a stamp pad. Drip some tempera paint the paper towel. Use your thumb to stamp the bodies of the snowmen. Add a fingerprint for a head.

When the paint is dry, you can add eyes, nose, mouth, arms, buttons etc. Use gel pens and markers. Draw some music notes on the lines and write the lyrics of a winter song belof the lines.

donderdag 25 november 2010

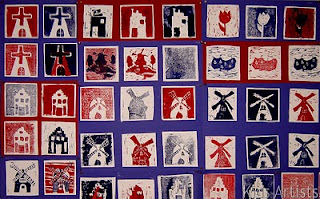
I love Holland

Made by students of grade 6

You need:

  1. two pieces of linoleum of 12 by 12 cm
  2. white drawing paper
  3. lino knives
  4. block printing ink in red and blue
  5. flat piece of glass
  6. linoleum roller
  7. lino press
  8. cardboard in red and blue
  9. scissors
  10. glue
What are typical Dutch things? Make a word web with the children. Think about cheese, canal houses, tulips, wooden shoes, cows etc. The children create a drawing on a scrap of paper with the theme I love Holland. Not too many details, because the drawing will be printed. The drawing has to be copied on both pieces of linoleum. It doesn't matter if they don't match exactly; this is even fun while making a two colour print, because the drawing seems to shift a bit. Use different linoleum knives. Cut the drawing from the first piece of linoleum. Cut the background from the second piece of linoleum, leaving the object. Lines within the object should be cut too.
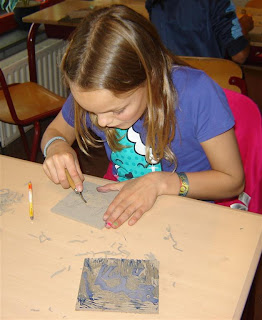
Shake the bottle of blockprint carefully to be sure oil will mix with the rest. Drip some red paint on the glass and roll it out with the lino roller. Make 2 prints of your work on a white sheet. Rinse the linoleum clean and make 2 prints in blue in the same way.

Repeat this process with the second piece of linoleum: 2 prints in red and 2 in blue. There will be 8 prints if you're finished.
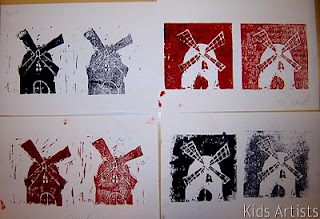
2 pieces of linoleum, 2 colours, 8 prints

Finally use one or more of those prints to make a two colour print. This has to be done by inking piece 1 red and printing it on a blue print of piece 2. See picture below. Let students choose their best prints and let them decide how many prints they want to use for their final artwork. Cut the prints with 1 cm white aound them. Make a composition on blue or red cardboard and paste the prints with 1 cm between them.
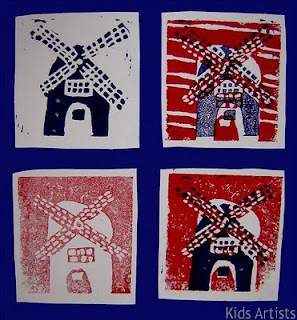
Final composition I love Holland, by Malou, grade 6

zondag 21 november 2010

Transport yourself

You need:
  1. piece of linoleum of 16 by 12 cm
  2. white paper towel from a towel dispenser
  3. mat
  4. block printing ink
  5. flat piece of glass
  6. linoleum roller
  7. lino press
What kind of transport do you know? Think of cars, limosines, trucks, airplanes, but also of skateboards, strollers etc. Everything with wheels can be used to transport persons!

Draw a mean of transportation on a piece of linoleum and cut it out. Shake the bottle of blockprint carefully to be sure oil will mix with the rest. Drip the paint on the glass and roll it out with the lino roller. Make several prints of your work on textured towel paper. Choose the best one to be your artwork.

zondag 14 november 2010

Printed leaves

You need:

  1. black construction paper A4 size
  2. flat dried autumn leaves
  3. white tempera and another cool colour
  4. brush
  5. colour pencils
  6. piece of sponge

I found this project on Artsonia. Ask students to take some autumn leaves for this lesson. The leaves should be dried flat, for example in a phone book.

Paint the veined side of a leaf with thick white tempera. Press the leaf on black paper; use a clean sheet to cover the leaf and press on it with flat hand. Do this with several leaves. Then pick an additional cool colour to blend with the leftover white paint and sponge paint the background. Be sure to leave a little black around each leaf for contrast. Add some autumn colour to each leaf using coloured pencils.

woensdag 14 april 2010

Printed nameplate

By Anne, 10 years old

You need:

  1. one piece of linoleum from 14 x 14 cm
  2. drawing paper
  3. lino knives
  4. mat
  5. block printing ink
  6. flat piece of glass
  7. linoleum roller
  8. lino press
Children draw their name in mirror image on the linoleum. They draw something of their own choice, or decorate their name. Use lino knives in different sizes to cut away the background and lines in their drawing if necessary. Shake the bottle of blockprint carefully to be sure oil will mix with the rest. Drip the paint on the glass and roll it out with the lino roller. Make several prints of your work. Choose the best one to be your artwork.

zondag 4 april 2010

Decorated snake

Made by Kim, 11 years old

You need:
  1. coloured paper A4 size
  2. black construction paper
  3. tempera paint
  4. nails with different sized heads
  5. paper towel
  6. scissors
  7. glue

Draw a snake on black paper and cut it out. Cut this snake in pieces, making straight or curved lines. Lay each cut piece directly on your background, in order not to lose a piece. Glue all the pieces one by one on the background with a millimeter space between them. Pour tempera paint on saucers and dip the head of a nail in the paint. Stamp dots, following the snake, in the colours you like. Use different sized nails if you like.

maandag 8 februari 2010

Lino print of musical instrument

Made by students from 11-12 years old
You need:
  1. two pieces of linoleum from 12 x 12 cm
  2. drawing paper from 12 x 12 cm
  3. sheets with music notes
  4. carbon paper
  5. lino knives
  6. mat
  7. black block printing ink
  8. flat piece of glass
  9. linoleum roller
  10. lino press
  11. glue
  12. coloured paper for background
Children draw a musical instrument. Draw this instrument on the two pieces of linoleum, using carbon paper. From the first piece of linoleum the background has to be cut away, so the instrument will remain. Details from the instrument can be cut with a small lino knife. From the second piece most of the instrument has to be cut, so the background and some details of the instrument will remain.

Shake the bottle of blockprint carefully to be sure oil will mix with the rest. Drip the paint on the glass and roll it out with the lino roller. Make several prints of your work. Choose the two best ones and paste them on a music paper.

woensdag 20 januari 2010

Printed penguins and polar bears

Made by Brittany, 11 years old

You need:
  1. piece of linoleum from 12 x 12 cm
  2. photograph form polar bear or penguin
  3. carbon paper
  4. lino knive
  5. mat
  6. black block printing ink
  7. flat piece of glass
  8. linoleum roller
  9. white drawing paper A4 size
  10. lino press
  11. scissors and glue
Children take a picture from a penguin of polar bear. The animal must be complete, not only a part of it. Because of the fact the animals must be printed, contour lines are important. Each child gets a piece of linoleum from 12 by 12 cm. Use carbon paper to draw the contours of the animal on the linoleum. Use lino knives to cut the background away; the animal has to remain. From the penguins the white belly has to be cut away too. But: remember the contour line has to remain. Details such as eyes, lines that indicate legs etc. have to be cut away with a small lino knive. Shake the bottle of blockprint carefully to be sure oil will mix with the rest. Drip the paint on the glass and roll it out with the lino roller. Make several prints of your work. Choose the two best ones and paste them on a black background. By tearing the paper instead of cutting, you'll accentuate the effect of the winter. The torn paper suggests an ice floe. See the example above.

Made by children from 11-12 years old

maandag 28 december 2009

Splattering fireworks

You need:
  1. black construction paper
  2. toothbrush
  3. tempera paint
  4. spoon
  5. straw
  6. photo of a building or skyline
  7. scissors
Choose an internet photograph of a famous building or skyline. Print it and cut it out carefully. Put the picture or a black sheet of paper. Dilute white tempera paint with water so it is fluid. Dip the toothbrush in the paint and knock the adhering drops off. Take a teaspoon in your writing hand and the toothbrush in the other. Scrape with the spoon on the hairs of the toothbrush in your own direction. This way the hairs of the toothbrush will spring back, while they release splashes of paint. Practice this first on a scrap sheet. Now splash around your image. Near the image you splash closer, further away you splash thinner.

When you are finished, gently take the image away. You'll see the silhouette of the building.Let your work dry before you do the second step. Dilute some tempera paint on a saucer with water so it is thinner. Leave one or two drops of diluted tempera on your artwork, but not on the silhouette. drupjes verf op je werkstuk vallen, maar niet op het silhouet (put your image back to the sheet if necessary). Blow through the straw at the paint drops in different directions, so you'll get fireworks. Do this as often as you like. Be careful, there should not be coloured paint on your silhouette. Paste your work finally on a coloured background.
This lesson is origanally from Art Attack.

dinsdag 13 oktober 2009

Autumn prints

You need:
  1. pieces of linoleum from 15 x 15 cm
  2. lino knife
  3. mat
  4. block printing ink
  5. flat piece of plexiglass
  6. linoleum roller
  7. construction paper
  8. lino press
After searching autumn leaves and taking them in the classroom, we take a careful look. What can you tell about the form, the veins, the colour etc.
Draw a leave or mushroom on your linoleum. Remember what you cut away will not print. It is not important to carve deeply into linoleum, just enough so that carved area is lower than the linoleum surface. Always carve away from your hand, always keep your hand behind the back edge of linoleum. When you want to check your printing block, place a piece of paper on the linoleum and rub over the paper with a crayon. This will create a “rubbing” and will give you an idea of what the final print will look like. Squeeze out “toothpaste” amount of ink on plexiglass. Roll ink out. Ink is ready when lines appear. Ink should look wet. If ink starts to look velvety/dry, sprinkle a little bit of water over the ink and add more ink. Put your linoleum block on a newspaper. Roll ink onto linoleum printing block, working quickly to cover all areas. Lay the block on a sheet in the printing press and press. Take away the block and your print is ready.
To make a group work, all kids have to cut out their prints. Ask some students to make a collage of all autumn leaves.


maandag 12 oktober 2009

Polka dots from Staphorst, Holland

Table cloth, group work
Staphorst is a a town in the eastern Netherlands. The town is famous for about 600 women who are still wearing traditional dress. Until now, utensils and cloths are designed with characteristic 'Staphorster Stipwerk', translated: Staphorst polka dots. Staphorster stipwerk is made by nails stuck in corks and then tipped in paint. The stipwerk is mostly done on a dark surface.

Benodigdheden:
  1. black fabric
  2. textile paint
  3. nails in different sizes
Show some examples of Staphorster Stipwerk (Google image searcher). Discuss what you see: colour use, size of the dots, motives, patterns etc. Let children practice first in making patterns. Use a scratch paper and colour pencils for this. If they understand the principle of making flowers out of polka dots, they can start stamping with the nails. This lesson can be done individually, but making a group table cloth is maybe much more fun! And: in stead of stamping on cotton, it is also possible to stamp on wooden utensils, like a small chipboard box or a wooden plate. Before stamping, the box has to be painted black of course. And, don't use textile paint but use tempera. Lacquer with vernish for shiny result.

Part of the table cloth

maandag 28 september 2009

Beautiful anemones

You need:
  1. white drawing sheet A4 size
  2. tissue paper in different colours
  3. brush
  4. can with water

With tissue paper you can make beautiful flowers without painting! In this lesson I chose anemones, but any flower will work. To make an anemone, fold a tissue paper three times until you have a rectangle. This rectangle has six lows now. Cut two petals out of this rectangle; this makes twelve petals totally. Six petals make one anemone. Cut petals from different colours tissue paper. Cut small and bigger ones. Take the white sheet and wet the place for the first flower with a brush. Put the petals one by one around an imaginary white circle (this is for the heart of the flower) on the wet spot. The petals will tighten themselves on the wet drawing sheet. Stich all petals this way. Overlap is allowed, working on the edge too. Cut little circles (flowerhearts) out of black tissue paper and stick them with water. The tissue paper has started 'bleeding' yet. The brighter the colour of tissue paper, the better it bleeds. Light colors bleed less. The colours of the tissue paper will blend together. If all is well, you'll see rays from the black heart into the petals. If not, wet the flowers again with a brush and water. Be careful, petals might shuffle. Let the artwork dry a little. When it's still moist a bit, pull of all petals. Your beautiful anemones are ready!

Anemones with tissue paper
Print, without tissue paper

zaterdag 26 september 2009

Autumn trees near the water

You need:
  1. light blue drawing paper A4 size
  2. oilpastel crayons
  3. tempera in autumn colours
  4. brushes

Fold the paper in half. Above the fold is the country, below the fold is the water. Students draw with oilpastels some trees without leaves in the grass. Those trees have to be coloured firmly. Below the fold is the reflection of the trees in the water. The trees have to be drawn again, but mucht less thick coloured.

When the trees are ready, students get a plate with five colours of tempera: yellow, orange, red, brown and green. leaves have to be made by tamponning with the brushes. Tell your students to tampon with two or more colours at the same time, so don't mix up the colours.

When the leaves are ready and the paint is still wet, fold the paper again. There is now a lighter print of the foliage at the bottom of the sheet: the reflection in the water. The branches of the tree will now be visible again, because part of the paint is now on the bottom of the sheet.