Posts tonen met het label De Stijl. Alle posts tonen

woensdag 17 juli 2024

Stamping with Mondrian


Goal:
 reducing the visible world in horizontal and vertical lines and primatr colors.   
Technique: stamping. 

You need:
  1. black cardboard 
  2. sponges cut in different sizes (squares and rectangles) 
  3. tempera paint in red, blue and yellow 
  4. brushes
  5. white crayons 
View these artworks of Mondrian and talk about how he abstracted a tree. 

Also talk about Victory Boogie Woogie, the painting in which you can see part of the map of New York. Tell students we are going to make our own Mondrian map. Discuss the terms primary colors, square, rectangle, vertical and horizontal lines.


Instruction 
Brushes will not be rinsed, but will remain the same color.
Show how to use a brush to rub the sponge with paint. 
Show how to stamp: do not slide the sponge, but lift it off the paper. This way you'll get a tight shape.  
Stamp horizontally or vertically only. 
Do not stamp two of the same colors next to each other. 
Make sure the shapes don't touch each other. You must be able to see the black roads between them. 


When the work had dried, draw stripes on the black roads using a white crayon. 

Elements of art: shape, color, line. 


Artworks are made by students of grade 1/2. 

dinsdag 5 maart 2024

Grey, like Theo van Doesburg


You need:
  1. white drawing sheet
  2. black construction paper
  3. ruler
  4. charcoal
  5. pencil
  6. glue

Theo van Doesburg (1883-1931) was a Dutch painter, architect and writer. He was charmed by the abstract art of Kandinsky and the cubism of Picasso. In 1917 he founded the magazine De Stijl (The Style), in which he and other artists could publish their innovative ideas. Well-known artists who also belong to De Stijl are Piet Mondriaan, Bart van der Leck and Gerrit Rietveld.

Characteristics of the Stijl artists:

  • use of primary colors and non-colors 
  • horizontal and vertical lines
  • use of geometric shapes 
  • strive for balance and harmony in the artwork

Van Doesburg, Composition 12 - abstraction of a landscape, 1918

In this lesson we discuss an artwork from 1917 that hangs in the Guggenheim New York. No primary colors, but only the non-colors black and white and everything in between.The goal for this lesson is not to copy the work, but to practice the technique of working with charcoal. 

Van Doesburg, Composition in grey, 1919

Look at the painting and discuss what stands out:
  • no color, only non-colors
  • geometric shapes with some rounded corners
  • suggestion of depth: some surfaces appear to rise through the use of light and 
  • dark next to eachother 
  • only horizontal and vertical lines 


How to make your own Van der Leck? 
First practice drawing with charcoal on a scrap. Press hard, soft, wipe. Get to know the material this way.  
Divide the sheet into rectangles using a pencil and ruler. Color with charcoal. Make sure that lines between the rectangles are clearly visible. Create color nuances by pressing harder or softer, rubbing and wiping. 
Stick the work on a black sheet. 

Elements of art: color, nuance, line, shape. 

Artworks made by students of grade 5.

vrijdag 30 oktober 2020

Mondrian, a bit different

 You need:

  1. white drawing sheet
  2. markers
  3. ruler
  4. pencil
Draw a Mondrian, but change one of the elements of art. For example: 
  • do not draw squares and rectangles, choose another geometric shape
  • do not color with primary colors, choose maximum four other colors
Draw your alternative Mondrian and color it with markers. Outline with black marker. 

Elements of art: color, shape, line. 

donderdag 29 oktober 2020

Mondrian in chalk pastels

 You need:

  1. black construction paper 
  2. pencil
  3. ruler
  4. chalk pastels 
  5. Elmer's glue 
  6. fixing spray
Look at and discuss about the artwork of Piet Mondrian.

Draw squares and rectangles on the black sheet using a pencil and a ruler. trace the lines with Elmer's glue. The glue will become transparent when it has dried. 
Color the squares and rectangles with soft pastels in white, black, red, yellow and blue. Instead of black pastels, you can leave some areas open. Be sure you don't get two areas of the same color next to each other. 
Fix the work with hairspray or fixative spray. 

Elements of art: color, shape, line. 

donderdag 13 juni 2019

Where Keith Haring meets Piet Mondriaan


You need:
  1. drawing sheet A2 size
  2. black strips 1,5 cm wide
  3. colored construction paper in red, yellow and blue
  4. ruler
  5. scissors
  6. glue
  7. black marker
This is a teamwork lesson for two students. 

Draw squares and rectangles of various sizes on the colored paper. Make sure they are straight: start from a right angle and measure carefully. Cut the squares and rectangles and spread them on the white sheet.  Make sure same colors do not touch each other and stick them. 
Continue with the black strips. Decide by yourself how many strips and where you want them, but there are four requirements:
  • the strips must be sticked straight! (use your ruler)
  • black strips must be sticked around all colored area's
  • use the black strips to create white area's (squares and rectangles) 
  • don't use to much glue. Let some strips stay loose so you can put a Haring figure behind it
Draw three or more Keith Haring  characters on the colored paper. Cut them and paste them on the Mondriaan sheet. Be sure there is no yellow character on a yellow area. 
Outline the characters with a black marker and draw some 'move stripes' around them.

dinsdag 25 september 2018

Mondriaan: from 2D into 3D

You need:
  1. white construction paper  A4 size
  2. ruler
  3. pencil
  4. colored construction paper in yellow, blue and red
  5. black marker
  6. cutting mat and cutter 
  7. glue
Show artworks of Piet Mondriaan and De Stijl and discuss them.

Fold the white sheet in 5 columns. The columns don't have the be the same width. Divide the sheet with pencil and ruler in three rows (thin, the lines have to be erased later).
Cut rectangle and squares out of colored paper. Make sure they are not wider as the columns. Paste  the rectangles and squares between the folded lines and outline them using a ruler and a black marker. Connect each one with its 'neighbour' with a marker. The lines should be horizontal or vertical.

Then cut two horizontal lines from the start of column 2 towards the end of column 4 (see picture).

zaterdag 22 september 2018

Mondriaan cube


You need:
  1. white cardboard
  2. ruler
  3. pencil
  4. cutting mat and knife
  5. markers
  6. glue
After a lesson about the work of Piet Mondriaan, students draw a template of a cube (nice goal for the math lesson!). The surfaces are 8 by 8 cm, the stick edges are 1 cm.

Cut the template with a cutting knife. Use a black fine marker to draw squares at 1/2-1 cm from the edges. Within these squares you draw straight lines to get some rectangles and squares. Color these using Mondriaan colors: red, yellow and blue. Leave some surfaces white.


Fold the stick edges and paste them to get the Mondriaan cube!


zaterdag 15 september 2018

Sawing like Piet Mondriaan


Made by a student of grade 3
You need:
  1. black construction paper
  2. plywood  
  3. ruler and pencil
  4. tempera paint in primary colors kleuren + white
  5. brush
  6. coping saw
  7. sandpaper
  8. glue
Divide a rectangular piece of thin plywood into rectangles and squares using ruler and pencil and saw them. Place every piece directly on the right spot the black construction paper. All pieces have to form a rectangle again. 

Sand the edges of pieces. Paint the pieces in primary colors and white. Past them on the black sheet. 

maandag 21 november 2016

Tea light holder The Style

Made by a student of grade 4

You need:
  1. black construction paper  41 by 12 cm 
  2. wax paper in red, blue and yellow
  3. cutting mat and cutter
  4. glue
Tell students about art the movement The Style and two of its most famous contributors Piet Mondriaan and Theo van Doesburg. 

Draw 4 lines with 10 cm between them from bottom to the top of the black sheet. The last strip (1 cm) is the glue strip. 
Draw four squares or rectangles on the black sheet. Then draw lines from about 1 cm wide. Cut the spaces between the lines and paste wax paper behind them. 
Finish the lantern by folding the four lines and pasting it. 

zaterdag 5 november 2016

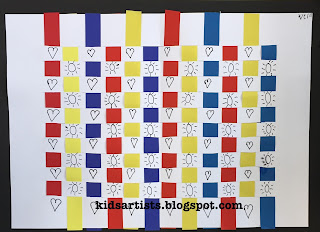
Weaving like Mondriaan

Made by a student of grade 2

You need:
  1. white sheet A4 size
  2. colored paper strips in primary colours
  3. scissors
  4. glue
  5. black fineliner 
Fold the white sheet in half.
Cut evenly-spaced slits starting from the folded edge and continuing up to about a half inch from the opposite. Open up the paper.
Take one paper strip and weave it across the slits, going over and under them. Push the strip to the top and start with another one. The second strip should be woven in an opposite pattern as the first one. If the first strip goes over and under across the slits, the second one should go under and over the slits.
Continue weaving until the white sheet is full. Paste the ends of the strips on the white sheet.
Create a frame by pasting the artwork on black construction paper. Draw small patters on the white strips using a fine black marker. 

zondag 30 oktober 2016

Mondriaan collage with printed lines


You need:

  1. paper in primary colours
  2. white sheet A3 size 
  3. pieces of cardboard 
  4. black tempera paint
  5. saucer
  6. ruler 
  7. pencil 
  8. scissors 
Just like Piet Mondriaan (De Stijl), students draw rectangles and squares using ruler and pencil on construction paper in yellow, blue and red.  After this the drawings have to be cut and pasted on a white sheet. However Mondriaan did not: students may stick colours together.  
Stamp straight lines using a piece of ribbed cardboard and black tempera paint. 

Made by a student of grade 3 

Source: http://artroom104.blogspot.nl/ 

zaterdag 5 december 2009

Stained glass in Mondriaan style

You need:
  1. black construction paper 20 by 20 cm
  2. tissue paper in green, red and white
  3. white pencil
  4. ruler
  5. cutting blade
  6. cutting mat
  7. glue
Discuss stained glass. How did the craftspeople of yesterday make stained glass? How do they make it today? Show some paintings of Mondriaan. What colours did he use? What forms do you see? Children are going to make a little square or round stained glas window out of paper. The style must be like Mondriaan, colours must be like Christmas. Give each student one sheet of black construction paper. First children must choose their form. When they choose a round form, they have to draw a circle with compasses. Cut this out. Draw another circle about 1,5 cm out of the edges; this is the frame. Children who chose the square, draw also a line about 1,5 out of the edges. This is the frame. Draw squares and/or rectangles in your window using ruler and a white pencil. The lines must be 1 cm wide. When ready, draw crosses in the rectangles that have to be cut out.
Cut away the forms with the crosses. Cut carefully and use an iron ruler. Use your black window as a template to draw the forms of squares and rectangles on the three different colours of tissuepaper. Cut the forms out of the tissue paper with 0,5 cm extra for the adhesive border. Paste the colours alternately on the backside of your window.