Posts tonen met het label markers. Alle posts tonen

dinsdag 30 mei 2023

A lesson in color theory

 You need:

  1. 4 cards of drawing paper, 10 by 7 cm
  2. pencil
  3. ruler
  4. felt tip pens of color pencils 
  5. black construction paper

Discuss de words primary and secundary colors using the color wheel.  
What are primary colors and why are they called so? What are secondary colors, how do you make them and why are they called so? What are the neutral colors? Discuss the word color nuance

What should you do?
  1. Draw a frame on the cards at 2 mm from the edge using a thin black marker.
  2. Draw a pattern of your choice on each card.
  3. Color the cards according to the terms discussed.
  4. Outline the patterns with a thin black marker.
  5. Stick the cards on a black background.
  6. Add the learned words.
Elements of art: color, line, nuance.

donderdag 25 mei 2023

Selfportrait like Roy Lichtenstein

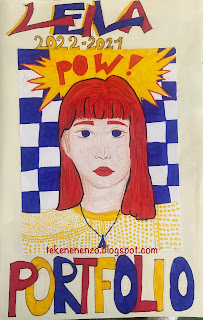
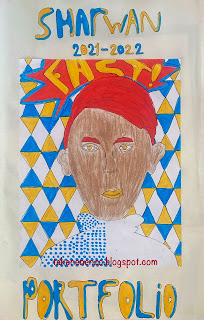
At our school it's customary to keep artwork at school until the of the school year. Students make a portfolio in june to take their work home. 
On front of it is a drawing in the style of one of the art movements we studied that year. In 2021-2022 it was pop art. 
These are the grade 6 portfolio folders with a self portrait in the style of Roy Lichtenstein. 

You need: 
For the folder: paper A1 size, folded in half
For the drawing

  1. white drawing paper A4 size 
  2. markers
  3. skin color pencils 
  4. fine marker in black
Show artwork of Lichtenstein and discuss the important features: use of primary colors (sometimes with green), grid dots, black outlines, speech bubbles and slogans (onomatopoeia).

contents portfolio folder grade 6

How?
  1. Draw a self portrait on the small sheet. 
  2. Add a text in a speech bubble that suits you. 
  3. Color your face using skin color pencils. Use markers for the rest of your drawing. 
  4. Fill one part of your drawing with dots. 
  5. Fill the background with a pattern. 
  6. Outline everything with a black marker. 
  7. Past e your work on the large sheet. 
  8. Draw in large letters: portfolio + you name + the school year. 

all artworks are made by students of grade 6

    donderdag 30 maart 2023

    Like Romero Britto

    Dutch tulips in the style of Romero Britto, by Malou, grade 6

    This was one of my most successful lessons so far; students enjoyed it and the results were amazing. But hello copycats: Britto never painted tulips! So please don't copy this lesson (I saw a lot of them already on artblogs Pinterest), but create one yourself. Or at least: mention your source, kidsartists.blogspot.com! 

    You need:
    1. white drawing sheet A4 size
    2. permanent marker
    3. colour markers
    4. ruler
    Romero Britto is a Brazilian artist. He was born in 1963 in grew up an extremely modest lifestyle amongst eight brothers and sisters in Recife Brazil. His drew and painted on any scrap of newspaper or cardboard he could find and filled them with colourful images of a beautiful world.  
    In 1983 Britto travelled to Europe to study the old masters. After this trip, he traveled to the USA where Pop Art was flourishing. He opened a gallery in Miami. In 1989,Absolut Vodka selected Britto to design an artwork with their famous logo. From that moment the name Britto was known to a greater public. His artwork are now represented in galleries and museums across five continents.
    Paris in the style of Britto, by Emmy grade 6

    Look at artwork of Britto on his gallery. Discuss the salient features: bright colours, simple shapes, the work is divided into sections that are filled with patterns, thick black outlines. Discuss how you to see the difference between the drawn picture and the background. Ask about the stylistic characteristics and where to classify this artist (Pop Art, Cubism).

    The students have to make a drawing with a topic of their choice. No details, but only the main lines. Divide the drawing surface with pencil and ruler in several sections. Trace all lines with a waterproof black marker and then colour them with markers in the way Britto did.

    For the background we stamped circles with toilet rolls on a coloured sheet and pasted the artwork on it.
    Flowers in the styleo of Britto, by Nadia grade 6

    Op art around an eye


    You need: 

    1. drawing sheet 20 by 20 cm
    2. ruler
    3. pencil
    4. post it 
    5. black markers

    Step 1
    Draw an eye in the middle. 
    Draw lines from the eye to the edges. Important: this must be an EVEN number of lines, otherwise you won't be able to color a checkerboard pattern later.  


    Step 2
    Put a post-it on the eye. Be sure there will be place for another one later.  Draw dots on the cornors with a pencil and connect them.  

    Step 3
    Do the same on another part of the sheet. 


    Step 4
    Trace all lines with a fine black marker. Draw alternately dots in the shapes that must become black. Color them with a bigger black marker

    Stap 5
    Color the iris of the eye with pencil. 

    woensdag 14 september 2022

    Robots rule

     You need:

    1. drawing sheets
    2. pencil
    3. markers
    4. water color paint
    5. brush 
    6. jar with water
    7. chalk pastels 


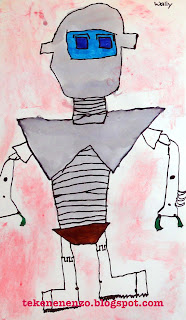
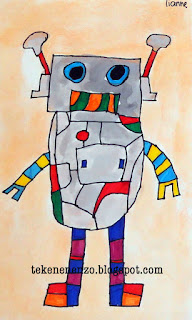
    Draw a robot. Trace all pencil lines with a black marker. Color the drawing with markers, except the parts that should become metallic look. 
    Paint the body of the robot grey (metallic) with water color paint. 
    Let dry and color the background with chalk pastels. 


    by students of grade 3


    maandag 15 augustus 2022

    Escher's tesselations

    You need: 
    1. white drawing sheet
    2. thin cardboard 7 by 7 cm
    3. pencil
    4. scissors
    5. color markers 
    6. black marker
    7. black construction paper for background 
    Use this book for your lesson: 'Nadir en Zenith in the world of Escher' by Wouter van Reek. Publisher: Leopold. EAN: 9789025876920. 


    Nadir and Zenith come to a place that is so strange they can’t even tell if it’s real. Their curiosity is aroused and they look further. And further. Going deeper and deeper into the weird and wonderful world of M.C. Escher, where nothing is quite what it seems. Fortunately Mr Escher helps them find their way. Or is it the other way round?

    M.C. Escher
    Maurits Cornelis (Mauk) Escher (1898-1972) is born in the Netherlands. After high school he goes to the graphics department of a technical college to become graphic artist. During a trip to the Alhambra in Granada he discovers the Moorish  mosaics. These have a major influence on his later artwork and are the basis for this lesson. 

    View artworks from Escher and discuss them. Show for example the impossible buildings Belvedere or Waterfall. 
    Look at some pictures with animal tesselations and talk about symmetry = two objects are each other's mirror image. You can show examples of the three basic types of symmetry. 

    What do you see? How would Escher have made these prints? In which pictures do you see he has made different animals? And in which prints do you see the same animal? Where are the animals mirrored? Where do you see all animals heading in the same direction? Can you mention other symmetrical things? 


    What should you do? 
    1. Take a piece of cardboard from 7 by 7 cm. Draw a shape on two following sides and cut them out. 

    2. Stick the cut pieces on the opposite site of the cardboard with tape. Make sure the distance from the edges is the same. 

    3. Trace this shape with a pencil on a drawing sheet. Move the shape and trace again. 

    4. Fill up your sheet completely, so also with half animals along the edges.  

    5. Search for an animal in the shape. Draw details.  

    6. Choose two colors and color the animals alternately. Outline the shapes with black marker and draw details with the black marker too.  

    7. Stick your artwork on a  black sheet. 

    vrijdag 18 maart 2022

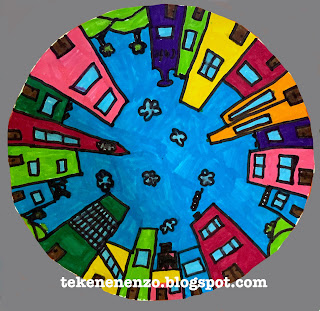
    Circle City


    You need: 

    1. white drawing sheet
    2. compass
    3. ruler
    4. pencil
    5. markers
    6. colored sheet
    7. glue

    Explain the one-point perspective: objects further away appear smaller. If we draw a street towards the horizon, it narrows and trees get smaller. 

    In one-point perspective you draw all lines parallel to the viewing direction to one point. You literally put a dot on the horizon. 

    What to do? 

    • Draw a circle of 20 cm in diameter using the compass. Mark the hole in the center with a dot.  
    • Draw lines form the edges of the circle to the dot in the middle, using ruler and pencil. 
    • Draw buildings in different heights using the lines.  Draw doors and windows. 
    • Color with markers. Outline everything with a fine black marker. 
    • Cut the circle and stick it on a colored sheet. 

    Art work made by students of grade 4. 

    donderdag 8 juli 2021

    Fun flowers


    You need:
    1. white or colored drawing sheet
    2. scraps of colored paper 
    3. scissors
    4. glue
    5. black markers

    Cut several circles from scraps of colored paper and paste them om the drawing sheet. Paste smaller circles on the bigger ones. Draw petals using several black markers in several thicknesses.   

    Source: Krokotak.com

    vrijdag 30 oktober 2020

    Mondrian, a bit different

     You need:

    1. white drawing sheet
    2. markers
    3. ruler
    4. pencil
    Draw a Mondrian, but change one of the elements of art. For example: 
    • do not draw squares and rectangles, choose another geometric shape
    • do not color with primary colors, choose maximum four other colors
    Draw your alternative Mondrian and color it with markers. Outline with black marker. 

    Elements of art: color, shape, line. 

    donderdag 22 oktober 2020

    Keith Haring figures on tissue paper

    made by students of grade 3

    You need:
    1. colored tissuepaper
    2. white drawing sheet
    3. jar with water
    4. brush
    5. scissors
    6. templates of Haring figures
    7. pencil
    8. black marker

    Choose 2 or more colors of tissuepaper. Fold them in 16 squares. Cut out. 
    Take a sheet of drawing paper, make it wet with a brush and water. Lay the pieces of tissue paper on this wet sheet and see how they bleed. Fill the whole sheet and be sure to use enough water. 
    Let dry and remove the tissue papers. 
    Cut two or more Haring templates and outline them with a pencil. Trace those lines with black marker and trace them again to make nice bold lines. 

    vrijdag 16 oktober 2020

    Pumpkins like Yayoi Kusama

    made by a student of grade 4

     You need:

    1. black construction paper
    2. colored paper
    3. black marker
    4. black fineliner
    5. scissors
    6. glue
    7. white pencil
    Yayoi Kusama (1929) is a Japanese artist. She creates paintings, sculptures and large installations with mirrors and lots of light symbolizing infinity. All her artworks have one thing in common: polka dots. That's why she's affectionately known as 'the princess of polka dots'. 
    From an early age Kusama wanted to make art, but her traditional Japanese parents didn't like this. That's why Kusama left for NewYork and joined artists there, including Andy Warhol. 

    By adding all-over marks and dots to her paintings, drawings, objects and clothes she feels as if she is making them (and herself) melt into, and become part of, the bigger universe. She said:

    ‘Our earth is only one polka dot among a million stars in the cosmos. Polka dots are a way to infinity. When we obliterate nature and our bodies with polka dots, we become part of the unity of our environment’.

    View and discuss artwork of Kusama. 
    • use of large and small polka dots 
    • backgrounds are often filled with triangles
    • use of bright colors
    • her installations suggest infinity
    Draw three pumpkins on the colored sheets and cut them. Draw bigger and smaller dots on the segments with markers. Draw triangels on the black sheet with a white pencil - start with a zigzag line. Paste the pumpkins on the black sheet.


    donderdag 7 november 2019

    Transport - like Hundertwasser


    Friedensreich Hundertwasser (1928-2000) was an Austrian artist and architect who is best known for the colorful buildings he designed, built with attention to the environment and natureThe buildings of Hundertwasser are very recognizablestraight lines are missingthere is use of bright colors and many of his buildings have typical turrets. The influence of architect Gaudi is obvious.
    The paintings of Hundertwasser have exuberant colours too and mainly undulating lines.

    Show buildings of Hundertwasser on the digital board. Discuss the salient  features: bright coloursundulating linesThen show some paintings and discuss the things that stand out:

     the use of small areas outlined with black
     no straight lines, usually parallel lines
     recurring spiral shapes
     bright colours

    Tell students they are going to draw means of transport in the style of Hundertwasser. 

    You need:
    1. drawing sheet
    2. pencil
    3. markers
    Draw a car, plane, boat or something you think is a mean of transport. Fill it with lines and patterns like Hundertwasser did. Cut your drawing and paste all means of transport on a great colored sheet. 

    Source: Dutch website Laat maar zien. 

    woensdag 6 november 2019

    Op art - like Henrique Matos

    You need:
    1. white drawing sheet A4 size
    2. liquid water colour
    3. jar with water
    4. compasses
    5. ruler
    6. pencil
    7. black waterproof markers
    Henrique José Teixeira Matos is a Portugese painter. He is born in 1961 in Oporto.  Matos painted landscapes, portraits and abstract works, but is best known for his op-art work.
    Show pictures of Matos's work on Wikimedia Commons. Look especially the op-art works and discuss what you see.

    More op-art lessons on this blog can be seen following the link Op-art.

    Paint a white sheet of paper with liquid watercolour and a lot of water a plain background.


    Drip some liquid water colour on the surface while it is still wet. Use more water if the colours won't flow. Leave the sheet to dry.


    Use compasses to draw some small circles (2 cm average) on the sheet. Draw wider circkels around them. Fill the sheet with those circles and half ones near the edges.


    Draw lines from the middle of the circles to the edges. Be sure it's an even number of lines and  Kkeep the lines as much as possible equidistant from each other. Color the squares alternating with a black marker or pencil.


    Op art hands


    You need:

    1. drawing sheet
    2. pencil
    3. ruler
    4. markers 
    Draw a grid on the sheet with squares from 2 cm by 2cm. Draw your hand or an object with a pencil. Color this alternately with black an a color of your choice.  Color the background squares with the same colors, but so that the checkerboard pattern reverses.

    zaterdag 9 februari 2019

    Popart like Burton Morris

    You need:
    1. several colours construction paper
    2. black cardboard 20 by 20 cm
    3. coloured cardboard 20 by 20 cm
    4. scissors
    5. glue
    6. black thick marker
    During our USA trip in the summer of 2009, I visited in the Coca-Cola Company in Atlanta, There I saw the artwork of Burton Morris for the first time: five paintings of cola bottles in pop-art style surrounded by light blue bubbles. So beautiful! Now I found a way to do this in school. And I think I'm the first blogger with a Morris lesson!
    Burton Morris (Pittsburgh, 1964) is an American pop-art artist. He is influenced by pop-art artists from the 60's and 70's, like Warhol, Lichtenstein and Haring. Now he is one of the most famous modern post pop-art artist. Morris's work shows a contemporary twist to traditional pop-art. His work is cheerful, energetic and colourful. His characteristic lines with the bright colours give his work a fantastic energy. Morris's work is known of tv-series like Friends and also appears in major advertising campaigns by U.S. companies like AT & T, Pepsi and Heinz.
    Show artwork of Morris on the digital board. Discuss the features: bright colours, black outlines, little detail, movement by little lines, white lines that suggest light and the distinctive black star shape around or in much of his work. Students are going to make an artwork in the style of Burton Morris with the subject: Valentine's Day.
    Step 1. Take two colours cardboard: black for the edge and one colour for the background. take a construction paper for the big heart.
    Step 2. Cut the edges of the background cardboard sloping away, to make a sort of rug. You have to cut at least 1 cm around.
    Step 3. Cut a large heart from the second coloured cardboard. Cut white 'light lines' from a white sheet for on and around the big heart.
    Step 4. Cut some smaller hearts from several colours of construction paper. Cut white 'light lines' and paste them on the little hearts; all on the same side.
    Step 5. Paste the big heart on the coloured cardboard. Paste the light lines on the heart and around it.
    Step 6. Cut long triangles from the sides of the rug, the 'flashy stripes'. Paste the rug on the black cardboard.
    Step 7. Paste the small hearts around the big heart; you may k de kleine hartjes rondom het grote hart, where you can go over the triangles. Outline the small hearts with a black marker.
    Step 8. Cut the black background away, leaving about 2 mm on the edges.
    Step 9. Paste the work on a coloured sheet (A4 size) and cut it into a square.
    Made by students of grade 4 and 5