Posts tonen met het label cut and glue. Alle posts tonen

zondag 6 oktober 2024

Pumpkin, like Burton Morris


 You need:

  1. several colors construction paper
  2. black cardboard 20 by 20 cm
  3. colored cardboard 20 by 20 cm
  4. scissors
  5. glue
  6. black marker
Burton Morris (Pittsburgh, 1964) is an American pop-art artist. He is influenced by pop-art artists from the 60's and 70's, like Warhol, Lichtenstein and Haring. Now he is one of the most famous modern post pop-art artist. Morris's work shows a contemporary twist to traditional pop-art. His work is cheerful, energetic and colourful. His characteristic lines with the bright colors give his work a fantastic energy. Morris's work is known of tv-series like Friends and also appears in major advertising campaigns by U.S. companies like AT & T, Pepsi and Heinz. 

Step by step description with photo's, see my other post about Burton Morris


And read the mail I got from Burton Morris when he came across my lesson of 2011: 

Dear Jacquelin,

I came across your blog and saw your student's artworks. I am truly touched that you honored my artwork in your teaching lessons and hope it was a success and inspired the children! 
I hope to show again in the Netherlands one day and feel free to keep in touch.
Your friend,
Burton Morris

woensdag 25 september 2024

Haunted house in the moonlight


You need:
  1. white drawing sheet A4 size 
  2. black construction paper
  3. yellow chalk pastel
  4. scissors
  5. cutting knife
  6. glue
  7. white pencil
  8. black marker
  9. blue and purple tempera paint
  10. sponge
  11. saucer
This lesson is all about Halloween and haunted houses. 

What to do? 
  • Tear a strip of black paper from about 5 cm and paste it on the bottom of the white sheet: the ground. 
  • Draw a old house on black paper and cut out.
  • Use a cutting knife for doors and windows. 
  • Paste the house on the white sheet. 
  • Use a white pencil for details such as bricks, ghosts, spiders, spider webs etc. Use a black marker to draw things in the open window.
  • Cut and paste a moon. 
  • Outline moon and house with yellow chalk pastel and smudge the chalk outwards. 
  • Stamp the background with purple and blue tempera and a sponge. 
  • Finally paste the artwork on a yellow background sheet.

zondag 21 juli 2024

Olympic athletes

You need:
  1. scissors
  2. glue
  3. white drawing paper A1 size
  4. cardboard in Olympic colors
  5. compasses
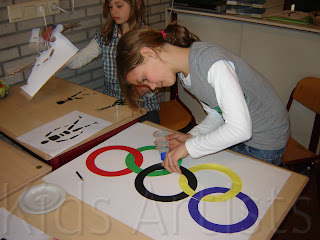
Start this lesson with the symbol of the Olympics: the colored rings. What do these rings mean? What colors do they have? How are they placed together? Ask one or two children to take the position of an athlete. What is the position of the legs, arms and body? Ask another student to show another position and discuss it again.
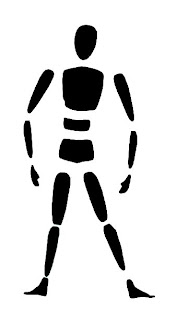
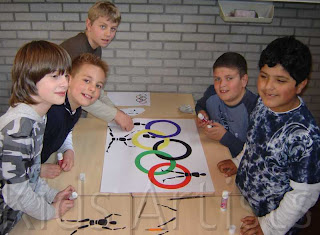
This is a group work for five students. Every group gets a big white sheet, five sheets of colored cardboard (colors of the rings: black, yellow, red, blue, green) and at least five copies of the athlete.
Step one: each group member cuts an Olympic ring, using compasses and scissors. Paste this five rings on the big white sheet. Look carefully which ring has to be pasted in front or back, and which ones have to be pasted through each other. Be sure the little cutting line is pasted underneath another ring.

  Step two: Every student takes a copy of the body and cuts every part of it. Then these bodyparts have to be pasted around, in, behind and in front of the Olympic rings.

donderdag 7 maart 2024

Mix and match with Mondrian

 by students of grade 3

You need:

  1. white sheets 21 by 21 cm
  2. black sheet 23 bij cm
  3. paper strips 3 by 6 cm in yellow, red and blue
  4. black squares 3 by 3 cm
  5. glue
Discuss life and work of Mondrian and the art movement De Stijl.  

I did this lesson in grade 5, students worked in  pairs. The figures are cut  before class. Per art work you need 4 black squares and 16 colored rectangles 


The assignment is:  
  • make a composition of 4 squares, each consisting of 4 colored rectangles and a black square in the middle. Make sure there are no 2 of the same colors next to each other
  • paste the composition on the white sheet, keeping a small white edge visible around each shape. 
  • finally paste the art work on a black surface 
Students from higher groups can measure and cut the figures themselves. 

Difficult assigment and not everyone succeeded! 


Elements of art: shape, color, line. 

dinsdag 28 maart 2023

Athletes in motion


You need:

  1. colored construction paper
  2. white drawing sheet 
  3. paperclips
  4. scissors
  5. cutting mat and cutting knife
  6. glue
  7. marker
  8. photo of an athlete 
Print a silhouette of an athlete. Put the colored sheets together with the printed athlete on top. Fix with paper clips. 
Cut out the athlete, and the colored sheets at the same time. Keep moving the paperclips to be sure the four sheets stay together. Use a cutting knife for areas the scissors can't reach.
Make a composition that suggests movement and stick the athletes on the white sheet. Use an marker to fill the background with patterns. 


Thanks to A faithfull attempt for this great lesson. 

donderdag 2 februari 2023

Art Nouveau flower tiles


Art Nouveau or Jugendstil is an art style that was practiced from 1890 and abruptly stopped with the start of World War 1 in 1914.  t die werd beoefend vanaf circa 1890 en abrupt stopte met de start van WO1 in 1914. 

Art Noveau was mainly applied to everyday products (for emample furniture, glassware, jewellery), in architecture, graphic art and painting. Artists were inspired by nature: patterns with birds, flowers, plants. clouds, rocks, women.  Graceful moving lines express emotion. 

Famous Art Nouveau artists are Alphonse Mucha,  Gustav Klimt, Gaudi, Berlage. 

You need:

  1. folding sheets 10 by 10 cm in several colors
  2. pencil
  3. scissors
  4. glue
  5. colored construction paper 30 by 20 cm

Show pictures of  Art Nouveau tiles: organic shapes of flowers and plants. 

Tell students they are going to build a litte wall of tiles in Art Nouveau style.  Every wall has six tiles. Flowers have to be cut out of the folding sheets. Try to use as much as possible of those sheets, so what you cut you glue on the wall. 

Artworks made by students of grade 2 

woensdag 1 februari 2023

Op art paper weaving like Victor Vasarely


Victor Vasarely, 1906-1997, was a French-Hungarian artist and one of the most important representives of Op Art.  Vasarely studied in Budapest and left for Paris in 1930 to work as a decorator. 

Op-art, short for optical art. The word optical is used to describe tings that relate to how we see. Artists use shapes, colours and patterns in special ways to create images that look as if they are moving or blurring. Op art started in the 1960. Op-art is a style of visual art that uses optical illusions. The artwork gives the viewer the impression of movement, hidden images and vibrating patterns.

You need: 

  1. black construction sheet  (23 by 33 cm,)
  2. white or colored paper in strips of 2 cm 
  3. ruler
  4. pencil
  5. scissors
  6. glue 
Stap 1
Fold the black sheet in half. Put the fold down in front of you. Draw a line at the top at 3 cm from the edge. Draw a center line from top to bottom. Mark a dot every cm on the fold from the center line. Make a dot every 1 cm at  the top starting from the center line. Draw lines between the dots. 

Stap 2
Leave the sheet folded in half. Cut the lines up to the 3 cm strip.   

Stap 3
Weave the strips into the frame. Start in the middle: press the strips agaiinst the fold on  both sides. Press the next strips against the previous ones.  

Stap 4
Glue the loose ends on one site. 


Stap 5
Turn your work over and cut the loose ends of the strips.  


by students of grade 6 

donderdag 21 oktober 2021

Painting with scissors like Matisse

made by students of grade 4

You need per student:

  1. 1 sheet white drawing paper
  2. 1 sheet colored construction paper 
  3. 1 sheet colored construction paper from which you cut 7 cm 
  4. 1 sheet blue construction paper 
  5. leftovers of colored paper
  6. glue
  7. scissors
  8. black marker

Who is Matisse?

Matisse (1869 –1954) was a French artist, known for both his use of colour and his fluid and original draughtsmanship. He was primarily known as a painter.

Matisse didn't care if stones were blue, he just chose the colors he liked. Some people thought is art was very ugly: someone who paints blue faces and green noses is a fool and Matisse was called 'Fauve', which means: wild. This is how the word Fauvism came into being for this art movement, art with bold colors. 

After a surgery Matisse spent the rest of his life in a wheelchair. He wasn't able to paint anymore, but could still paint with his scissors.

View various artworks of Matisse. 


Then few the artwork Oasis. What stands out? 

  • no straigh lines 
  • organic shapes
  • bright colors
  • What is an oasis and why is this artwork called so?  
How to make it 

Step 1
Take the two colored sheets: a whole one and one with 7 cm cut off. Paste the smaller sheet on the large one. The strip at the bottom is the table for the fishbowl. 

Step 2
Cut Matisse shapes and glue them on the small sheet. Let them fall of the sheet and cut away the outer pieces.

Step 3
Fold a white sheet in half on the long side and cut out a fishbowl. The center line of the bowl is the fold of the sheet. Trace around the bowl with a thick black marker.   

Step 4
Cut 'water' out of the blue sheet, slightly smaller than the bowl. Paste it in the bowl. Paste the bowl on the colored sheet with organic shapes. 

Step 5
Cut two or three fishes and some water plants and paste them in the bowl.


Elements of art: shape, color. 


donderdag 8 juli 2021

Fun flowers


You need:
  1. white or colored drawing sheet
  2. scraps of colored paper 
  3. scissors
  4. glue
  5. black markers

Cut several circles from scraps of colored paper and paste them om the drawing sheet. Paste smaller circles on the bigger ones. Draw petals using several black markers in several thicknesses.   

Source: Krokotak.com

maandag 28 december 2020

Stained glas animals

 
made by students of grade 5

You need:

  1. black construction paper 
  2. wax paper in several colors
  3. white pencil
  4. ruler
  5. cutting mat 
  6. cutting knife
  7. glue

A stained glass window is a window in which several pieces of (mostly colored) glass are stuck in frames of lead. Stained-glass windows were made in times when it wasn't possible yet to make a window in one piece. We see those stained glass windows in old houses, but especially in churches. The light from outside enters in multiple colors into the church. 

View stained glass windows and tel about their origin and the effect of the colored light.  

Use a white pencil to draw an animal on the black sheet. Draw at least three lines from the animal to all edges of the sheet. Divide the animal into some surfaces. 
Make all lines 1 cm wide. Hatch the surfaces between the 1 cm lines with the white pencil.
Cut the white area's. When ready, use the black sheet as a template to draw the pieces of wax paper. Cut them out with an extra 0,5 cm and stick them behind the window. Make sure that there are no two same colors next to each other. 

Elements of art: line, shape, color. 
Technique: cutting.
Connecting with: history. 

zondag 13 december 2020

3D winter or Christmas scene


made by students of grade 5/6

You need: 

  1. white cardboard 21 by 21 cm
  2. colored glace paper 14,5 by 14,5 cm
  3. cutting knife 
  4. cutting mat
  5. glue

Too difficult or not enough time? Skip step 1 and 2. 

Step 1
Draw a square at 2 cm from the edges, this is the outside of the frame. 

Step 2
Draw in this square another square at 3 cm of the edges: this is the front of the frame.  

Step 3
Draw in the 15 by 15 cm square a simple winter or Christmas scene.  Make the lines 1 cm wide and make sure they are on 4 sides attached to the 1 cm wide frame. See pattern below. 

Step 4
Color the parts you have to cut out grey.  

Step 5
Cut out the grey parts. 

Step 6
Cut the corners diagonally, see pattern. 

Step 7
Fold the lines of the 15 by 15 square. 

Step 8
Stick the corners.

Step 9
Stick the glace paper in the frame. 


Elements of art: line, form, space.


donderdag 29 oktober 2020

Still life with fruit

door leerlingen van groep 5

You need:
  1. corrugated cardboard
  2. scissors
  3. white drawing sheet
  4. tempera paint
  5. brush
  6. glue
  7. colored construction paper
Vies and discuss still lifes of fruit in different styles (for example Caravaggio and Cezanne). How is the fruit arranged? Why at that way? Which parts are light and which parts are dark? What does that mean? 


Provide each group of students with a bowl of different fruit types. Students paint the fruits (no drawing first!) after a good observation. 
Cut a fruit bowl out of the cardboard. Cut out the fruits with a small white edge. Stick the fruits on a colored sheet, be sure to let them overlap each other. Stick the cardboard bowl. Some fruits will partly disappear in it. 

Elements of art: space, color, value. 

zaterdag 12 september 2020

The birds of George Braque lesson 2

artworks are made by students of grade 4

This is lesson 2 about George Braque. First lesson: click here.  

You need:

  1. blue construction paper 
  2. colored paper
  3. scissors
  4. glue

George Braque (1882-1962) was a French painter and sculptor. Together with Picasso he was founder of cubism.
After is cubist time, Braque painted simplified figurative paintings of landscapes and still lifes with musical instruments and bottles. Remarkable are the letters and nummers Braque added to his works.
When Braque became ill, he was no longer able to paint. He turned to making color litographs of simple bird silhouettes. The same birds you that can also be seen in one of the ceiling paintings of the Louvre in Paris.

Look at the artwork Les oiseaux of George Braque.  

  • simple shapes (silhouet)
  • white outlines
  • blue background
  • geometrical shapes: stars and moon 

What do you have to do: 
Draw at least three silhouettes of birds on colored paper. Cut them. Cut geometrical shapes out of paper scraps. Paste everything on the blue sheet.  


Elements of art: shape, space.
Techniques: drawing, making a collage, cut and glue 

maandag 7 september 2020

The flowers of Andy Warhol


You need:
  1. black construction paper A4 size
  2. brushes
  3. tempera paint
  4. scraps of colored paper
  5. scissors 
  6. glue
Andy Warhol - popart
Andy Warhol (1928-1897) was an American painter, photographer and filmaker. He started his working life as an advertising artist and became an artist in the early 1960's. He
 introduced everyday consumer products into his artwork, such as Campbell's soup cans and Coco Cola bottles. 

Warhol is one of the leading artists of Pop art. 
Using printing techniques he created large series of works of Marilyn Monroe or political themes such as the electric chair. Warhol used photographs of others to edit.
The Flowers series clearly show how Warhol applied the silkscreen printing technique. We see the flowers of the rare Hibiscus fragilus.  
The Flowers series are also seen as Warhol's answer toe Van Gogh's famous paintings of sunflowers and Claude Monet's artworks of water lilies. 

Stamp green and yellow tempera on a black sheet of paper leaving about one inch of the edges black. Let dry. 
Cut at least four flowers with five petals from scraps of colored paper. Do not draw in first, but cut by hand. Stick the flowers on the black sheet. No overlap. 

Elements of art: shape, color

maandag 10 augustus 2020

Zebra


You need:

  1. drawing sheet A3 size 
  2. drawing sheet A3 size
  3. tea
  4. glue
  5. sand
  6. brush
  7. charcoal
  8. wool in black and white
  9. scissors
After reading The zebra who ran too fast fro Jenni Desmond we did this lesson. 

Dillute glue with a cup of strong tea and add some sand. Paint the large sheet with this. Color and texture will emphasize the natural habitat of the zebra. 
Fold the other two sheets in half and cut a neck and head (oval). 
Use charcoal to draw vertical lines on the head and horizontal lines on the body. Cut ears and draw lines on them. Cut pieces of white and black wire and paste them. 

Elements of ard: line, shape and texture.
Techniques: cut and glue, draw with charcoal