Posts tonen met het label Valentine's day. Alle posts tonen

zaterdag 9 februari 2019

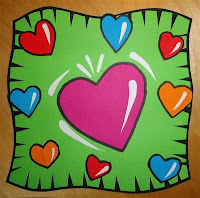
Popart like Burton Morris

You need:
  1. several colours construction paper
  2. black cardboard 20 by 20 cm
  3. coloured cardboard 20 by 20 cm
  4. scissors
  5. glue
  6. black thick marker
During our USA trip in the summer of 2009, I visited in the Coca-Cola Company in Atlanta, There I saw the artwork of Burton Morris for the first time: five paintings of cola bottles in pop-art style surrounded by light blue bubbles. So beautiful! Now I found a way to do this in school. And I think I'm the first blogger with a Morris lesson!
Burton Morris (Pittsburgh, 1964) is an American pop-art artist. He is influenced by pop-art artists from the 60's and 70's, like Warhol, Lichtenstein and Haring. Now he is one of the most famous modern post pop-art artist. Morris's work shows a contemporary twist to traditional pop-art. His work is cheerful, energetic and colourful. His characteristic lines with the bright colours give his work a fantastic energy. Morris's work is known of tv-series like Friends and also appears in major advertising campaigns by U.S. companies like AT & T, Pepsi and Heinz.
Show artwork of Morris on the digital board. Discuss the features: bright colours, black outlines, little detail, movement by little lines, white lines that suggest light and the distinctive black star shape around or in much of his work. Students are going to make an artwork in the style of Burton Morris with the subject: Valentine's Day.
Step 1. Take two colours cardboard: black for the edge and one colour for the background. take a construction paper for the big heart.
Step 2. Cut the edges of the background cardboard sloping away, to make a sort of rug. You have to cut at least 1 cm around.
Step 3. Cut a large heart from the second coloured cardboard. Cut white 'light lines' from a white sheet for on and around the big heart.
Step 4. Cut some smaller hearts from several colours of construction paper. Cut white 'light lines' and paste them on the little hearts; all on the same side.
Step 5. Paste the big heart on the coloured cardboard. Paste the light lines on the heart and around it.
Step 6. Cut long triangles from the sides of the rug, the 'flashy stripes'. Paste the rug on the black cardboard.
Step 7. Paste the small hearts around the big heart; you may k de kleine hartjes rondom het grote hart, where you can go over the triangles. Outline the small hearts with a black marker.
Step 8. Cut the black background away, leaving about 2 mm on the edges.
Step 9. Paste the work on a coloured sheet (A4 size) and cut it into a square.
Made by students of grade 4 and 5

woensdag 27 januari 2016

Valentine - like Robert Indiana


Made by a student of grade 2

You need:
  1. drawing sheet 20 by 20 cm
  2. water colour paint
  3. brushes
  4. fine black marker
A lesson about the famous LOVE sculpture of Robert Indiana. I used the Dutch word LIEF (meaning Nice, or I like you) 
Fold the sheet in four squares. Draw hearts in each part. Draw fat letters on the foreground. Fill letters and hearts with patterns and paint with water colour paint. Outline with fine black marker. 

Blogwriter in NY!

donderdag 13 oktober 2011

Burton Morris!!!

Made by a student of grade 6

In February I posted a lesson about Burton Morris. It is a tutorial to make artwork in his style.
Today I was highly surprised when I got an email of the artist himself! Burton Morris wrote me! You'll all understand how excited I was!!!

Dear Jacquelin,

I came across your blog and saw your student's artworks. I am truly touched that you honored my artwork in your teaching lessons and hope it was a success and inspired the children!

I hope to show again in the Netherlands one day and feel free to keep in touch.

Your friend,
Burton Morris


If you want to check it out again, follow this link: http://kidsartists.blogspot.com/2011/02/in-style-of-burton-morris.html

To see his wonderful website: www.burtonmorris.com

dinsdag 8 februari 2011

Connected hearts

You need:
  1. white drawing sheet A5 size
  2. piece of cardboard
  3. scissors
  4. oil pastels
  5. colour pencils
  6. watercolour paint
  7. jar with water
  8. brush
  9. coloured paper
  10. glue
  11. metallic gel pen or marker
Draw a heart on a piece of cardboard and cut it out. Trace the heart several times on the drawing sheet. Hearts should overlap. Trace the heart also on the edged of the sheet. Draw smaller hearts within the traced ones; be sure there is about half cm space between the two lines. Draw and erase the the pencil lines of the overlapping hearts as if they weave together: below - above - below - above. Colour the hearts between the double lines with oil pastels. Paint the sheet with diluted watercolour paint and leave the work to dry. Trace the oil pastel harts on both sides with coloured pencils. Paste the artwork on a coloured sheet and finish the hearts on the frame, using a silver metallic gel pen or marker.

zaterdag 5 februari 2011

Patterned hearts like Jim Dine

You need:
  1. drawing sheet A5 size
  2. crayons
  3. liquid water colour
  4. brush

Fold the sheet of paper into quarters. Cut a heart out of a piece in the hearts: Trace this heart four times with a pencil. Draw patterns in the hearts with crayons: stripes, circles, zigzag lines etc. Draw different patterns around the hearts.

Paint the whole sheet with liquid watercolour. The crayon will resist the ink.

donderdag 28 januari 2010

Valentine's day (with Jim Dine)

You need:
  1. white paper 20 by 20 cm
  2. cardboard 10 by 10 cm
  3. pencil and ruler
  4. scissors
  5. glue
  6. colour pencils
  7. oil pastel crayons
  8. chalk pastel
  9. salt
  10. tempera paint
  11. different kinds of coloured paper (ribbed cardboard, tissue paper, crepe paper etc.)
  12. watercolour paint
  13. brushes
  14. markers
  15. red or pink paper for background
Jin Dine, born in 1935 in Cincinatti, is a sculptor and popart artist. Hearts, ties and tools are recurrent themes in his art. Let children learn about Jim Dine by showing and discussing his artworks. Because of upcoming Valentine's day a lesson about hearts today! Basic colours are red and white (and making pink of these of course!).
Children get a sheet from 20 by 20 cm. They have to divide this sheet with ruler and pencil into four squares from 10 by 10 cm. Fold the little cardboard and draw a heart against the fold. Cut it out. Trace this heart in the four squares. Divide the different colouring supplies on different tables. Stimulate children to experiment with these materials. What happens when I sprinkle salt in watercolour paint? How can I make my heart pop up from the paper? Can I combine chalk pastel and oilpastel? What happens when I sprinkle water on tissuepaper? Students have to colour their hearts and backgrounds by using as many supplies and techniques as possible. While doing this, kids may walk around through the classroom(s) and choose the place where the art supplies of their choice are. The only restriction is: when all chairs are occupied, you have to choose another supply first. When the four hearts are ready, they have to be pasted on a red or pink background.
All artworks are made by children of 10-12 years old