Posts tonen met het label famous artists. Alle posts tonen

zondag 6 oktober 2024

Pumpkin, like Burton Morris


 You need:

  1. several colors construction paper
  2. black cardboard 20 by 20 cm
  3. colored cardboard 20 by 20 cm
  4. scissors
  5. glue
  6. black marker
Burton Morris (Pittsburgh, 1964) is an American pop-art artist. He is influenced by pop-art artists from the 60's and 70's, like Warhol, Lichtenstein and Haring. Now he is one of the most famous modern post pop-art artist. Morris's work shows a contemporary twist to traditional pop-art. His work is cheerful, energetic and colourful. His characteristic lines with the bright colors give his work a fantastic energy. Morris's work is known of tv-series like Friends and also appears in major advertising campaigns by U.S. companies like AT & T, Pepsi and Heinz. 

Step by step description with photo's, see my other post about Burton Morris


And read the mail I got from Burton Morris when he came across my lesson of 2011: 

Dear Jacquelin,

I came across your blog and saw your student's artworks. I am truly touched that you honored my artwork in your teaching lessons and hope it was a success and inspired the children! 
I hope to show again in the Netherlands one day and feel free to keep in touch.
Your friend,
Burton Morris

woensdag 17 juli 2024

Stamping with Mondrian


Goal:
 reducing the visible world in horizontal and vertical lines and primatr colors.   
Technique: stamping. 

You need:
  1. black cardboard 
  2. sponges cut in different sizes (squares and rectangles) 
  3. tempera paint in red, blue and yellow 
  4. brushes
  5. white crayons 
View these artworks of Mondrian and talk about how he abstracted a tree. 

Also talk about Victory Boogie Woogie, the painting in which you can see part of the map of New York. Tell students we are going to make our own Mondrian map. Discuss the terms primary colors, square, rectangle, vertical and horizontal lines.


Instruction 
Brushes will not be rinsed, but will remain the same color.
Show how to use a brush to rub the sponge with paint. 
Show how to stamp: do not slide the sponge, but lift it off the paper. This way you'll get a tight shape.  
Stamp horizontally or vertically only. 
Do not stamp two of the same colors next to each other. 
Make sure the shapes don't touch each other. You must be able to see the black roads between them. 


When the work had dried, draw stripes on the black roads using a white crayon. 

Elements of art: shape, color, line. 


Artworks are made by students of grade 1/2. 

zaterdag 15 juni 2024

Monet's waterlilies pond

 You need:

  1. drawing paper A3 size
  2. tempera paint in green, blue, white, red and yellow
  3. two brushes per student
  4. two spunges per student
  5. paper towels
  6. oil pastel crayons 
  7. schotels  
Claude Monet (1840-1926) is considered one of the most important painters of Impressionism. 

 Typical for Impressionists:

  • they choose subjects from ordinary life 
  • special attention for light and color
  • work in the open air
  • smooth brushstrokes
  • dashes resemble a sketch
  • it's about the impression!
Discuss the term impressionism. Show some paintings by Monet and zoom in on a work with water lilies in Arts & Culture. Do students see the characteristics of impressionism in this artwork?

Monet had a large garden with a pond and a Japanese bridge in Giverny France. He liked to paint in that garden. His works of water lilies are therefore famous and are the basis of this lesson.

Lesson 1
Squeeze some blue, green and white paint onto a saucer. Dipt your sponge into the blue paint. Stamp on the sheet. Do the same with green paint and stamp all over the sheet. Finally do this with white paint. You can use the green side of your sponge,  to get a light green color also. Let the work dry.


Lesson 2
To paint the water lilies: mix a little bit of red with white paint. Paint ovals spread across the sheet. Not too neat, it's all about impression!
Paint a green border at the bottom of the ovals: the leaf. To make it fresher, you can mix some light green paint and use it. You don't have to clean the green brush first. 
Then paint a heart in your flower with yellow. Let the work dry. 
Finally draw lines in your lily with a dark red or purple oil pastel: the petals. 

Artworks made by students of grade 1 and 2.

donderdag 7 maart 2024

Mix and match with Mondrian

 by students of grade 3

You need:

  1. white sheets 21 by 21 cm
  2. black sheet 23 bij cm
  3. paper strips 3 by 6 cm in yellow, red and blue
  4. black squares 3 by 3 cm
  5. glue
Discuss life and work of Mondrian and the art movement De Stijl.  

I did this lesson in grade 5, students worked in  pairs. The figures are cut  before class. Per art work you need 4 black squares and 16 colored rectangles 


The assignment is:  
  • make a composition of 4 squares, each consisting of 4 colored rectangles and a black square in the middle. Make sure there are no 2 of the same colors next to each other
  • paste the composition on the white sheet, keeping a small white edge visible around each shape. 
  • finally paste the art work on a black surface 
Students from higher groups can measure and cut the figures themselves. 

Difficult assigment and not everyone succeeded! 


Elements of art: shape, color, line. 

dinsdag 5 maart 2024

Grey, like Theo van Doesburg


You need:
  1. white drawing sheet
  2. black construction paper
  3. ruler
  4. charcoal
  5. pencil
  6. glue

Theo van Doesburg (1883-1931) was a Dutch painter, architect and writer. He was charmed by the abstract art of Kandinsky and the cubism of Picasso. In 1917 he founded the magazine De Stijl (The Style), in which he and other artists could publish their innovative ideas. Well-known artists who also belong to De Stijl are Piet Mondriaan, Bart van der Leck and Gerrit Rietveld.

Characteristics of the Stijl artists:

  • use of primary colors and non-colors 
  • horizontal and vertical lines
  • use of geometric shapes 
  • strive for balance and harmony in the artwork

Van Doesburg, Composition 12 - abstraction of a landscape, 1918

In this lesson we discuss an artwork from 1917 that hangs in the Guggenheim New York. No primary colors, but only the non-colors black and white and everything in between.The goal for this lesson is not to copy the work, but to practice the technique of working with charcoal. 

Van Doesburg, Composition in grey, 1919

Look at the painting and discuss what stands out:
  • no color, only non-colors
  • geometric shapes with some rounded corners
  • suggestion of depth: some surfaces appear to rise through the use of light and 
  • dark next to eachother 
  • only horizontal and vertical lines 


How to make your own Van der Leck? 
First practice drawing with charcoal on a scrap. Press hard, soft, wipe. Get to know the material this way.  
Divide the sheet into rectangles using a pencil and ruler. Color with charcoal. Make sure that lines between the rectangles are clearly visible. Create color nuances by pressing harder or softer, rubbing and wiping. 
Stick the work on a black sheet. 

Elements of art: color, nuance, line, shape. 

Artworks made by students of grade 5.

donderdag 25 mei 2023

Selfportrait like Roy Lichtenstein

At our school it's customary to keep artwork at school until the of the school year. Students make a portfolio in june to take their work home. 
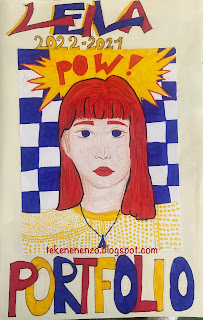
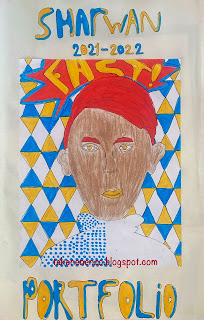
On front of it is a drawing in the style of one of the art movements we studied that year. In 2021-2022 it was pop art. 
These are the grade 6 portfolio folders with a self portrait in the style of Roy Lichtenstein. 

You need: 
For the folder: paper A1 size, folded in half
For the drawing

  1. white drawing paper A4 size 
  2. markers
  3. skin color pencils 
  4. fine marker in black
Show artwork of Lichtenstein and discuss the important features: use of primary colors (sometimes with green), grid dots, black outlines, speech bubbles and slogans (onomatopoeia).

contents portfolio folder grade 6

How?
  1. Draw a self portrait on the small sheet. 
  2. Add a text in a speech bubble that suits you. 
  3. Color your face using skin color pencils. Use markers for the rest of your drawing. 
  4. Fill one part of your drawing with dots. 
  5. Fill the background with a pattern. 
  6. Outline everything with a black marker. 
  7. Past e your work on the large sheet. 
  8. Draw in large letters: portfolio + you name + the school year. 

all artworks are made by students of grade 6

    donderdag 30 maart 2023

    Like Romero Britto

    Dutch tulips in the style of Romero Britto, by Malou, grade 6

    This was one of my most successful lessons so far; students enjoyed it and the results were amazing. But hello copycats: Britto never painted tulips! So please don't copy this lesson (I saw a lot of them already on artblogs Pinterest), but create one yourself. Or at least: mention your source, kidsartists.blogspot.com! 

    You need:
    1. white drawing sheet A4 size
    2. permanent marker
    3. colour markers
    4. ruler
    Romero Britto is a Brazilian artist. He was born in 1963 in grew up an extremely modest lifestyle amongst eight brothers and sisters in Recife Brazil. His drew and painted on any scrap of newspaper or cardboard he could find and filled them with colourful images of a beautiful world.  
    In 1983 Britto travelled to Europe to study the old masters. After this trip, he traveled to the USA where Pop Art was flourishing. He opened a gallery in Miami. In 1989,Absolut Vodka selected Britto to design an artwork with their famous logo. From that moment the name Britto was known to a greater public. His artwork are now represented in galleries and museums across five continents.
    Paris in the style of Britto, by Emmy grade 6

    Look at artwork of Britto on his gallery. Discuss the salient features: bright colours, simple shapes, the work is divided into sections that are filled with patterns, thick black outlines. Discuss how you to see the difference between the drawn picture and the background. Ask about the stylistic characteristics and where to classify this artist (Pop Art, Cubism).

    The students have to make a drawing with a topic of their choice. No details, but only the main lines. Divide the drawing surface with pencil and ruler in several sections. Trace all lines with a waterproof black marker and then colour them with markers in the way Britto did.

    For the background we stamped circles with toilet rolls on a coloured sheet and pasted the artwork on it.
    Flowers in the styleo of Britto, by Nadia grade 6

    Op art around an eye


    You need: 

    1. drawing sheet 20 by 20 cm
    2. ruler
    3. pencil
    4. post it 
    5. black markers

    Step 1
    Draw an eye in the middle. 
    Draw lines from the eye to the edges. Important: this must be an EVEN number of lines, otherwise you won't be able to color a checkerboard pattern later.  


    Step 2
    Put a post-it on the eye. Be sure there will be place for another one later.  Draw dots on the cornors with a pencil and connect them.  

    Step 3
    Do the same on another part of the sheet. 


    Step 4
    Trace all lines with a fine black marker. Draw alternately dots in the shapes that must become black. Color them with a bigger black marker

    Stap 5
    Color the iris of the eye with pencil. 

    woensdag 29 maart 2023

    Animals in spring like Hans Innemee


    by students of grade 1-2
    You need:

    1. grey construction paper 21 bij 21 cm 
    2. oilpastels
    This lesson is for grade 1-2. In 2012 I wrote a lesson for grade 3-4 about Hans Innemee. 

    Hans Innemee (1951) is a Dutch artist. View artwork of him with the students. Discover the small stories in his work. Can you tell a small story while looking at these two birds? 


    Discuss the artworks: 
    1. subject: animals
    2. few colors
    3. frame
    4. simple background
    Task for today: draw young animals in spring. Color them with oilpastels. Outline with black around the drawing. 

    vrijdag 3 februari 2023

    Self portrait like Alphonse Mucha


    You need:
    1. portrait photo of yourself
    2. white drawing sheet
    3. brown and grey construction paper
    4. color pencil
    5. gold pencil
    6. scissors
    7. glue
    Alphonse Mucha
    Alphonse Mucha (Czech republic, 1860-1939) is an Art Nouveau artist. Graceful women,  shapes from nature, soft colors and stylized letters  en  are the basis of his work.
    In 1887 he moves to Parijs, at that time the center of the modern world: a vibrant night life, modern department stores, wide boulevards with artificial lights that illuminate the city  after sunset. Mucha isn't quite succesfull by then, but that changes when he gets his first assignment: a poster for the  v theater show Gismonda with the famous actress Sarah Bernhardt. Mucha paints a lifesize poster of a beautiful woman surrounded by stylized flower patterns and graceful lines. With this poster Mucha establishes his name as an artist  and is assured of sufficient work in the years that follow. His posters turn Paris into an open-air museum with art for everyone to see. 
    Show some artwork of Mucha and discuss them: graceful wavy lines, organic shapes, no bright colors.


    Task
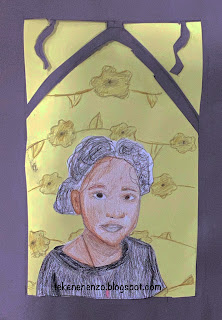
    Draw the picture of yourself  and color it with pencils. Cut out and stick on brown paper. Decorate the background with organic shapes using a gold color pencil. Cut a frame for you portrait and stick it on your artwork.  

    Artworks are made by students of grade 5 and 6. 

    donderdag 2 februari 2023

    Art Nouveau flower tiles


    Art Nouveau or Jugendstil is an art style that was practiced from 1890 and abruptly stopped with the start of World War 1 in 1914.  t die werd beoefend vanaf circa 1890 en abrupt stopte met de start van WO1 in 1914. 

    Art Noveau was mainly applied to everyday products (for emample furniture, glassware, jewellery), in architecture, graphic art and painting. Artists were inspired by nature: patterns with birds, flowers, plants. clouds, rocks, women.  Graceful moving lines express emotion. 

    Famous Art Nouveau artists are Alphonse Mucha,  Gustav Klimt, Gaudi, Berlage. 

    You need:

    1. folding sheets 10 by 10 cm in several colors
    2. pencil
    3. scissors
    4. glue
    5. colored construction paper 30 by 20 cm

    Show pictures of  Art Nouveau tiles: organic shapes of flowers and plants. 

    Tell students they are going to build a litte wall of tiles in Art Nouveau style.  Every wall has six tiles. Flowers have to be cut out of the folding sheets. Try to use as much as possible of those sheets, so what you cut you glue on the wall. 

    Artworks made by students of grade 2 

    woensdag 1 februari 2023

    Op art paper weaving like Victor Vasarely


    Victor Vasarely, 1906-1997, was a French-Hungarian artist and one of the most important representives of Op Art.  Vasarely studied in Budapest and left for Paris in 1930 to work as a decorator. 

    Op-art, short for optical art. The word optical is used to describe tings that relate to how we see. Artists use shapes, colours and patterns in special ways to create images that look as if they are moving or blurring. Op art started in the 1960. Op-art is a style of visual art that uses optical illusions. The artwork gives the viewer the impression of movement, hidden images and vibrating patterns.

    You need: 

    1. black construction sheet  (23 by 33 cm,)
    2. white or colored paper in strips of 2 cm 
    3. ruler
    4. pencil
    5. scissors
    6. glue 
    Stap 1
    Fold the black sheet in half. Put the fold down in front of you. Draw a line at the top at 3 cm from the edge. Draw a center line from top to bottom. Mark a dot every cm on the fold from the center line. Make a dot every 1 cm at  the top starting from the center line. Draw lines between the dots. 

    Stap 2
    Leave the sheet folded in half. Cut the lines up to the 3 cm strip.   

    Stap 3
    Weave the strips into the frame. Start in the middle: press the strips agaiinst the fold on  both sides. Press the next strips against the previous ones.  

    Stap 4
    Glue the loose ends on one site. 


    Stap 5
    Turn your work over and cut the loose ends of the strips.  


    by students of grade 6 

    maandag 15 augustus 2022

    Escher's tesselations

    You need: 
    1. white drawing sheet
    2. thin cardboard 7 by 7 cm
    3. pencil
    4. scissors
    5. color markers 
    6. black marker
    7. black construction paper for background 
    Use this book for your lesson: 'Nadir en Zenith in the world of Escher' by Wouter van Reek. Publisher: Leopold. EAN: 9789025876920. 


    Nadir and Zenith come to a place that is so strange they can’t even tell if it’s real. Their curiosity is aroused and they look further. And further. Going deeper and deeper into the weird and wonderful world of M.C. Escher, where nothing is quite what it seems. Fortunately Mr Escher helps them find their way. Or is it the other way round?

    M.C. Escher
    Maurits Cornelis (Mauk) Escher (1898-1972) is born in the Netherlands. After high school he goes to the graphics department of a technical college to become graphic artist. During a trip to the Alhambra in Granada he discovers the Moorish  mosaics. These have a major influence on his later artwork and are the basis for this lesson. 

    View artworks from Escher and discuss them. Show for example the impossible buildings Belvedere or Waterfall. 
    Look at some pictures with animal tesselations and talk about symmetry = two objects are each other's mirror image. You can show examples of the three basic types of symmetry. 

    What do you see? How would Escher have made these prints? In which pictures do you see he has made different animals? And in which prints do you see the same animal? Where are the animals mirrored? Where do you see all animals heading in the same direction? Can you mention other symmetrical things? 


    What should you do? 
    1. Take a piece of cardboard from 7 by 7 cm. Draw a shape on two following sides and cut them out. 

    2. Stick the cut pieces on the opposite site of the cardboard with tape. Make sure the distance from the edges is the same. 

    3. Trace this shape with a pencil on a drawing sheet. Move the shape and trace again. 

    4. Fill up your sheet completely, so also with half animals along the edges.  

    5. Search for an animal in the shape. Draw details.  

    6. Choose two colors and color the animals alternately. Outline the shapes with black marker and draw details with the black marker too.  

    7. Stick your artwork on a  black sheet.