zondag 21 juli 2024

Olympic athletes

You need:
  1. scissors
  2. glue
  3. white drawing paper A1 size
  4. cardboard in Olympic colors
  5. compasses
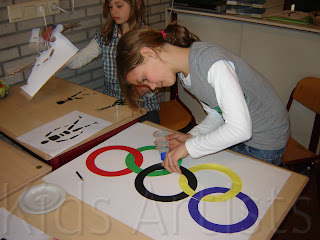
Start this lesson with the symbol of the Olympics: the colored rings. What do these rings mean? What colors do they have? How are they placed together?
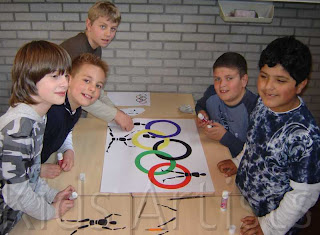
 Ask one or two children to take the position of an athlete. What is the position of the legs, arms and body? Ask another student to show another position and discuss it again.
This is a group work for five students. Every group gets a big white sheet, five sheets of colored cardboard (colors of the rings: black, yellow, red, blue, green) and at least five copies of the athlete.
Step one: each group member cuts an Olympic ring, using compasses and scissors. Paste this five rings on the big white sheet. Look carefully which ring has to be pasted in front or back, and which ones have to be pasted through each other. Be sure the little cutting line is pasted underneath another ring.

  Step two: Every student takes a copy of the body and cuts every part of it. Then these bodyparts have to be pasted around, in, behind and in front of the Olympic rings.

woensdag 17 juli 2024

Stamping with Mondrian


Goal:
 reducing the visible world in horizontal and vertical lines and primatr colors.   
Technique: stamping. 

You need:
  1. black cardboard 
  2. sponges cut in different sizes (squares and rectangles) 
  3. tempera paint in red, blue and yellow 
  4. brushes
  5. white crayons 
View these artworks of Mondrian and talk about how he abstracted a tree. 

Also talk about Victory Boogie Woogie, the painting in which you can see part of the map of New York. Tell students we are going to make our own Mondrian map. Discuss the terms primary colors, square, rectangle, vertical and horizontal lines.


Instruction 
Brushes will not be rinsed, but will remain the same color.
Show how to use a brush to rub the sponge with paint. 
Show how to stamp: do not slide the sponge, but lift it off the paper. This way you'll get a tight shape.  
Stamp horizontally or vertically only. 
Do not stamp two of the same colors next to each other. 
Make sure the shapes don't touch each other. You must be able to see the black roads between them. 


When the work had dried, draw stripes on the black roads using a white crayon. 

Elements of art: shape, color, line. 


Artworks are made by students of grade 1/2. 

zaterdag 15 juni 2024

Monet's waterlilies pond

 You need:

  1. drawing paper A3 size
  2. tempera paint in green, blue, white, red and yellow
  3. two brushes per student
  4. two spunges per student
  5. paper towels
  6. oil pastel crayons 
  7. schotels  
Claude Monet (1840-1926) is considered one of the most important painters of Impressionism. 

 Typical for Impressionists:

  • they choose subjects from ordinary life 
  • special attention for light and color
  • work in the open air
  • smooth brushstrokes
  • dashes resemble a sketch
  • it's about the impression!
Discuss the term impressionism. Show some paintings by Monet and zoom in on a work with water lilies in Arts & Culture. Do students see the characteristics of impressionism in this artwork?

Monet had a large garden with a pond and a Japanese bridge in Giverny France. He liked to paint in that garden. His works of water lilies are therefore famous and are the basis of this lesson.

Lesson 1
Squeeze some blue, green and white paint onto a saucer. Dipt your sponge into the blue paint. Stamp on the sheet. Do the same with green paint and stamp all over the sheet. Finally do this with white paint. You can use the green side of your sponge,  to get a light green color also. Let the work dry.


Lesson 2
To paint the water lilies: mix a little bit of red with white paint. Paint ovals spread across the sheet. Not too neat, it's all about impression!
Paint a green border at the bottom of the ovals: the leaf. To make it fresher, you can mix some light green paint and use it. You don't have to clean the green brush first. 
Then paint a heart in your flower with yellow. Let the work dry. 
Finally draw lines in your lily with a dark red or purple oil pastel: the petals. 

Artworks made by students of grade 1 and 2.

dinsdag 2 april 2024

Mexican amate

You need:
  1. brown paper bag
  2. tempera paint in fluoresecent colours and white
  3. brushes
  4. jar with water
  5. black marker
  6. coloured paper for background
  7. glue or stapler
Amate is a way of making paper, done for centuries by Mexican Indians. Amate paper is made by cooking the inner bark of various trees. At the beginning of the 20th century the Nahua Indians of Mexico started making amate paintings as a form of folk art, especially in order to exchange and sell them to tourists.
Show some pictures of Mexican amate paintings. Discuss the features: birds, flowers, bright colours and black outlines. A frame around the drawing with a pattern in bright colours too.

Tear the edges off the paper: use thumb and fingers of both hands and tear slowly. Use a pencil to draw some birds and flowers, add a patterned frame and paint everything with fluorescent tempera. Let dry and outline everything with a black marker. 

Paste or staple the artworks on coloured construction paper.

vrijdag 15 maart 2024

Tamponing an Easter bunny

 You need:

  1. colored paper
  2. tamponing brushes 
  3. white tempera paint
  4. pencil and color pencils  

A lesson to learn the technique of tamponing with a tamponing brush: do not move the brush back and forth, but stamp. Result will be a softer texture than when using normal brushes.  


No tamponing brushes in school? Give students a cotton ball in a cloth spin. 


Wat moet je doen?
Schets de contouren van een paashaas. Druk zo zacht mogelijk op je potlood, want dikke potloodlijnen blijven zichtbaar onder de witte verf. 
Tamponneer de haas en laat drogen. 
Teken met zwart potlood streepjes rondom.
Versier de tekening eventueel met lentebloemen. 

Alle kunstwerken zijn gemaakt door leerlingen van groep 4. 

Beeldaspecten: nuance, textuur. 


dinsdag 12 maart 2024

Pretty tulip prints


You need:
  1. corrugated cardboard or a cardboard box 
  2. scissors
  3. roller 
  4. blockprint or tempera paint* 
  5. colored or white sheets 
* blockprint dries more slowly and therefore works better than tempera paint. 


With cardboard boxes you can make beautiful prints. These tulips are cut from a cardboard box. 

roll in with block print

Cut a simple tulip from cardboard. Roll them in different colors and print several times on a sheet. Experiment with colors on top of each other and wet in wet. Print the tulips in several heights and let them overlap for a spatial effect. Let dry and stick the art work on a colored sheet. 


Elements of art: space, color, texture. 

donderdag 7 maart 2024

Mix and match with Mondrian

 by students of grade 3

You need:

  1. white sheets 21 by 21 cm
  2. black sheet 23 bij cm
  3. paper strips 3 by 6 cm in yellow, red and blue
  4. black squares 3 by 3 cm
  5. glue
Discuss life and work of Mondrian and the art movement De Stijl.  

I did this lesson in grade 5, students worked in  pairs. The figures are cut  before class. Per art work you need 4 black squares and 16 colored rectangles 


The assignment is:  
  • make a composition of 4 squares, each consisting of 4 colored rectangles and a black square in the middle. Make sure there are no 2 of the same colors next to each other
  • paste the composition on the white sheet, keeping a small white edge visible around each shape. 
  • finally paste the art work on a black surface 
Students from higher groups can measure and cut the figures themselves. 

Difficult assigment and not everyone succeeded! 


Elements of art: shape, color, line. 

dinsdag 5 maart 2024

Grey, like Theo van Doesburg


You need:
  1. white drawing sheet
  2. black construction paper
  3. ruler
  4. charcoal
  5. pencil
  6. glue

Theo van Doesburg (1883-1931) was a Dutch painter, architect and writer. He was charmed by the abstract art of Kandinsky and the cubism of Picasso. In 1917 he founded the magazine De Stijl (The Style), in which he and other artists could publish their innovative ideas. Well-known artists who also belong to De Stijl are Piet Mondriaan, Bart van der Leck and Gerrit Rietveld.

Characteristics of the Stijl artists:

  • use of primary colors and non-colors 
  • horizontal and vertical lines
  • use of geometric shapes 
  • strive for balance and harmony in the artwork

Van Doesburg, Composition 12 - abstraction of a landscape, 1918

In this lesson we discuss an artwork from 1917 that hangs in the Guggenheim New York. No primary colors, but only the non-colors black and white and everything in between.The goal for this lesson is not to copy the work, but to practice the technique of working with charcoal. 

Van Doesburg, Composition in grey, 1919

Look at the painting and discuss what stands out:
  • no color, only non-colors
  • geometric shapes with some rounded corners
  • suggestion of depth: some surfaces appear to rise through the use of light and 
  • dark next to eachother 
  • only horizontal and vertical lines 


How to make your own Van der Leck? 
First practice drawing with charcoal on a scrap. Press hard, soft, wipe. Get to know the material this way.  
Divide the sheet into rectangles using a pencil and ruler. Color with charcoal. Make sure that lines between the rectangles are clearly visible. Create color nuances by pressing harder or softer, rubbing and wiping. 
Stick the work on a black sheet. 

Elements of art: color, nuance, line, shape. 

Artworks made by students of grade 5.

dinsdag 30 mei 2023

A lesson in color theory

 You need:

  1. 4 cards of drawing paper, 10 by 7 cm
  2. pencil
  3. ruler
  4. felt tip pens of color pencils 
  5. black construction paper

Discuss de words primary and secundary colors using the color wheel.  
What are primary colors and why are they called so? What are secondary colors, how do you make them and why are they called so? What are the neutral colors? Discuss the word color nuance

What should you do?
  1. Draw a frame on the cards at 2 mm from the edge using a thin black marker.
  2. Draw a pattern of your choice on each card.
  3. Color the cards according to the terms discussed.
  4. Outline the patterns with a thin black marker.
  5. Stick the cards on a black background.
  6. Add the learned words.
Elements of art: color, line, nuance.

donderdag 25 mei 2023

Selfportrait like Roy Lichtenstein

At our school it's customary to keep artwork at school until the of the school year. Students make a portfolio in june to take their work home. 
On front of it is a drawing in the style of one of the art movements we studied that year. In 2021-2022 it was pop art. 
These are the grade 6 portfolio folders with a self portrait in the style of Roy Lichtenstein. 

You need: 
For the folder: paper A1 size, folded in half
For the drawing

  1. white drawing paper A4 size 
  2. markers
  3. skin color pencils 
  4. fine marker in black
Show artwork of Lichtenstein and discuss the important features: use of primary colors (sometimes with green), grid dots, black outlines, speech bubbles and slogans (onomatopoeia).

contents portfolio folder grade 6

How?
  1. Draw a self portrait on the small sheet. 
  2. Add a text in a speech bubble that suits you. 
  3. Color your face using skin color pencils. Use markers for the rest of your drawing. 
  4. Fill one part of your drawing with dots. 
  5. Fill the background with a pattern. 
  6. Outline everything with a black marker. 
  7. Past e your work on the large sheet. 
  8. Draw in large letters: portfolio + you name + the school year. 

all artworks are made by students of grade 6

    zondag 21 mei 2023

    A field full of daisies

    Made by a student of grade 5

    You need:
    1. white drawing sheet A3 size
    2. tempera paint in blue, green, white, yellow and red
    3. egg boxes or saucers
    4. brushes
    5. jars with water
    6. newspapers
    7. paper towels
    8. coloured paper for background
    Daisies (bellis perennis) are, until it freezes, found in lawns. View pictures of daisies and discuss what they look like. 
    Students start to paint the grass. They have to make their own green colors by mixing blue, white and yellow. Paint the entire sheet with small vertical strokes and let dry.

    Then the daisies can be painted. In the front of the field daisies are larger  then further away. Use a small brush and a lot of paint, to make sure the green grass is really covered with the white paint of the flower. Use a different color green for the stalks or take the unmixed color green directly from the bottle. Paint the hearts of the flowers with big yellow blobs.
    Paste the artwork on a matching background.

    dinsdag 2 mei 2023

    Prisoners in World War II


    You need:
    1. white drawing sheet A4 size
    2. ribbed cardboard
    3. pencil
    4. watercolour paint
    5. brushes
    6. jar with water
    7. black wool 
    8. glue
    In Holland we rembember the victims of World War II on the 4th of May. The 5th of May we celebrate the day of liberation. In schools World War II is an important part of the history lessons. Students are always very interested in this topic.

    "We had to draw one or more people in a concentration camp. Our drawings should show the fear and powerlessness of the prisoners. Most of all did well and the artworks were really beautiful. When the drawing was finished, we had to paint it with watercolour paint, using sad colours. We used black wool to make barbed wire and pasted it in front of the drawing. Finally we pasted the artworks on ribbed cardboard. It was an intense task, and it made us really think about that terrible time."


    Artworks are made by students of grade 6

    Thanks to Sylvia Versteeg

    zaterdag 15 april 2023

    Cherry blossom tree

    You need:

    1. drawing sheet
    2. tempera paint in red and white 
    3. crayons
    4. liquid water color paint
    5. brush
    6. broccoli 

    Step 1
    Draw a tree with crayon.  


    Step 2
    Paint the background with diluted liquid water color paint and let dry.  


    Stap 3
    Stamp blossom with pieces of broccoli.  
     

    Source: www.gluedtomycraftsblog.com 

    donderdag 13 april 2023

    Tulips; spring is coming!

    You need:
    1. a bunch of tulips
    2. vases or glasses
    3. drawing paper A4 size
    4. white crayons
    5. water paint
    6. brushes
    7. jar with water
    8. colored paper for background
    9. glue

    What does a tulip look like? What can you tell about the stem and the leaves? What do the petals look like? 
    Every group gets a vase with some tulips. Students todraw a horizon line about a third from the bottom. 
    Draw tulips with a white crayon. Look carefully at the tulips in the vase. The tulips must overlap.
    Colour them with water paint, the white lines will remain. Paint the lawn and the air. Stick the artwork on a colored background.


    Painting without using your hands


    You need: 

    1. big drawing sheets
    2. brushes
    3. tempera paint
    4. liquid water color paint
    5. tape

    Painting without using your hands is quite a challenge! You can paint with your feet or mouth. We tried both. 

    Painting with your feet
    Put tables aside, newspapers on the floor and stick drawing sheets on top. Very important: take off the shoes in the hallway and leave them there 😀

    Place a container with three colors tempera paint between two students. A beautiful portrait is too much, so ask them to paint simple lines or shapes. 

    Painting with your mouth 
    This is less difficult. Cover the tables with newspapers. Place jars with diluted water color paint and brushes. Students may paint what the want. You may also give them a simple goal: paint rectangles in different colors.