Posts tonen met het label people. Alle posts tonen

donderdag 25 mei 2023

Selfportrait like Roy Lichtenstein

At our school it's customary to keep artwork at school until the of the school year. Students make a portfolio in june to take their work home. 
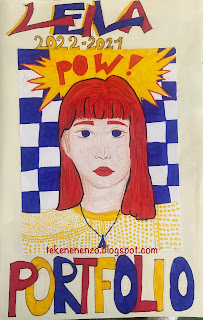
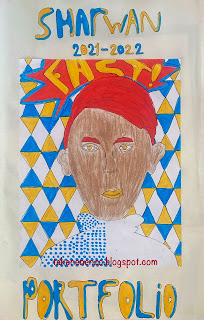
On front of it is a drawing in the style of one of the art movements we studied that year. In 2021-2022 it was pop art. 
These are the grade 6 portfolio folders with a self portrait in the style of Roy Lichtenstein. 

You need: 
For the folder: paper A1 size, folded in half
For the drawing

  1. white drawing paper A4 size 
  2. markers
  3. skin color pencils 
  4. fine marker in black
Show artwork of Lichtenstein and discuss the important features: use of primary colors (sometimes with green), grid dots, black outlines, speech bubbles and slogans (onomatopoeia).

contents portfolio folder grade 6

How?
  1. Draw a self portrait on the small sheet. 
  2. Add a text in a speech bubble that suits you. 
  3. Color your face using skin color pencils. Use markers for the rest of your drawing. 
  4. Fill one part of your drawing with dots. 
  5. Fill the background with a pattern. 
  6. Outline everything with a black marker. 
  7. Past e your work on the large sheet. 
  8. Draw in large letters: portfolio + you name + the school year. 

all artworks are made by students of grade 6

    dinsdag 2 mei 2023

    Prisoners in World War II


    You need:
    1. white drawing sheet A4 size
    2. ribbed cardboard
    3. pencil
    4. watercolour paint
    5. brushes
    6. jar with water
    7. black wool 
    8. glue
    In Holland we rembember the victims of World War II on the 4th of May. The 5th of May we celebrate the day of liberation. In schools World War II is an important part of the history lessons. Students are always very interested in this topic.

    "We had to draw one or more people in a concentration camp. Our drawings should show the fear and powerlessness of the prisoners. Most of all did well and the artworks were really beautiful. When the drawing was finished, we had to paint it with watercolour paint, using sad colours. We used black wool to make barbed wire and pasted it in front of the drawing. Finally we pasted the artworks on ribbed cardboard. It was an intense task, and it made us really think about that terrible time."


    Artworks are made by students of grade 6

    Thanks to Sylvia Versteeg

    dinsdag 28 maart 2023

    Athletes in motion


    You need:

    1. colored construction paper
    2. white drawing sheet 
    3. paperclips
    4. scissors
    5. cutting mat and cutting knife
    6. glue
    7. marker
    8. photo of an athlete 
    Print a silhouette of an athlete. Put the colored sheets together with the printed athlete on top. Fix with paper clips. 
    Cut out the athlete, and the colored sheets at the same time. Keep moving the paperclips to be sure the four sheets stay together. Use a cutting knife for areas the scissors can't reach.
    Make a composition that suggests movement and stick the athletes on the white sheet. Use an marker to fill the background with patterns. 


    Thanks to A faithfull attempt for this great lesson. 

    dinsdag 26 oktober 2021

    Wire portrait like Alexander Calder

    made by teacher Wouter 

    During a study day on art education our teachers made portraits of wire. This can also be done in higher grades. If you want to make wire figures in lower grades, then choose a simpler shape, for example fruit/veggies or an animal. 

    This activity can be done in a lesson about Alexander Calder, known for his wire portraits and mobiles. 

    You need:

    1. 3 meters wire thickness 1,3 mm
    2. wire cutter
    3. printed selfie 30 by 40 cm
    4. black marker
    5. painters tape

    Take a picture of yourself and print it. 

    Outline your face, eyes, nose, mouth and hair using the black marker. Turn the sheet over, the lines can be seen on the back of it now.  

    Wrap 3 m of wire around your fingers into a bunch. 

    Start at the neck. Lay the wire flat on the photo and follow the lines of your face. Try to lay out the portrait without cutting the wire. If this doesn't work out, you may smuggle by cutting the wire and go on with a new piece. Give the portrait more strength by doubling the wire on some places. Stick the wire now and then on the photo with painters tape. 

    Finished? Remove the pieces of tape. Fix the places where wire comes up by making connections with small pieces of wire. See detail photo.  

    outline photo with marker

    turn over, marker lines have been pushed through

    follow the outlines with wire, stick with tape

    make stronger

    artworks on the table

    hang up for beautiful shadows on the wall   

    donderdag 21 januari 2021

    Covid haircut


    made by a student of grade 5

    You need:

    1. white drawing sheet 
    2. pencil
    3. color pencils
    Hairdressers have been closed for a while because of the epidemic …. what consequences does that have? 


    How do you look now? Or your parents? Or a famous person? 

    Assignment: 
    Draw a portrait of yourself or someone else with a Covid haircut. 
    Choose which materials you use and whether you draw in black and white or in color.  
    Difficult to draw a portrait? No, watch this video about face proportions. 

    Beeldaspecten: vorm, lijn, ruimte. 

    woensdag 12 augustus 2020

    Life-size Keith Haring groupwork


    Show Haring's works and discuss them: 
    • comic like people
    • few details
    • thick black outlines
    • bright colors
    • dashes that indicate movement 
    You need:
    1. life-size drawing sheets.
    2. tempera paint
    3. brushes grote vellen schetspapier 
    Paste drawing sheets together. There must fit a child on it. 
    Make groups of 4 students. Trace one student of each group using a black marker.


     Students paint the traced figure in one color. Fill the rest of the sheet with patterns in black paint. 


    donderdag 9 mei 2019

    Picture book illustration


    Students of grade 6 made this illustration. After a good study of the original illustration in a Dutch picturebook, they made a list of required materials to use for this artwork. The faces and arms are painted, the clothes and curtains are cut out of fabric, the wallpaper comes from a sample book for wallpaper and the flags are from scraps of paper.


    zaterdag 12 januari 2019

    Cat on head - like Corneille


    Made by a student of grade 3
    You need:
    1. drawing sheet A3 size
    2. oil pastels
    3. liquid watercolor paint
    4. brushes
    Corneille painted often cats, birds and women. There are some paintings where he painted the cat on the head of a woman!
    Show Corneille paintings on the digital board or use google: 'Corneille woman cat'.

    Who of you has a cat at home? Does it ever lie with you? Does your cat ever lie on your head?
    Look at these artworks. What do you see? Why would the painter left the cat's eyes white?  Do the women on the paintings have hair? 

    Draw a head on your sheet with oilpastel (dark color). Maybe your own head, but you may choose another head too. Draw a cat sitting, standing or lying down on the head. The cat looks like hair! What hairstyle it is, had to do with the position of the cat. 
    Color your drawing with bright colors. Trace the outlines with a dark color if necessary and paint the background with liquid watercolor paint. 

    Made by a student of grade 3

    There are more lessons about Corneille on this blog! Use the search function. 

    woensdag 12 september 2018

    Portfolio: Bad Hair Day

    You need:
    1. white sheets
    2. liquid watercolor paint
    3. straws
    4. oil pastel crayons
    How to draw a face? We used the website Wikihow. Students draw their own face on a large white sheet and color it with oil pastels. Drop liquid water color in several colors above the head and blow it in different directions using straws. 


    On the photo our proud third grade students with their portfolio's in which we collected all the artwork of this school year.

    dinsdag 14 juni 2016

    Olympic athletes

    You need:
    1. scissors
    2. glue
    3. white drawing paper A1 size
    4. cardboard in Olympic colors
    5. compasses
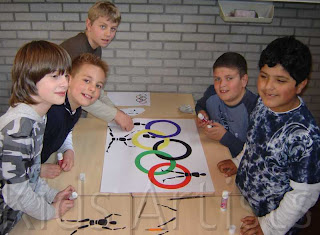
    Start this lesson with the symbol of the Olympics: the colored rings. What do these rings mean? What colors do they have? How are they placed together? Ask one or two children to take the position of an athlete. What is the position of the legs, arms and body? Ask another student to show another position and discuss it again.
    This is a group work for five students. Every group gets a big white sheet, five sheets of colored cardboard (in the colors of the rings: black, yellow, red, blue and green) and at least five copies of the athlete.
    Step one: each group member cuts an Olympic ring, using compasses and scissors. Paste this five rings on the big white sheet. Look carefully which ring has to be pasted in front or back, and which ones have to be pasted through each other. Be sure the little cutting line is pasted underneath another ring.

      Step two: Every student takes a copy of the body and cuts every part of it. Then these bodyparts have to be pasted around, in, behind and in front of the Olympic rings.

    zaterdag 19 oktober 2013

    The man with the big mouth - Paul Klee


    Made by a student of grade 3

    Benodigdheden:
    1. drawing sheet A2 size
    2. brushes
    3. tempera paint
    4. pencil
    5. black marker
    6. scissors
    7. glue
    8. coloured wallpaper
    Paul Klee (1879 – 1940) is a German/Swiss painter. His work belongs to modern art. Klee developed mainly as an autodidact and left more than 9000 artworks. In 1912 he saw the work of Picasso and Malevich and met Robert Delaunay, who believed colour is the most important element in a painting. After a trip to Tunisia in 1914 Klee started to paint more colorful and abstract. He painted landscapes, portraits, animals, mythology, mysterious machines. In his work he combined abstract and figurative shapes. Klee 's work cannot be described in one single word. Surrealism, cubism, abstraction are terms which are applicable to his paintings. He is classified by expressionism. (Source: Wikipedia)

    Show the painting 'The man with the big mouth' on the digital board. Write 'yes' on the left and 'no' on the rigth. Type the following sentences on the board:
    • He has a big mouth
    • His nose is exactly as long as his chin
    • He has curls
    • He can smell good
    • He is afraid
    • His nose looks like a knife
    • The eyes are blue
    • He doesn't seem nice
    • He looks pissed off
    • He has no ears
    • He has white teeth
    • His face is composed of puzzle pieces
    • The colours are bleak
    • I only see bright colors
    Have students drag the sentences one by one to the right spot.

    The students draw a face from the side. The nose has to be as long as the chin. Draw two eyes. Divide the face in surfaces. Colour each part with tempera using only mixed colours just like Paul Klee did. Only the eyes should be painted in clear blue.
    Wait until the work is dry and outline all color patches with a black marker. Cut and paste the artwork on a coloured piece of wallpaper.

    This project was done in grade 3/4. For higher grades: draw the face with only one line, so without lifting the pencil.

     Door Zahra, groep 5

    Source : Paul Klee voor kinderen, by Birgit Brandenburg 

    maandag 7 oktober 2013

    Singing in the rain

    Artwork made by a student of grade 1
    You need:
    1. white drawing sheetA2 size
    2. crayons
    3. liquid watercolour
    4. brush
    Students draw a person under an umbrella and colour it in with crayons. Then they draw raindrops with white crayon. Paint the entire drawing with liquid watercolour.

    Be sure that:
    • rain falls from top to bottom;)
    • under the umbrella is no rain
    • rain is transparent, so we draw with white on white!
    • rain forms puddles on the ground

    donderdag 5 september 2013

    Eyecatcher


    You need:

    1. drawing sheet A5 size
    2. colour pencils

    See each other's eyes. What components does an eye have? How is the shape of an eye? What colours do you see in the iris? How can you do this in a drawing? What is characteristic for the pupil? How can you draw the highlight in the eyes? 
    See videos on YouTube, How to draw an eye / How to draw eyes.

    Kids drawing one eye and colour it in with colour pencil. Wipe the colors with your fingers to mix them. Accents can be applied with a black fineliner. 

    Artworks are made by students of grade 7. 

    dinsdag 14 mei 2013

    Cubist portrait like Pablo Picasso


    You need:
    1.  blue or brown construction paper A4 size
    2. oilpastel crayons
    3. white chalk pastel
    Show some cubistic works of Picasso on the digital board. What do you see? What does the face look like? What happened with eyes and noses? From what point of view do you see the facial parts?

    Artworks made by students of grade 6

    Students draw with white chalk pastel a portrait in cubistic style. This means eyes or nose or mouth should be drawn from another point of view.
    Divide face and hair in several parts. Colour them with oilpastels. Outline face, hair and facial parts with black. Outline the facial parts, face and hairline with black.
     

    zondag 10 maart 2013

    Salvador Dali's mustache


    You need:
    1. drawing sheet A3 size
    2. oil pastel crayons
    3. pencil 
    4. black marker 
    5. pipe cleaner 
    More information about Salvador Dalí, see the lesson High legged elephant in the style of Salvador Dali.

    Show some surrealistic artworks of Dali and discuss the surreliastic parts of it.  Show The melting clocks. Discuss the shape of the clockes. What happened to these clocks? Are these clocks that you can hang on the wall? Why not? Why do we call this surreal?

    Using a step by step method, the students draw a face. I opted for the method of WikiHow. Interchange in this method step 1 and 2 by folding the sheet in four parts and then draw an egg shale according to the measures in the figure below. Then continue following the steps on WikiHow.
    This is the face of Dali. Draw some melting clocks around it. Draw also some half ones on the edged of the sheet.

    The clocks and face have to remain white. Colour the background with warm colors and the clothes of Dali with cold colours (or vice versa).
    Outline the clocks and face with black oil pastel. Use a black marker for the numbers and hands of the clock and the parts of the face. Colour the iris of the eyes with a bright colour.

    Pierce two holes under the nose and put a piece of pipe cleaner through them. Bend it into a nice mustache. Sign your artwork with your own name. Put the name Dali with a small mustache anywhere at work.


    Artworks made by students of grade 4

    Thanks to Anne Farell from Use your coloured pencils who gave me the idea of the pipecleaner mustache! 

    vrijdag 15 februari 2013

    Catching snowflakes


    Made by students of grade 4
    You need:
    1. blue construction paper
    2. oilpastel crayons
    3. fiberfill 
    4. glue 
    I don't know who was the first that posted this lesson ...Who do I link? Artsonia, Pinterest? However, it came across all art blogs lately! 

    It's snowing! Look up and try to catch snowflakes with you tongue! What does your face look like when you look up?
    Draw a child in a cheerful winter sweater. Colour with oil pastels. Outline with black. Paste a piece of fiberfill on the tongue, and do not forget to draw the snowflakes.

    (Source: Artsonia/Pinterest)

    zondag 26 augustus 2012

    Turning around with Keith Haring


    You need:
    1. drawing sheets 20 by 20 cm
    2. pencil
    3. markers
    4. coloured contruction paper 
    5. glue
    I found this lesson on Pinterest, it's originally from DaVinci's Wings.
    Show artwork of Keith Haring (1958-1990) and talk about the characteristics of his work:
     
    people are drawn as in cartoons
    fewdetails
    thick black lines and contours
    bright colors
    • dashes indicate movement
    Students draw figures in Keith Haring style. The sheet must be filled completely and also rotatably: the figures are not all the same way, but are crisscrossing the drawing. Furthermore, also figures on the edge of the sheet, to make the drawing more exciting (what happens beyond the edges?)
    All figures have to be coloured with marker; choose just one colour. Outline with a black fineliner and then add motion dashes.
    Paste work on construction paper that is the same color as the marker colour.

    See also my other lessons about Keith Haring:
     
    Artworks made by students of grade 4

    maandag 5 september 2011

    Swimmer - like David Hockney


    I found this terrific lesson on the blog 'Use your coloured pencils' of Anne Farrell. I used this lesson to tell about artist David Hockney and his swimming pool paintings.

    You need:
    1. white drawing sheet A4 size
    2. coloured paper for background 
    3. oil pastels
    4. liquid water colour, blue and green
    5. brush
    6. jar with water
    The successful British artist David Hockney was born in 1937 in Bradford, England. He studied at the Royal Academy in London. His first works were anecdotal and ironic. In 1964 Hockney moved to California, where he developed a more realistic way of painting. The main themes at this time, are pools, landscapes and portraits.
    From 1966 David Hockney increasingly used photographs for his paintings. He made ​​collages containing just photographs. After 1980, Hockney's work became a more expressionistic character. His work shows influences of Picasso Besides paintings, Hockney also makes drawings and etchings. 

    Look at artwork of David Hockney, especially those with swimming pools. Discuss with the students how people look like under water - flowing hair, lighter skinWhat causes the shimmering
    surfaces on the water and what do they look like?
    The students draw one or more people in swimsuits and colour them with oil pastels. Use white oil pastel to draw a water pattern in the background, consisting of wavy horizontal, vertical and diagonal lines.
    Paint the picture with blue and/or green diluted coloured ink. The swimmers and the white lines will not resist the ink.
    Artworks made by students of grade 4

    vrijdag 8 juli 2011

    Portrait of your schoolmate

     
    Made by students of grade 5
      
    You need:
    1. drawing paper A4 size
    2. colour pencils
    3. watercolour paint
    4. brushes
    5. coloured ribbed cardboard
    6. stapler
    After an instruction about proportions of a head, students draw their classmate who is sitting in front of him. The portraits are coloured with colour pencils, the background is painted with watercolour paint. The frames are made from coloured ribbed cardboard strips.