Posts tonen met het label perspective. Alle posts tonen

vrijdag 18 maart 2022

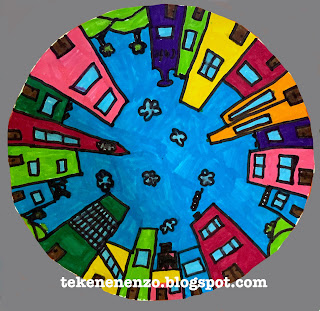
Circle City


You need: 

  1. white drawing sheet
  2. compass
  3. ruler
  4. pencil
  5. markers
  6. colored sheet
  7. glue

Explain the one-point perspective: objects that are further away appear smaller. If we draw a street towards the horizon, it narrows and trees get smaller. 

In one-point perspective you draw all lines parallel to the viewing direction to one point. You literally put a dot on the horizon. 

What to do? 

  • Draw a circle of 20 cm in diameter using the compass. Mark the hole in the center with a dot.  
  • Draw lines form the edges of the circle to the dot in the middle, using ruler and pencil. 
  • Draw buildings in different heights using the lines.  Draw doors and windows. 
  • Color with markers. Outline everything with a fine black marker. 
  • Cut the circle and stick it on a colored sheet. 

Art work made by students of grade 4. 

dinsdag 30 oktober 2012

Lost in the hall, a lesson about surrealism and perspective

Made by a student of grade 6

Thanks to Phyl, who originally posted this lesson. You can find hers here!

You need:
  1. white drawing sheet 24 by 24 cm
  2. ruler
  3. pencil
  4. watercolour paint
  5. brushes
  6. jar with water
  7. magazines
  8. scissors and glue
  9. rubber foam
Show some surrealistic artwork from Dali and discuss about the salient features  surrealism.

Follow the first two steps of this lesson through direct instruction: the students follow the instructions the teacher gives.

Step 1
Draw two diagonal lines. Draw a square of 8 by 8 cm around the middle point. Draw around the square dots every 1 cm. Draw on the outside edges of the sheet dots with 3 cm between them.


Step 2
Connect the opposite dots by drawing lines. Draw on the diagonal lines dots with 2 cm between them. Connect the dots. 


Step 3
Colour walls, floor and cealing with watercolor. Always select two colours together and keep both walls equal in color.

Step 4
Cut some squares on three sides apart, fold the paper and paste a picture from a magazine behind.

Step 5
Cut two human figures out of foam and paste them as if they are floating in space.


zaterdag 18 februari 2012

Patchwork landscape

By a student of grade 3.
You need:
  1. white drawing sheets
  2. tempera paint
  3. brushes
This is an easy lesson in perspective for younger students. Talk about perspective and show the picture of the disappearing railway.
Do a step by step guide on the blackboard to make this drawing:


1. Put the sheet in the width for you.
2. Draw a wavy line on 2/3 of the bottom.
3. Place a dot in the middle on the top of the sheet.
4. Draw lines with a ruler from the bottom and sides of the sheet to the dot.
5. Divide the strips in squares.
6. Draw houses and trees on the horizon line.


After this the students can finish their artwork independently. Paint the squares all different and use different patterns. Stpale or paste the artwork on a coloured background.

vrijdag 13 mei 2011

MOMA

Made by Debbie, grade 6
You need:
  1. drawing sheet A4 size
  2. colour pencils
  3. ruler
A lesson about drawing one point perspective.

Students draw a square in the middle of their sheet and draw four lines from the corners to the middle, see schedule. These are the floor and ceiling lines. Draw two lines from both short sides to the middle. Between these two lines the paintings has to be drawn. Draw lines from the bottom to the middle for tiles or parquet.
It's nice to draw artworks that students have made this schoolyear or to choose for artworks of famous painters.
Colour with colour pencils.