Showing posts with label crayons. Show all posts

Wednesday, March 18, 2026

April showers will bring us flowers

What do you need?
  1. white drawing sheet
  2. water color paint
  3. ruler
  4. white crayon 
  5. paint brush
  6. water
Before
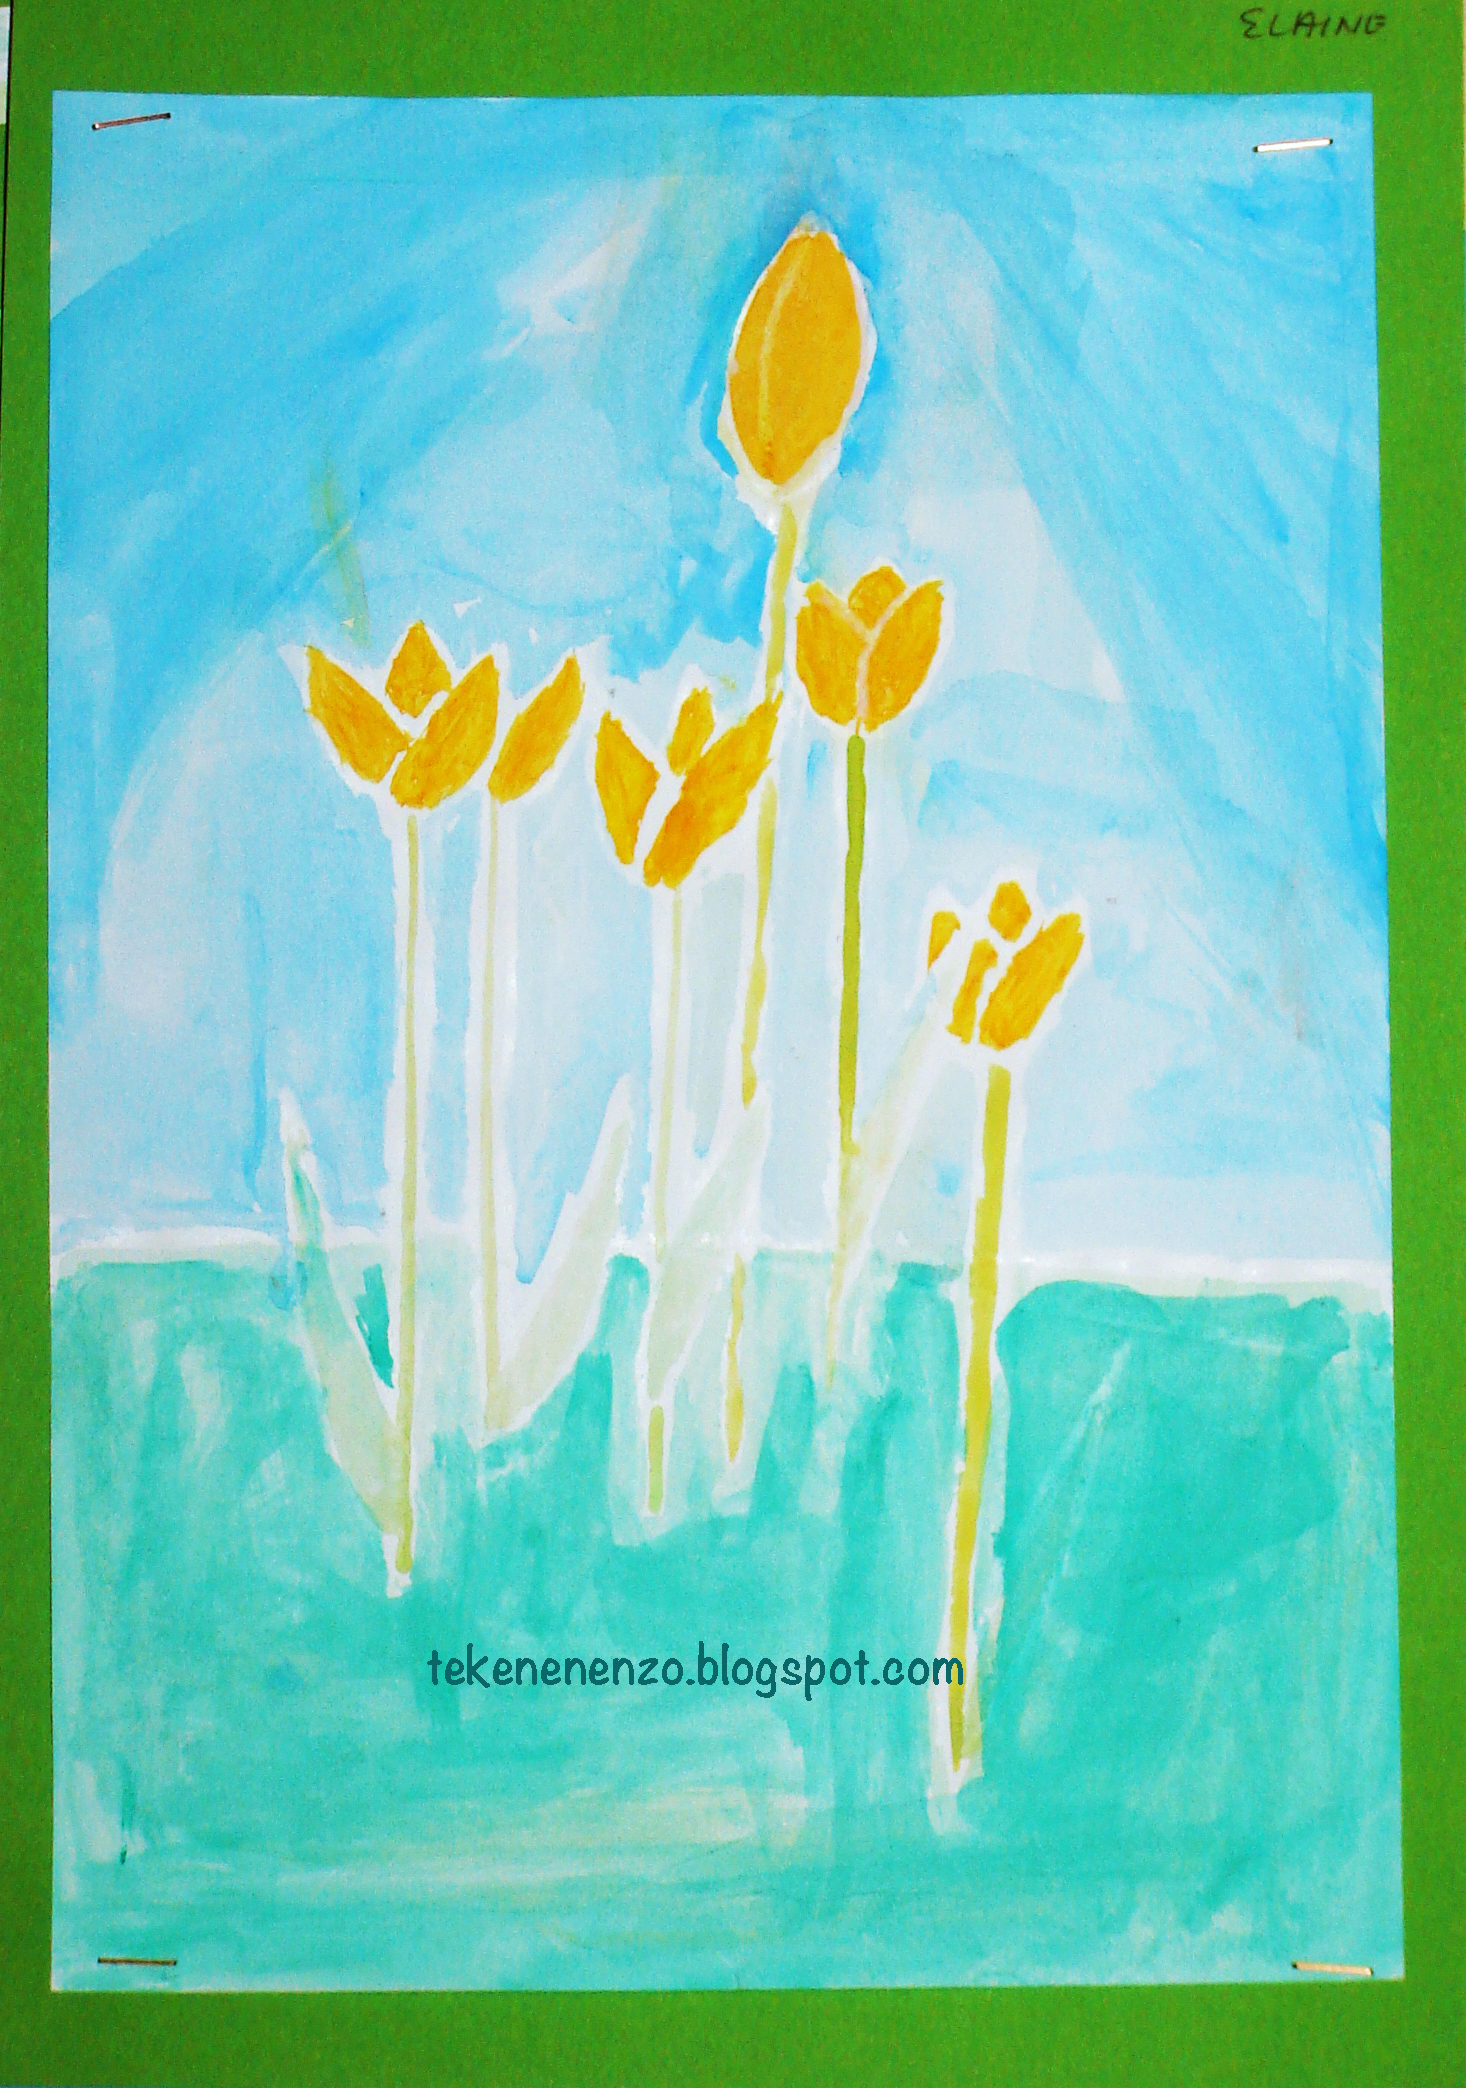
Dutch weather in spring is a weather type with showers, alternated with sunny periods. We call those typical spring showers 'Maartse buien' (March Showers), while English meteorologists speak about 'April showers who bring us flowers'. 
In this lesson students have to draw spring flowers (tulips, daffodils etc.) during a rain shower.
 
What should you do?
  1. Sketch some spring flowers on a white sheet. Make sure your lines are extremely thin. 
  2. Draw vertical lines with one centimeter between them using a ruler and a white crayon. Make sure your crayon has a sharp point. 
  3. Paint your drawing with diluted watercolor paint. Use a lot of water to make bright colors. The crayon will resist the water paint, so your shower will be very clear!


Wednesday, January 28, 2026

Patterned hearts

What do you need?
  • drawing sheet 
  • crayons
  • liquid water color
  • brush

What should you do?

  1. Fold the sheet into 4 rectangles. 
  2. Cut a heart out of a piece cardboard. 
  3. Trace it four times with a pencil. 
  4. Draw patterns in the hearts with crayons: stripes, circles, zigzag lines etc. Draw different patterns around the hearts.
  5. Paint the sheet with liquid watercolor. The crayon will resist the ink.

Saturday, January 3, 2026

Snowmen mandala


What do you need?
  • white drawing sheet 
  • compasses
  • scissors 
  • crayons or oil pastels 
  • indian ink
  • brush

What should you do?

Step 1
  1. Draw a circle with a diameter of 20 cm. 
  2. Draw within about 1 cm another circle (the edge of the mandala). 
  3. Cut out and fold into 8 pieces. 
  4. Draw against one of the folds half of a snowman using black oil pastel/crayon.
  5. Fold the sheet and press firmly with your hands to get a print of the snowman on the other side of the fold. 
  6. Trace this half with black oil pastel/crayon.
  7. Repeat this and draw the other three snowmen. 
  8. Color the snowmen and background. 
  9. Make sure the snowmen are really colored white, otherwise they will turn completely black with ink after step 2.
  10. Color the edge with a nice pattern.
Step 2
  1. Crumple the picture into a ball. 
  2. Make flat again. 
  3. Paint the entire drawing with indian ink. Rinse the ink immediately after it in the sink. 
  4. Let dry. The ink will rest in the folds and create a great antique effect.
  5. Cut the circle and paste it on a colored background. 
Drawings made by students of grade 6. 
This lesson is a variaton on 'Autumn leaves mandala'

Tuesday, December 30, 2025

Happy new year


What do you need? 
  • white drawing sheet 
  • blue liquid water color paint 
  • brush
  • crayons
  • black construction paper
  • leftovers of yellow and orange paper
  • yellow chalk pastel

What should you do? 
  1. Draw fireworks with crayons on a white sheet. 
  2. Paint the whole sheet with blue liquid water color paint. 
  3. Let dry.
  4. Cut a skyline out of half a sheet of black paper. 
  5. Paste the skyline on the blue sheet. 
  6. Cut windows from yellow or orange paper.
  7. Draw a yellow chalk line on the roofs and smudge it.   
Works of art made by students of grade 3, 4 and 5.

Wednesday, December 24, 2025

Winter tree in warm-cool colors

 What do you need?

  • drawing paper
  • crayons
  • watercolor paint
  • black tempera 
  • brushes
  • jar with water
What should you do?
  1. With crayon: draw a horizon line.
  2. Draw a tree trunk from the bottom of the sheet. 
  3. Draw branches that touch the edges of the sheet. 
  4. Draw a pattern in the landscape below the horizon line. 
  5. With watercolor paint: paint the sky. 
  6. Paint the surfaces between the branches in warm or cool colors. 
  7. Paint the surfaces in the landscape: warm if you first chose cool, cool if you first chose warm. 
  8. With tempera: paint the branches and trunk black. 
Works of art made by students of grade 4.
Elements of art: color (warm and cool), space, line (pattern)

Friday, November 21, 2025

Scratch a Christmas ball

What do you need?
  • drawing sheet
  • oil pastels or crayons
  • black tempera paint 
  • brush
  • aluminium foil 
  • ribbon
  • toothpick or skewer
What should you do?
  1. Color the sheet with crayons. 
  2. Paint it over with black tempera paint and let dry. 
  3. Scratch with a toothpick a Christmas ball and fill it with patterns. 
  4. Cut a small piece of aluminium foil and paste it on the ball with a folded ribbon under it. 
Works of art made by students of grade 6.
Elements of art: line (pattern)

Friday, October 17, 2025

Autumn leaves with tissue paper

What do you need?
  • white drawing sheet
  • tissue paper in autumn colors
  • brush
  • jar with water
  • white crayons
Before
Look at different shapes of autumn leaves. Discuss shapes and colors. 

What should you do?
  1. Draw different leaves on the sheet with white crayon. 
  2. Tear parts of tissue paper (not too small) in autumn colors. 
  3. Stick the pieces by wetting the sheet part by part and laying them in it. Watch out: no two same colour pieces next to each other. Be sure the tissue paper is wet enough to bleed.

   4. Let the artwork dry a little. 
   5. When it's still moist a bit, pull of the tissue paper. You can use tweezers           to avoid colored fingers! 

Works of art made by students of grade 3. 

Thursday, April 13, 2023

Tulips; spring is coming!

You need:
  1. a bunch of tulips
  2. vases or glasses
  3. drawing paper A4 size
  4. white crayons
  5. water paint
  6. brushes
  7. jar with water
  8. colored paper for background
  9. glue

What does a tulip look like? What can you tell about the stem and the leaves? What do the petals look like? 
Every group gets a vase with some tulips. Students todraw a horizon line about a third from the bottom. 
Draw tulips with a white crayon. Look carefully at the tulips in the vase. The tulips must overlap.
Colour them with water paint, the white lines will remain. Paint the lawn and the air. Stick the artwork on a colored background.


Thursday, September 15, 2022

Patchwork landscape

by a student of grade 4
 You need:

  1. white drawing sheets
  2. water color paint
  3. brushes
  4. jar with water
  5. crayons
Steps:
  1.  Put the sheet in width for you.
  2.  Draw a wavy line on 2/3 of the bottom using a crayon.
  3. Divide this area in 12 of 15 surfaces by drawing 2 horizontal and 3 o4 r vertical lines. 
  4. Draw with a crayon house and trees on the horizon line.
  5. Draw patterns in the surfaces.
  6. Paint the surfaces in differtent colors.  
  7. Paint house, trees and  air. 
With this lesson you can also practice one-point perspective. Place a dot in the middle from the top of the sheet and draw vertical lines towards this dot. 


bij a student of grade 4


Sunday, November 8, 2020

Same insect - different colors


made by student of grade 1

You need:
  1. drawing sheets A5 size
  2. crayons
  3. liquid watercolor paint 
  4. brush
Draw two the same insects and color them with crayons: one with cool colors, the other with warm colors. 
Paint the background with dilluted watercolor paint: warm colors for the 'warm' insect, cool colors for the 'cool' insect. 


Element of art: color.

Friday, April 29, 2016

Birdies on a branch

Made by a student of grade 1

You need:
  1. liquid water color paint
  2. brushes
  3. crayons
  4. white sheet
  5. feathers
  6. glue
Draw a branch with some birdies on it. Their eyes should be big and white! Color the birds with crayons using bright colors. Paint the branch and background with water color paint. Let dry. Draw feet and paste feathers. 

Monday, April 11, 2016

Funny houses like James Rizzi


Made by Kalen, grade 4

You need:
  1. white drawing sheet
  2. crayons 
  3. liquid watercolor paint
  4. brushes
  5. jars with water 
James Rizzi was born in 1950 in Brooklyn. He studied art in Florida, where he started experimenting with printing, painting and sculpting. Rizzi’s work often shows his birthplace New York. His paintings look sometimes childishly naive, with the bright colors and brilliant gaiety. In the art press Rizzi is often described as "Urban Primitive Artist '. Rizzi himself says he is influenced by Picasso, Klee and Dubuffet.

Made bij Jade, grade 4

Show some paintings of Rizzi and discuss the characteristics:
  • bright colours
  • no gradations within colours
  • evertything is outlined with black
  • houses have human faces/characteristics
  • the artwork is full and busy
  • background is full too
Students use a dark color crayon to draw a house in Rizzi style, a house with human characteristics like hair, mouth, eyes etc. 
Paint with liquid water color paint.

Monday, October 7, 2013

Singing in the rain

Artwork made by a student of grade 1
You need:
  1. white drawing sheetA2 size
  2. crayons
  3. liquid watercolour
  4. brush
Students draw a person under an umbrella and colour it in with crayons. Then they draw raindrops with white crayon. Paint the entire drawing with liquid watercolour.

Be sure that:
  • rain falls from top to bottom;)
  • under the umbrella is no rain
  • rain is transparent, so we draw with white on white!
  • rain forms puddles on the ground

Tuesday, October 1, 2013

One colour city - group work like Alisa Burke

You need:
  1. drawing sheet A1 size
  2. drawing sheets 10 by 20 cm (A4 size cut in three) 
  3. various colouring materials: crayons, oilpastel, colour pencils, watercolour paint, markers, tempera etc. 
  4. fine black marker 
  5. liquid water colour paint 
  6. big brush
  7. scissors
  8. glue
An artwork I came across on Pinterest from Alisa Burke was the inspirations for this lesson. Show Burke's work and discuss it: all houses in the same colour, windows are white, everything is outlined with black marker, houses uizen hebben één kleur, de ramen zijn wit, alles is zwart omrand, the houses aren't just next to each other but behind each other and (overlap). That means you cannot see the bottom of the houses that are not on the first row. 

Students form groups of four and discuss together the colour they'll choose. One of the students paints the background: use white crayon to draw stars or clouds and then paint the entire sheet with with liquid watercolor. Leave about one inch white along the edges.

On the smaller sheets students draw high houses, with windows and doors and decorations. Colour with the material of you choice. Outline the house and windows with black fineliner and cut it out. Be sure the group draw together about 15 houses.
Lay the painted houses on the large sheet to get a beautiful collage. Note that you do not see undersides of the houses that are not in the front row.

Made by students of grade 5/6

Sunday, August 25, 2013

Busy bees


You need:
  1. white crayon
  2. markers
  3. liquid watercolour paint
  4. brush
Fold the sheet of paper in half. Draw on both halves a bee. Colour the body with black and yellow marker. Colour the head black, keeping two white dots for eyes. Draw with black marker six legs and two wings. Use white crayon to draw veins in the wings.
Paint the background and the wings with liquid watercolour while keeping the edges white for about one cm.

Made by students of grade 3/4
Source: Artsonia. 

Monday, June 25, 2012

Sailing into summer

You need:
  1. white drawing sheet A4 size
  2. pencil
  3. water colour paint
  4. crayons
  5. brushes
  6. jar with water
Draw a horizon line on the half of the sheet using a green crayon. Draw above a green wavy line, these art the bushes. Draw with pencil two sail boats in the water. Colour them with crayons in bright colors. Draw clouds in the sky using a white crayon and colour them white. Draw waves with white crayon in the water. Paint the sky, bushes and water using water colour paint with plenty of water.   The crayons will resist the paint so that clouds and waves become visible again.

Saturday, January 14, 2012

A journey through space


You need:
  1. white drawing paper A5 size
  2. crayons
  3. black paint
  4. brush
  5. toothpick
  6. coloured construction paper
As part of a school project about the Dutch astronaut André Kuipers and his space journey, students scratched these drawings.
Colour the entire drawing sheet with crayons. Choose the colours you want, but don't use black or white. Then Paint the entire sheet black and let dry. Scratch a space scene with a toothpick. Paste the artwork on a coloured background.

All artworks are made by students of grade 3

Thursday, September 15, 2011

Peaks and valleys

Made by a student of grade 2

You need:
  1. drawing sheet A4 size
  2. crayons in bright colours
  3. watercolour paint
  4. brushes
  5. jar with water
Discuss with the students the difference between hills and mountains. When do we call something a mountain, when a hill? What does the top of hills look like? And what about the top of a mountain - this can be a sharp point or eroded and round, depending on the age of the mountain. 

Show students step by step how to draw a landscape with hills and mountains. Start with two wave lines Start with two wavy lines on the bottom of the drawing sheet. Draw diagonal lines down from the lowest points. Draw some high mountain peeks behind the hilss and draw a sun behind the peeks.


Fill the mountains and hills with patterns. Use crayons in bright colours. Each mountain should have its own pattern. Paint the mountains and the sky with watercolour paint. Patterns and lines will resist the watery paint.

Sunday, August 21, 2011

Sunflowers in five different materials

You need:
  1. sunflowers or pictures of them
  2. white drawing sheet A1 size, cut in strips of 30 by 65 cm
  3. five different colouring materials, like colour pencils, tempera paint, watercolour paint, oil pastels, crayons, coloured ink, aquarell pencils etc.
  4. brushes
  5. pencil, ruler
  6. coloured paper
  7. scissors
Look with the students at some sunflowers or pictures of them. How thick is the stem, what can you tell about the leaves, how are the petals divided, what colours do you see in the heart of the flower, etc.

Divide the sheet with thin lines into five strips of 13 cm high. Draw some sunflowers. Make sure the flowers themselves are drawn at the demarcation of the strips. Make sure too that in each compartment at least half a sunflower or leave is drawn.
Choose five different colour materials. Use in every compartment a different material. Consider yourself the order of the materials, for example from bright (markers) to less bright (aquarelle pencils).
Paste the work on a coloured background. Or cut the five compartments and paste them with some space between on a coloured background.
Made by students of grade 5

Sunday, August 14, 2011

African adire

Made by a student of grade 4
You need:
  1. white drawing paper A4 size
  2. crayons
  3. liquid watercolour
  4. brush
  5. ruler
  6. pencil
Yoruba women in Nigeria make a type of resist-dyed cloth that they call adire. They make some adire by folding, tying, and/or stitching cloth with raffia before dyeing. This is called adire oniko, after the word for raffia, iko. They also make another type, adire eleko, by painting or stenciling designs on the cloth with starch. Both types are dyed in indigo, a natural blue dye.
The dye-resistant starch can be either painted freehand or stenciled onto the fabric. When freehand painting, the artist usually paints a grid of squares or rectangles onto the fabric first. Then she fills these squares with geometric and representational motifs.
Stenciled patterns are even more diverse. New motifs, both geometric and representational, are constantly being created. They can include everything from simple shapes to elephants, keys, letters, and skyscrapers. The metal stencils are made by men, who sell them to the female adire artists.

Show some pictures of african adire and discuss them. Show African symbols and talk about their meanings.

Students use pencil and ruler to divide their sheets in squares of 5 by 5 cm. Draw with a yellow or white crayon symbols and/or patterns in these squares. Paint the sheet using coloured ink.