Posts tonen met het label portraits. Alle posts tonen

donderdag 25 mei 2023

Selfportrait like Roy Lichtenstein

At our school it's customary to keep artwork at school until the of the school year. Students make a portfolio in june to take their work home. 
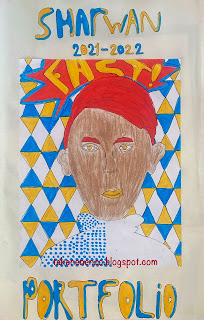
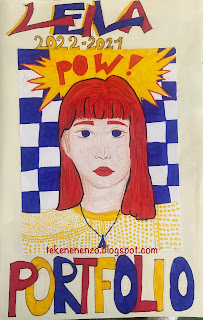
On front of it is a drawing in the style of one of the art movements we studied that year. In 2021-2022 it was pop art. 
These are the grade 6 portfolio folders with a self portrait in the style of Roy Lichtenstein. 

You need: 
For the folder: paper A1 size, folded in half
For the drawing

  1. white drawing paper A4 size 
  2. markers
  3. skin color pencils 
  4. fine marker in black
Show artwork of Lichtenstein and discuss the important features: use of primary colors (sometimes with green), grid dots, black outlines, speech bubbles and slogans (onomatopoeia).

contents portfolio folder grade 6

How?
  1. Draw a self portrait on the small sheet. 
  2. Add a text in a speech bubble that suits you. 
  3. Color your face using skin color pencils. Use markers for the rest of your drawing. 
  4. Fill one part of your drawing with dots. 
  5. Fill the background with a pattern. 
  6. Outline everything with a black marker. 
  7. Past e your work on the large sheet. 
  8. Draw in large letters: portfolio + you name + the school year. 

all artworks are made by students of grade 6

    vrijdag 3 februari 2023

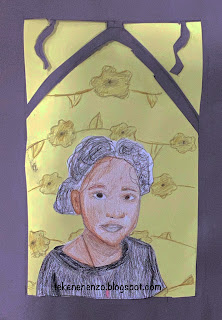
    Self portrait like Alphonse Mucha


    You need:
    1. portrait photo of yourself
    2. white drawing sheet
    3. brown and grey construction paper
    4. color pencil
    5. gold pencil
    6. scissors
    7. glue
    Alphonse Mucha
    Alphonse Mucha (Czech republic, 1860-1939) is an Art Nouveau artist. Graceful women,  shapes from nature, soft colors and stylized letters  en  are the basis of his work.
    In 1887 he moves to Parijs, at that time the center of the modern world: a vibrant night life, modern department stores, wide boulevards with artificial lights that illuminate the city  after sunset. Mucha isn't quite succesfull by then, but that changes when he gets his first assignment: a poster for the  v theater show Gismonda with the famous actress Sarah Bernhardt. Mucha paints a lifesize poster of a beautiful woman surrounded by stylized flower patterns and graceful lines. With this poster Mucha establishes his name as an artist  and is assured of sufficient work in the years that follow. His posters turn Paris into an open-air museum with art for everyone to see. 
    Show some artwork of Mucha and discuss them: graceful wavy lines, organic shapes, no bright colors.


    Task
    Draw the picture of yourself  and color it with pencils. Cut out and stick on brown paper. Decorate the background with organic shapes using a gold color pencil. Cut a frame for you portrait and stick it on your artwork.  

    Artworks are made by students of grade 5 and 6. 

    dinsdag 26 oktober 2021

    Wire portrait like Alexander Calder

    made by teacher Wouter 

    During a study day on art education our teachers made portraits of wire. This can also be done in higher grades. If you want to make wire figures in lower grades, then choose a simpler shape, for example fruit/veggies or an animal. 

    This activity can be done in a lesson about Alexander Calder, known for his wire portraits and mobiles. 

    You need:

    1. 3 meters wire thickness 1,3 mm
    2. wire cutter
    3. printed selfie 30 by 40 cm
    4. black marker
    5. painters tape

    Take a picture of yourself and print it. 

    Outline your face, eyes, nose, mouth and hair using the black marker. Turn the sheet over, the lines can be seen on the back of it now.  

    Wrap 3 m of wire around your fingers into a bunch. 

    Start at the neck. Lay the wire flat on the photo and follow the lines of your face. Try to lay out the portrait without cutting the wire. If this doesn't work out, you may smuggle by cutting the wire and go on with a new piece. Give the portrait more strength by doubling the wire on some places. Stick the wire now and then on the photo with painters tape. 

    Finished? Remove the pieces of tape. Fix the places where wire comes up by making connections with small pieces of wire. See detail photo.  

    outline photo with marker

    turn over, marker lines have been pushed through

    follow the outlines with wire, stick with tape

    make stronger

    artworks on the table

    hang up for beautiful shadows on the wall   

    donderdag 21 januari 2021

    Covid haircut


    made by a student of grade 5

    You need:

    1. white drawing sheet 
    2. pencil
    3. color pencils
    Hairdressers have been closed for a while because of the epidemic …. what consequences does that have? 


    How do you look now? Or your parents? Or a famous person? 

    Assignment: 
    Draw a portrait of yourself or someone else with a Covid haircut. 
    Choose which materials you use and whether you draw in black and white or in color.  
    Difficult to draw a portrait? No, watch this video about face proportions. 

    Beeldaspecten: vorm, lijn, ruimte. 

    woensdag 3 oktober 2018

    Collage like Karel Appel (CoBrA)

    On black background, made by a student of grade 5

    You need:
    1. black or white drawing sheet A3 size
    2. colored construction paper, 5 colors for each student 
    3. glue
    4. black tempera paint
    5. small brush
    6. liquid water color paint for background 
    Karel Appel (1921-2006) was a Dutch expressionistic painter and sculptor, famous as one of the founders of the CoBrA movement. CoBrA stands for Copenhagen, Brussels and Amsterdam.
    CoBrA artists were inspired by children's drawings and the art of mentally disturbed.

    Tell your students about abstract and figurative art. Show abstract and figurative artworks and ask which word belongs to them.
    Then view some of Karel Appel's works: Little Boy, Some people together, Blue faced beast and Saarbrücken (Google pictures). Are these figurative or abstract? Put your hand on the eyes of the painting. Is the artwork still figurative? Students will discover the Appel's art is very close to abstract. 

    When we see Karel Appel, we discover:
    • large surfaces
    • bright colors
    • a few colors
    • thick black lines
    Students tear (using two thumbs and two fingers, show well how they have to tear)  organic shapes from the construction paper.  It's absolutely not the intention to tear a human of animal. The shapes have to be 'just like that'.  Some students will smuggle a little bit and stick an eye somewhere. Then squeeze an eye :) but do not accept clearly laid human figures.

    When they have torn enough pieces, students make a composition of the shapes and paste them on the black or white sheet. The pieces may also be stuck over or on top of each other. Then the most exciting part of this lesson: what do I see in my collage? Ask a classmate to keep your work up. What do you see? Turn the work 90 degrees, and again and again. Do you see an animal or a human?
    Use black paint and a thin brush to draw lines on your artwork so that your human of animal is also visible to others. Not too much lines, there must be some guesswork too!

    On a painted backgrond, made by student of grade 5

    woensdag 12 september 2018

    Portfolio: Bad Hair Day

    You need:
    1. white sheets
    2. liquid watercolor paint
    3. straws
    4. oil pastel crayons
    How to draw a face? We used the website Wikihow. Students draw their own face on a large white sheet and color it with oil pastels. Drop liquid water color in several colors above the head and blow it in different directions using straws. 


    On the photo our proud third grade students with their portfolio's in which we collected all the artwork of this school year.

    dinsdag 14 februari 2017

    Dali's moustache II

    Made by a student of grade 1
    You need:
    1. colored sheet A4 size
    2. black marker
    3. white sheet A4 size
    4. black crayon
    5. scissors and glue 
    6. pipe cleaner 
    More information about Salvador Dalí, see the lesson High legged elephant in the style of Salvador Dali.

    Show some surrealistic artworks of Dali and discuss the surrealistic parts of it.  Show The melting clocks. Discuss the shape of the clocks. What happened to these clocks? Are these clocks that you can hang on the wall? Why not? Why do we call this surreal?
    Dali's artwork will surprise you. We see realistic parts, complemented with dreams and fantasy.

    Dali was an eccentric man. Show som portraits of Dali and look at all those different ways he wears his moustache.

    Students write words about surrealism and Dali with a marker on the colored sheet. Then they draw a portrait of him with crayon on a white sheet. Cut it, paste in on the colored sheet. Puncture two holes under the nose and pull the pipe cleaner through. Shape the moustache in a way that Dali would like!

    zaterdag 19 oktober 2013

    The man with the big mouth - Paul Klee


    Made by a student of grade 3

    Benodigdheden:
    1. drawing sheet A2 size
    2. brushes
    3. tempera paint
    4. pencil
    5. black marker
    6. scissors
    7. glue
    8. coloured wallpaper
    Paul Klee (1879 – 1940) is a German/Swiss painter. His work belongs to modern art. Klee developed mainly as an autodidact and left more than 9000 artworks. In 1912 he saw the work of Picasso and Malevich and met Robert Delaunay, who believed colour is the most important element in a painting. After a trip to Tunisia in 1914 Klee started to paint more colorful and abstract. He painted landscapes, portraits, animals, mythology, mysterious machines. In his work he combined abstract and figurative shapes. Klee 's work cannot be described in one single word. Surrealism, cubism, abstraction are terms which are applicable to his paintings. He is classified by expressionism. (Source: Wikipedia)

    Show the painting 'The man with the big mouth' on the digital board. Write 'yes' on the left and 'no' on the rigth. Type the following sentences on the board:
    • He has a big mouth
    • His nose is exactly as long as his chin
    • He has curls
    • He can smell good
    • He is afraid
    • His nose looks like a knife
    • The eyes are blue
    • He doesn't seem nice
    • He looks pissed off
    • He has no ears
    • He has white teeth
    • His face is composed of puzzle pieces
    • The colours are bleak
    • I only see bright colors
    Have students drag the sentences one by one to the right spot.

    The students draw a face from the side. The nose has to be as long as the chin. Draw two eyes. Divide the face in surfaces. Colour each part with tempera using only mixed colours just like Paul Klee did. Only the eyes should be painted in clear blue.
    Wait until the work is dry and outline all color patches with a black marker. Cut and paste the artwork on a coloured piece of wallpaper.

    This project was done in grade 3/4. For higher grades: draw the face with only one line, so without lifting the pencil.

     Door Zahra, groep 5

    Source : Paul Klee voor kinderen, by Birgit Brandenburg 

    donderdag 22 augustus 2013

    This is ME!!!


    You need:
    1. drawing sheet A4 size
    2. watercolour paint
    3. brushes
    4. black marker
    A great lesson to start a new year of school! Students draw a self portrait using a black marker and colour it with watercolour paint.

    Made by students of grade 1

    dinsdag 14 mei 2013

    Cubist portrait like Pablo Picasso


    You need:
    1.  blue or brown construction paper A4 size
    2. oilpastel crayons
    3. white chalk pastel
    Show some cubistic works of Picasso on the digital board. What do you see? What does the face look like? What happened with eyes and noses? From what point of view do you see the facial parts?

    Artworks made by students of grade 6

    Students draw with white chalk pastel a portrait in cubistic style. This means eyes or nose or mouth should be drawn from another point of view.
    Divide face and hair in several parts. Colour them with oilpastels. Outline face, hair and facial parts with black. Outline the facial parts, face and hairline with black.
     

    zondag 10 maart 2013

    Salvador Dali's mustache


    You need:
    1. drawing sheet A3 size
    2. oil pastel crayons
    3. pencil 
    4. black marker 
    5. pipe cleaner 
    More information about Salvador Dalí, see the lesson High legged elephant in the style of Salvador Dali.

    Show some surrealistic artworks of Dali and discuss the surreliastic parts of it.  Show The melting clocks. Discuss the shape of the clockes. What happened to these clocks? Are these clocks that you can hang on the wall? Why not? Why do we call this surreal?

    Using a step by step method, the students draw a face. I opted for the method of WikiHow. Interchange in this method step 1 and 2 by folding the sheet in four parts and then draw an egg shale according to the measures in the figure below. Then continue following the steps on WikiHow.
    This is the face of Dali. Draw some melting clocks around it. Draw also some half ones on the edged of the sheet.

    The clocks and face have to remain white. Colour the background with warm colors and the clothes of Dali with cold colours (or vice versa).
    Outline the clocks and face with black oil pastel. Use a black marker for the numbers and hands of the clock and the parts of the face. Colour the iris of the eyes with a bright colour.

    Pierce two holes under the nose and put a piece of pipe cleaner through them. Bend it into a nice mustache. Sign your artwork with your own name. Put the name Dali with a small mustache anywhere at work.


    Artworks made by students of grade 4

    Thanks to Anne Farell from Use your coloured pencils who gave me the idea of the pipecleaner mustache! 

    vrijdag 8 juli 2011

    Portrait of your schoolmate

     
    Made by students of grade 5
      
    You need:
    1. drawing paper A4 size
    2. colour pencils
    3. watercolour paint
    4. brushes
    5. coloured ribbed cardboard
    6. stapler
    After an instruction about proportions of a head, students draw their classmate who is sitting in front of him. The portraits are coloured with colour pencils, the background is painted with watercolour paint. The frames are made from coloured ribbed cardboard strips.

    zaterdag 29 januari 2011

    Clowning around

    You need:
    1. coloured construction paper 32 by 23 cm
    2. white drawing paper A5 size
    3. oil pastels
    4. scissors
    5. glue
    6. tempera paint

    Look at pictures of clowns on the digiboard and talk about how they recognize a clown.

    Give each student a coloured construction paper and a white sheet of A5 size. Let them cut the corners of the white sheet, and let them paste this clown's face on the coloured sheet. Draw a clown using oil pastels: eyes, nose, mouth, hair, hat, bow etc. Colour the different parts with oil pastels. Outline everything with black.

    Use toilet rolls and tempera paint to stamp coloured circles around the clown. Hang them all together on the bulletin board: ready for carnival!

    Artworks made by students of grade 2

    zaterdag 22 januari 2011

    The man with the apple - like René Magritte (2)

    Made by Tyra, grade 6
    You need:
    1. white drawing sheet A4 size
    2. aquarelle pencils
    3. jar with water
    4. brush
    5. fine black marker
    Rene Magritte is born in 1898 in Belgium. When Magritte is 13 years old, his mother commits suicide. She jumps in the river Samber and is found with her dress covering her face. This image has been suggested as the source of several paintings from Magritte: people hiding their faces with several objects.
    In 1924 Magritte became friends with members of a surrealism group in Brussels: André Breton, Joan Miró and Salvador Dalí. These artists influence Magritte's work. In the end Magritte became famous with surrealistic paintings.
    Magritte gave his paintings a realistic effect of surrealism. He painted simple objects, like a shoe, an apple, a pipe or a tree. Magritte took these things out of their ordinary environment and placed them in a special surrounding.
    One of Magritte's most famous works is "La Trahison des Images" (The Treachery of Images). This is a very realistic painting from a pipe, with the text: Ceci n'est pas une pipe (This is not a pipe). The painting is not a pipe, but rather an image of a pipe. As Magritte himself commented: "The famous pipe. How people reproached me for it! And yet, could you stuff my pipe? No, it's just a representation, is it not? So if I had written on my picture 'This is a pipe,' I'd have been lying!" By putting us constantly on the wrong track, Magritte forces us to think about art. Magritte thought it the task of an artist to place reality in a different context.
    Links: Magritte museum, Brussel See also the other lesson In the style of René Magritte (1) on this blog.
    Made by Debbie, grade 6
    Students draw a part of a man or woman, from about chest height. Like Magritte, we see no face. And, like Magritte, the person has something on his head. In stead of the face, students draw an object of their choice. The drawing, person and background, has to be coloured with aquarelle pencils. Use water and a brush to create the effect of aquarel paint. Wait until the artwork is dry and outline everything with a fine marker.
    woensdag 13 oktober 2010

    Photo fun

    You need:
    1. copy of a photo of the student in black/white, A4 size
    2. coloured construction paper A4 size
    3. ruler
    4. scissors
    5. glue

    Take a digital photo of each student and print in black and white on A4 paper. Students draw on the back of the picture horizontal lines with 2 cm space between them. Cut the lines. Paste the strips with half a cm between the on the coloured paper.

    With the name of the student and his birthday under the arwork, this is a nice birthday calendar for in the classroom.

    zaterdag 21 augustus 2010

    Selfportrait in manga style

    You need:

    1. half A4 size drawing sheet
    2. colour pencils
    3. black marker

    Manga consist of comics and print cartoons in the Japanese language and conforming to the style developed in Japan in the late 19th century. In their modern form, manga date from shortly after World War II but they have a long, complex pre-history in earlier Japanese art.

    The name comes from 'uncontrolled or random brushstrokes'. This refers to the loose style of drawing. Anime is the term used for manga style cartoon films. Ask students some examples of anime films. They probably know Pokemon and Dragonball Z. Show them some manga style drawings, there are lots of them on the internet. Discuss the remarkable things about manga:

    • the characters tend to be slim and attractive
    • in the comics for kids, the characters have large expressive eyes
    • nose and mouth often consist of a smooth line
    • the hair colours are striking and often unnatural
    • the heads are large in proportion to body
    There are numerous internet sites where you can learn to draw manga. Google op 'how to draw manga'. For almost each body part you can find sites. During this lesson the students make a portrait of their face in manga style. Give them the schedule for the head (on the blackboard or a copy).

    Discuss how students can make the manga figure look like himself. Discuss how the head itself can look like a manga self portrait. Think of appearance as a hairstyle, glasses, moles, colour of the eyes, jewelry etc. Students draw their own head and shoulders in manga style. Colour with coloured pencil, outline with black marker.

    vrijdag 20 augustus 2010

    Selfportrait in black and white

    You need:
    1. canvas
    2. digital photograph
    3. acrylic paint
    4. brushes
    5. carbon paper
    6. pen
    Show portraits made by Andy Warhol and discuss them. What is remarkable about those portraits? Would you recognize a Warhol? Why is that?
    To make this selfportrait each child needs a digital portrait of himself. Use a photo editor to make the photo black and white. I used Corel Paint Shop Pro. Choose for 'image' and then 'grayscale'. Then click on 'effects', choose 'artistic effects' and then 'posterize'. Choose for four or five layers.
    Print the photograph and trace it with a pen and carbon paper on a canvas. Paint the portrait with acrylic paint in greyscale. Paint the background in your choice of colours.

    maandag 26 april 2010

    Hairstyle

    You need:
    1. drawing paper A4 size
    2. indian ink
    3. dip pen
    4. drawing board
    5. black construction paper

    Ask children a day before you want to do this lesson, to do something special with their hair. For girls this might be easy, they can braid their hair, make a ponytail or use accessoires. But boys too can style their hair in different shapes, just using gel! In preparation for this lesson kids have to practice drawing with indian ink and a dip pen.

    Children have to draw the back of another child. To organize this, they all have to sit in a row around a big table. On this table you put the indian ink bottles. For children who are lefthanded, place some stools besides them to put on their bottle of ink. See schedule.

    Give all students a drawing board, drawing sheet and a dip pen. Tell them to draw the back of the classmate in front of him/her. It is important not to draw a contour line of the head, but make this contour out of as many hairs as you can!

    This drawing has to be finished in one lesson, because of the fancy hairstyles! When finished, paste the artworks on a black background. Write with silver marker the artist and the name of the person who's hair is drawn.

    All drawings are made by children of 10-11 years old