dinsdag 31 augustus 2010

Wavy waves

You need:
  1. white drawing sheet A4 size
  2. markers
  3. coloured paper for background
  4. glue
  5. scissors
Draw on a white sheet with pencil four wavy lines from left to right.

Then draw five wavy lines from top to bottom.

Draw a cross of slightly wavy lines in each square.

Choose three colours and colour the triangles: one colour for the bottom triangles of the squares, another colour for the left triangles and a third colour for the triangles on the right. The upper triangle in a square is always white. This is the foamy head of the wave!

Cut a slightly wavy line on the left, right and bottom of the drawing. Cut a strip of the upper triangles away. Paste the work 'wavy' on a coloured sheet.

zaterdag 28 augustus 2010

Name tag - like Paul Klee

You need:

  1. white drawing sheet, 15 by 21 cm (A5 size)
  2. pencil
  3. ruler
  4. eraser
  5. markers

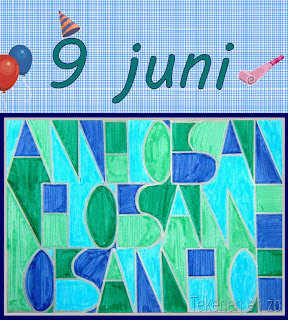
This is a great lesson for the beginning of the school: a name tag in the style of painter Paul Klee. This drawing can also be used for the birthday calendar that each group makes at the beginning of the school year.

Paul Klee

Paul Klee (1879 – 1940) is a German/Swiss painter. His work belongs to the modern art. Klee developed mainly as an autodidact and left more than 9000 artworks. In 1912 he saw the work of Picasso and Malevich, and he met Robert Delaunay, who believed colour is the most important element in a painting. After a trip to Tunisia in 1914 Klee started to paint more colorful and abstract. He painted many subjects : landscapes, portraits, animals, mythology, mysterious machines. In his work he combined abstract and figurative shapes. Klee 's work cannot be described in one single word. Surrealism, cubism, abstraction are terms which are applicable to his paintings. He is classified by expressionism. (Source: Wikipedia)

Lesson

Show some artworks of Paul Klee and discuss them. What do you see? Wat zie je? What does strike you? Show finally the work 'Blue Night' and discuss this. Is this like the other works you 've seen? Do you recognize the painting style? What colours are used in Blue Night? How do we call those colours? Students have to make a drawing in Paul Klee style. Divide the sheets of paper. The sheet must be up with the short side. Using a gray pencil and ruler students divide the sheet into three strips of 5 to 21 cm.
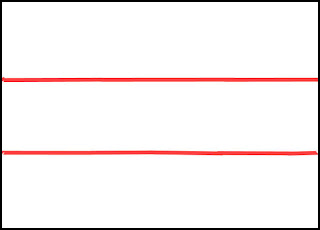
Starting top left, write the first letter of your name in capital. The letter must be 5 cm high and touch the first line and the side and top of the sheet. Write the second letter. Be sure the second letter hits the first one, as well as the writing line and the top of the sheet. Do the same with the rest of the letters of your name. If you're ready with your name, start over again.
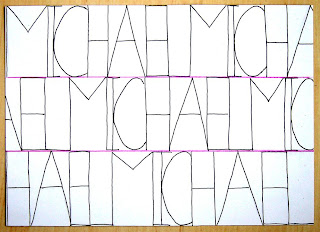
Writing lines are pink in this example. Click to enlarge.

Proceed on the second line and make sure the letters touch the top of the first line. The third line goes the same way, but the letters should touch the bottom of the sheet and the letters on the second line. See example above. Use an eraser to remove the writing lines. Beware: the letters must stay! So: with an E the bottom line is part of the letter, and should therefore not be erased.
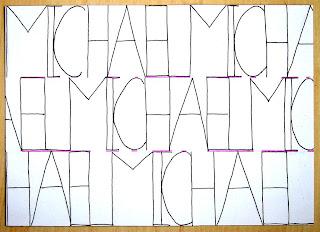
The writing lines are erased. Click to enlarge.

Choose four colours markers. Colour the white spots who are completely surrounded by lines. This might be small spots from the letters, but they could be tall as well because of open letters. Make sure won't get twice the same color side by side. You can prevent this by colouring from top to bottom or from left to right. Choose cool colours just like Klee, or let the kids choose themselves. Just four colours!
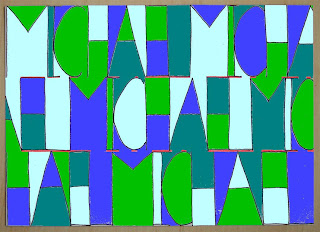
Four colours. Example is made with Paintshop. Click to enlarge.

When it is finished, outline with a thick marker. In this example is chosen for silver, because it fits well with the cold colours of the work. To make a birthday calendar for the class, the work has to be pasted on a calendar sheet. This can be drawn, but can also be made on the computer as shown below.
dinsdag 24 augustus 2010

A sea of flowers

You need:
  1. white drawing paper A4 size
  2. waterpaint
  3. brushes
  4. jars with water
  5. black permanent marker

A sea of flowers is an expression used for fields with so many flowers, that you can hardly see the end of it. Let children see examples of 'a sea of flowers'. Have you ever seen a sea of flowers yourself? Where or when?

Tell the students they are going to paint a sea of flowers, but literally! Flowers in the water, a lot of them!

Let the children directly paint their flowers, so no pencil drawing first. They use water paint and (lots of) water. Choose different colours and shapes, and paint steals and leaves too. Do not only paint in the middle of the sheet, but also at the edge so you can see half flowers. (If you choose this lesson for a group work, children should make agreements about the places their flowers will come together and the colours of the flowers).

When the flowers are ready, students paint the background with light blue waterpaint. Paint as close as possible along the flowers , but do not touche them to prevent colours from running together. Leave the work to dry. Outline the flowers with a black marker. All spots and white edges are thus concealed.

Paste all works together to create a group work: our sea of flowers!

zondag 22 augustus 2010

Funky flipflops

By Marrit, 11 years old

You need:
  1. two white drawing sheets A4 size
  2. coloured construction paper
  3. two split pens or paper fasteners
  4. scissors
  5. glue
  6. markers
Tear wide strips of the narrow side of a sheet of light blue and a dark blue sheet construction paper. Paste thes over and over and partially overlapping on a white sheet of paper: these are the waves of the sea in which your flipflops will disappear! You can also choose yellow paper and sandpaper, to suggest the beach. Trace your foot on the second white sheet. Cut it twice. Remember that one of them should be a mirror image. Colour the flipflops with bright summer colours.

Cut out of the remaining white paper four strips of about 15 cm long and 1.5 cm wide. Colour these too. Prick a hole in both flip-flops on the spot between the big toe and second toe. Prick holes in the four strips, approximately 0.5 cm from the end. Insert a split pin through the two strips and the slipper. Glue the ends of the strips under the slipper. Paste the flipflops on the sheet with waves.

zaterdag 21 augustus 2010

Selfportrait in manga style

You need:

  1. half A4 size drawing sheet
  2. colour pencils
  3. black marker

Manga consist of comics and print cartoons in the Japanese language and conforming to the style developed in Japan in the late 19th century. In their modern form, manga date from shortly after World War II but they have a long, complex pre-history in earlier Japanese art.

The name comes from 'uncontrolled or random brushstrokes'. This refers to the loose style of drawing. Anime is the term used for manga style cartoon films. Ask students some examples of anime films. They probably know Pokemon and Dragonball Z. Show them some manga style drawings, there are lots of them on the internet. Discuss the remarkable things about manga:

  • the characters tend to be slim and attractive
  • in the comics for kids, the characters have large expressive eyes
  • nose and mouth often consist of a smooth line
  • the hair colours are striking and often unnatural
  • the heads are large in proportion to body
There are numerous internet sites where you can learn to draw manga. Google op 'how to draw manga'. For almost each body part you can find sites. During this lesson the students make a portrait of their face in manga style. Give them the schedule for the head (on the blackboard or a copy).

Discuss how students can make the manga figure look like himself. Discuss how the head itself can look like a manga self portrait. Think of appearance as a hairstyle, glasses, moles, colour of the eyes, jewelry etc. Students draw their own head and shoulders in manga style. Colour with coloured pencil, outline with black marker.

vrijdag 20 augustus 2010

Selfportrait in black and white

You need:
  1. canvas
  2. digital photograph
  3. acrylic paint
  4. brushes
  5. carbon paper
  6. pen
Show portraits made by Andy Warhol and discuss them. What is remarkable about those portraits? Would you recognize a Warhol? Why is that?
To make this selfportrait each child needs a digital portrait of himself. Use a photo editor to make the photo black and white. I used Corel Paint Shop Pro. Choose for 'image' and then 'grayscale'. Then click on 'effects', choose 'artistic effects' and then 'posterize'. Choose for four or five layers.
Print the photograph and trace it with a pen and carbon paper on a canvas. Paint the portrait with acrylic paint in greyscale. Paint the background in your choice of colours.

donderdag 19 augustus 2010

Summer memory

You need:
  1. white drawing paper
  2. watercolour paint
  3. brushes
  4. jar with water
  5. glue
  6. colour pencils
  7. grey or light brown cardboard

Passed holiday's are always full of memories. Sunset on the beach, a sunny afternoon in the woods or impressive threatening clouds above the sea. What colours belong to that memory? What colours belong to a sunset, to the woods and what colours would you use for the threatening thunderstorm?

Paint your sheet full with your holiday memories using watercolour paint. Paint sloping strips in different colours. After drying, tear the sheet in strips while following the different colours. Glue your strips with a little space between them on the grey/light brown paperboard. Write a title in beautiful characters and decorate the frame with little holiday memory doodles (shells, clouds, flowers etc).

Made by students of grade 5