Posts tonen met het label colour pencils. Alle posts tonen

woensdag 26 mei 2010

Connected fish

You need:
  1. drawing paper A4 size
  2. colour pencils
  3. black fine maker
  4. waterpaint
  5. brushes

This task seemed easier than it was ... :) Draw some simple fish, consisting of only a body and tail. See example. Some fish must overlap. Then the contour lines of the fish have to be widened to one cm. Draw and erase the overlapping fish to make the lines go up and down. Colour the contour lines firmly and colour the inside of the fish lightly with the same colour. Draw patterns with a fineliner. Paint the background with dilluted waterpaint. You may also cut out the fish. Create a sea landscape on a blue sheet and paste the fish between water plants.

Made by students of 11 years old

woensdag 12 mei 2010

Comic strip hero

You need:
  1. picture of a comic hero on A6 size
  2. drawing paper A3 size
  3. ruler
  4. pencil
  5. markers or colour pencils
  6. scissors and glue
  7. coloured paper for background

Ask kids to bring a picture of their favorite comic strip hero. Bring it back or enlarge it to A6 size on a copier. Create a 1 cm on the picture using a ruler and a pencil. Number each square starting across the top from the left corner.

Draw a 2 cm grid on the large drawing sheet. Number in the same fashion all the squares. Begin drawing the line created by the picture in each square. Sometimes it helps to go over the outline of the head with a pencil so you can see the line clearly. As you do this the head will begin to show up as an exact copy of the picture. Finish the drawing this way. Use colour pencils or markers to colour it. Outline everything with a black marker.

All works are made by children of 10-11 years old

woensdag 28 april 2010

Doodle for Google: I love football!

You need:
  1. Google logo
  2. colour pencils
  3. markers

2010 is the year of the World Championship Football in South-Africa. So the Doodle for this year has to be a doodle for football lovers. Several countries, including the Netherlands, can send in their doodles. Price: a trip to South Africa and your doodle for 24 hours on Google sites of participating countries. That's a price all our students wanted to win! Here a few results.

Doodles are made by children of 10-12 years old

maandag 19 april 2010

Turning around with circles, like Sonia Delaunay

You need:

  1. white drawing sheet, cut at 21 cm by 21 cm
  2. markers or colour pencils
  3. coloured paper for background
  4. compass
  5. glue

Sonia Delaunay (Gradizhsk,1885 – Paris, 1979) was an Ukrainian-French painter, married to srtist Robert Delaunay. Her work includes paintings, textile design and stage design. In her work she used bright colors, obtained by the reflection of a prism or streetlights. This pure colours and shapes have an innovative impact, but especially an emotional power in itself. In her life she has experimented with many styles, including Orphism, cubism and abstract art. (Wikipedia).

All kids get a square drawing sheet of 21 by 21 cm. On this sheet they draw concentric circles with a compass. The eyes of the circles always have to be at the edge of the sheet. The circles are coloured with markers of colour pencils in maximum 5 colours.

When ready, cut the drawing in four squares of 10,5 by 10,5 cm. By rotating the four parts, a beautiful composition can be made. Paste those four pieces on a coloured background, leaving 1,5 cm between the squares.

All artworks are made by children of 10-11 years old

maandag 5 april 2010

Fruit and veggies in popart style

Made by students of grade 6

You need:

  1. piece of cardboard 9 by 9 cm
  2. drawing paper 20 by 29 cm
  3. colour pencils or markers
  4. fine black marker

Draw a frame of 1 cm around the drawing sheet. Draw within this frame six squares of 9 by 9 cm, with 1 cm between the squares. Draw a cartoonlike piece of fruit or vegetables on the cardboard and cut it out. Trace it in the six squares. Colour the fruit or veggies with colour pencils or markers. To make the fruit pop out of the paper, the backgrounds have to be drawn with a fine black marker in different patterns in.

vrijdag 2 april 2010

Seeking the name

You need:
  1. drawing sheet 20 by 20 cm
  2. pencil
  3. colour pencils or markers
  4. black fine marker
With this project kids learn about radial design as well as symmetry. First fold the paper so you have eight equal triangles. Then write your name in bubble letters inside one triangle. Be sure to touch the top and bottom of the triangle. Outline the name with a black marker. Go to the window and trace the name with pencil in the seven resting sections. Outline the names with black marker. Colour the letters and spaces between them. You can do this in different ways: the letters with colour markers and the negative spaces with colour pencils (see example below), or negative and positive spaces both with markers (see example above). When ready, you've made an incredible symmetrical design! Seeing the name inside the drawing is very difficult ... you have to seek it!

Made by Danjel, 12 years old

dinsdag 16 maart 2010

Easter bunny

You need:
  1. white drawing sheet A4 size
  2. colour pencils
  3. template for easter egg
Scetch an Easter bunny in the middle of the sheet. Cut an egg out of a piece of cardboard. Trace this egg so many times on your drawing sheet - also over the bunny - till it's competely full. Overlapping is required. Colour the bunny parts in warm colours, the background in cool colours.

zondag 14 maart 2010

A plumber's nightmare

Made by Sander, 12 years old

You need:

  1. white drawing paper A4 size
  2. colour pencils
  3. pencil
  4. fine black marker
  5. coloured paper for background

Talk about the work of the plumber. View the pipes under a sink: how are the pipes connected, how are curves made? Talk about the horrible things a plumber may encounter: leaking pipes, filthy creatures, smelly sludge. Imagine with the class on a sewer pipe system which is inhabited by creepy creatures.

How do you draw a pipe? How can you show that a pipe is round? Where is the light part and where are the shadows? Show this on the blackboard. Children draw 'A plumber's nightmare' according to their own imagination. Leave the pipes white, make shadows with pencil lines. Outline evertything with a fine black marker. These drawing can also be done by a group. This requires the students to make agreements on connecting the pipes at each drawing.

vrijdag 5 maart 2010

What's for supper tonight?

Made by Lotte, 10 years old

You need:
  1. drawing paper A3 size
  2. colour pencils
  3. tempera and brushes
  4. or coloured paper and glue

Talk about food. What do you like most? What is healthy food? Why do we have to eat vegetables and fruit? What about burgers and fries? Talk about china and cutlery and how a table has to be set.

Draw the meal you like most. Draw everything from above; so a glass is just a circle. Draw your plate with food, a saucer, a glass, knive, spoon, fork and colour everything with colour pencil. Then cut out all parts. Paint a sheet with a pattern and colours that fits to your china; your placemat. You may also use coloured paper and glue to decorate your placemat. When your placemat is ready, paste all cut-out parts on it.

Made by children from 10-11 years old

woensdag 24 februari 2010

Spotted fish

You need:
  1. white drawing paper A4 size
  2. colour pencils
  3. coloured paper for background
Tropical fish are beautiful fish with often bright colors. The live in warm seas with coral reefs to shelter. Show pictures of tropical fish and discuss the anatomy of the fish (gills, fins). Point out the bright colours and sometimes strange shapes of the fish. Students scetch a fish on their sheet with pencil. Behind the fish they scetch waves. Sketch as thin as possible, so the pencil lines won't show through the colours later. Both the fish and the waves must be coloured with 'spots', drop-like shapes that accentuate the water. About a half cm between the spots should remain white. Colour the waves with different colours blue and green. Colour the spotted fish with warm colours.
Made by children from 11-12 years old

donderdag 28 januari 2010

Valentine's day (with Jim Dine)

You need:
  1. white paper 20 by 20 cm
  2. cardboard 10 by 10 cm
  3. pencil and ruler
  4. scissors
  5. glue
  6. colour pencils
  7. oil pastel crayons
  8. chalk pastel
  9. salt
  10. tempera paint
  11. different kinds of coloured paper (ribbed cardboard, tissue paper, crepe paper etc.)
  12. watercolour paint
  13. brushes
  14. markers
  15. red or pink paper for background
Jin Dine, born in 1935 in Cincinatti, is a sculptor and popart artist. Hearts, ties and tools are recurrent themes in his art. Let children learn about Jim Dine by showing and discussing his artworks. Because of upcoming Valentine's day a lesson about hearts today! Basic colours are red and white (and making pink of these of course!).
Children get a sheet from 20 by 20 cm. They have to divide this sheet with ruler and pencil into four squares from 10 by 10 cm. Fold the little cardboard and draw a heart against the fold. Cut it out. Trace this heart in the four squares. Divide the different colouring supplies on different tables. Stimulate children to experiment with these materials. What happens when I sprinkle salt in watercolour paint? How can I make my heart pop up from the paper? Can I combine chalk pastel and oilpastel? What happens when I sprinkle water on tissuepaper? Students have to colour their hearts and backgrounds by using as many supplies and techniques as possible. While doing this, kids may walk around through the classroom(s) and choose the place where the art supplies of their choice are. The only restriction is: when all chairs are occupied, you have to choose another supply first. When the four hearts are ready, they have to be pasted on a red or pink background.
All artworks are made by children of 10-12 years old

maandag 4 januari 2010

Swinging snakes

Made by Bart, 12 years old

You need:
  1. white drawing sheet A4 size
  2. colour pencils
  3. chalk pastels
  4. hairspray
Snakes swing themselves around branches of trees. In order not to fall, the snake has to swing alternately front and back along the branches. This is easy to be shown with a vacuum cleaner hose and a couple chair legs. Children draw three trunks with some branches. Around the trunks and branches they draw three or more snakes. Be careful with the principle of going for along and back along. The snakes have to be coloured firmly to highlight the contrast with the trees. Colour the trees. Colour the background with chalk pastel and fix the work with hairspray.

woensdag 30 december 2009

Skaters in Dutch landschape

Made by Brittany, 11 years old

You need:

  1. light blue construction paper
  2. dark transperant glossy paper
  3. glue
  4. flour
  5. colour pencils
  6. scissors
Beautiful photographs of Dutch landscapes and skaters on frozen water, are the inspiration for this lesson. There are many of these pictures on the internet (search for 'hollands landschap schaatsen'). Show some of these pictures and discuss them. Take a light blue sheet (or paint one) and paste and paste in the middle transparent dark, glossy paper on it; this is the ice. Cut a circle from a white sheet and paste in on the light blue sheet. Make the white streaks on the ice by drawing lines with a glue stick and sprinkling flour over it; shake the rest of. Draw a windmill or a landscape. Draw some skating people on another sheet and colour them with bright colours. Cut those skaters and paste them on the ice.

Made by students from 10-11 years old

maandag 14 december 2009

Christmas trees collage

By Silke, 10 years old
I found this idea on Artsonia a collage of Christmas trees coloured with different materials on music paper. You need:
  1. white drawing paper A4 size
  2. different colouring materials, like crayons, oilpastel, watercolour paint, tempera, colour pencils, markers, aquarelle pencils etc.
  3. music paper
  4. chalk pastel
  5. green paper for background
  6. scissors
  7. glue
  8. black marker
Divide different colour materials in your classroom. One place with paint (water paint and tempera paint), one place with crayons and oil pastel, one place with pencils and markers. Children draw three overlapping triangles on a white sheet, the Christmas trees. These trees have to be coloured with different materials and patterns. The only colour they may use is green, in all its nuances. To colour, children have to take place at the table where the material of their choice is. When finished, the trees and patterns have to be outlined with a black marker. The trees (with the black outline) must be cut out. Then kids have to tear pieces of music paper and paste them on a new white sheet. Colour the background with light blue chalk pastel. Do not colour the music paper, just rub the edges with the chalk pastel. Paste the trees on the blue sheet and paste this work on a green background.

This work can also be done as a group work. All trees (or groups of trees) have to be glued then on a large background of music paper.

By children of 10-11 years old

Christmas Angels

By Felix, grade 5
You need:
  1. black construction paper A4 size
  2. pencils in yellow, gold, silver and white
On black paper children draw one or more Christmas angels, flying in a starry sky. By limiting the number of colours, children are forced to think about the use of patterns in the dresses of the angels. Finish the work with a frame; a simple straight line, a dot pattern or a golden frame!

Christmas angels, by children of grade 5

maandag 21 september 2009

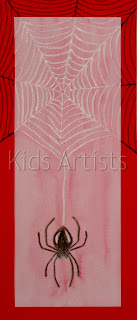
A spider and his web

In fall you will find beautiful spider webs in the garden and around the school. Especially when the morning dew is glistening on the wires in the sun, a web seems a work of art. In this lesson the students draw a spider web with a spider, after they first have looked carefully at those webs. How is the web built? How many basic threads do you see? What does a spider look like? How many legs has he? How do they look?

You need:

  1. white drawing sheet A4 size cut lengthwise
  2. crayons
  3. water paint
  4. brushes
  5. jar with water
  6. black finepointed marker or white pencil
  7. coloured paper
Draw at the top of a half sheet a web with a white crayon (be sure the point is sharp). One of the base threads have to be drawin in the middle, because the spider will hang out there. Draw a spider with black crayon and connect him with the web by drawing the middle white base thread down. Paint the whole sheet with water paint in a colour you like. Use lots of water. Crayonlines will resist the paint. Let the work and see the dewdrops on the web! Glue the work on a coloured background. Draw the web further on the background, with black fineliner or white pencil.

vrijdag 11 september 2009

Birthday calendar, like Wayne Thiebaud

You need:

  1. white sheets A4 format
  2. colour pencils
At the beginning of a schoolyear, our students make their own birthday calendar. This is a good reason to show and discuss some paintings from Wayne Thiebaud. Each child draws his own birthday cake, surrounded by his birthdate and first name. Arround this drawing they have to draw a frame as broad as the ruler and draw festive stuff like little cakes, lollipops, candy, little flags, presents etc.

dinsdag 1 september 2009

Remembering summer

You need:
  1. square drawing sheet 20 x 20 cm
  2. colour pencils
Divide the sheet in four squares. Draw in every square your own summer memory! Decorate the edges in four different ways.

zaterdag 1 augustus 2009

Picknick quilt

What kind of things do you think of when you hear the word summer? Which of those things are easy to be drawn? An ice cream will be easy to draw, but a drawn beach will be less clear as part of a quilt. Is it better to choose objects that belong to the beach such as shells or beach toys. Each group receives a large sheet of coloured paper and white squares of paper from 11 by 11 cm. We're drawing summerquilts together!

Discuss how you can get a group work: choosing matching colours or choosing the same subject.

You need:

  1. pencils
  2. sheets of paper from 10 by 10 cm
  3. scissors and glue
  4. big cardboard for background

Every member of the group makes some drawings for a summerquilt. Those little drawings have to be coloured with colour pencil. When all drawings are ready, they have to be glued on the coloured background. Possibly the edges of the large sheets can be decorated with sticky buttons or drawn patterns.

Picknickkleed, door Oscar, Ozan, Yorn, Fabian en Richard, groep 7

zaterdag 4 juli 2009

Crazy monkey's

You need:
  1. white drawing sheets
  2. colour pencils
  3. scissors and glue
  4. green or yellow sheets for background

We always have to laugh about monkey's; maybe because they look so much like us!

In this lesson we're going to draw monkey's and add some extra funny details. Look at monkey photographs first. What do they look like - lenth of arms and legs, size of the head, eyes, nose etc. CHildren draw a frame on their sheet about 2 cm from the sides. The instruction is: draw a hanging monkey with two or three funny details. Examples: an Ipod, clothes, or jewellery . Draw your monkey as big as possible, but stay within the frame. Next: draw a jungle background, with climbing plants, tree trunks, big leaves and exotic fruit. Vervolgens wordt een oerwoudachtige achtergrond getekend: slingerplanten, grote varens, takken, boomstammen, grote bladeren, vruchten. Some of those leaves or branches may stick out of the frame. Colour the drawing with natural colours. Make sure the complete sheet is coloured, there will be no more white! Cut out the drawing (watch for the outsticking details) and glue it on a green or yellow sheet.