Posts tonen met het label grade 1. Alle posts tonen

dinsdag 14 februari 2017

Dali's moustache II

Made by a student of grade 1
You need:
  1. colored sheet A4 size
  2. black marker
  3. white sheet A4 size
  4. black crayon
  5. scissors and glue 
  6. pipe cleaner 
More information about Salvador DalĂ­, see the lesson High legged elephant in the style of Salvador Dali.

Show some surrealistic artworks of Dali and discuss the surrealistic parts of it.  Show The melting clocks. Discuss the shape of the clocks. What happened to these clocks? Are these clocks that you can hang on the wall? Why not? Why do we call this surreal?
Dali's artwork will surprise you. We see realistic parts, complemented with dreams and fantasy.

Dali was an eccentric man. Show som portraits of Dali and look at all those different ways he wears his moustache.

Students write words about surrealism and Dali with a marker on the colored sheet. Then they draw a portrait of him with crayon on a white sheet. Cut it, paste in on the colored sheet. Puncture two holes under the nose and pull the pipe cleaner through. Shape the moustache in a way that Dali would like!

vrijdag 16 december 2016

Dancing Christmas trees

Made by a student of grade 1
You need:

  1. white drawing sheet
  2. pencil
  3. markers
  4. chalk pastels
Dancing Christmas trees are Christmas trees who look like them only because of the shape (rectangular) and decorations (balls, garlands and stars)! The trunks are much longer than the  the ordinary trees and because of the curves in them it looks they are dancing.  
Draw with pencil, colour with markers, outline with black marker and colour the background with chalk pastels.


zaterdag 5 november 2016

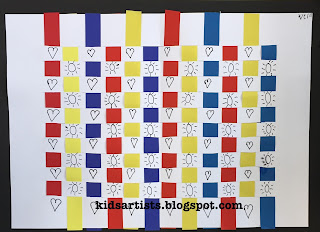
Weaving like Mondriaan

Made by a student of grade 2

You need:
  1. white sheet A4 size
  2. colored paper strips in primary colours
  3. scissors
  4. glue
  5. black fineliner 
Fold the white sheet in half.
Cut evenly-spaced slits starting from the folded edge and continuing up to about a half inch from the opposite. Open up the paper.
Take one paper strip and weave it across the slits, going over and under them. Push the strip to the top and start with another one. The second strip should be woven in an opposite pattern as the first one. If the first strip goes over and under across the slits, the second one should go under and over the slits.
Continue weaving until the white sheet is full. Paste the ends of the strips on the white sheet.
Create a frame by pasting the artwork on black construction paper. Draw small patters on the white strips using a fine black marker. 

vrijdag 14 oktober 2016

Happy monsters

You need:


  1. drawing sheets A3 size
  2. markers
  3. tempera paint

Draw happy monsters! Not the scary types, but the nice ones with big eyes. Color with markers, background with tempera. Outline with black marker.

Made by students of grade 6

vrijdag 29 april 2016

Birdies on a branch

Made by a student of grade 1

You need:
  1. liquid water color paint
  2. brushes
  3. crayons
  4. white sheet
  5. feathers
  6. glue
Draw a branch with some birdies on it. Their eyes should be big and white! Color the birds with crayons using bright colors. Paint the branch and background with water color paint. Let dry. Draw feet and paste feathers. 

vrijdag 11 maart 2016

Printing African animals


You need:
  1. styrofoam
  2. pencil
  3. block printing ink
  4. paint roller
  5. flat piece of plexiglass
  6. coloured paper
Explain the principle of printing. Why is it that people started to print texts and pictures?


Draw an African animal with a pencil on the styrofoam. Press to get a print in the foam. Squeeze out “toothpaste” amount of ink on plexiglass. Roll ink out. The ink is ready when lines appear. Ink should look wet.
Put the styrofoam on a newspaper. Roll one colour ink onto the foam, working quickly to cover all areas. Lay a sheet on top of foam and press with a flat hand. Take away the sheet and your print is ready. Let dry and cut it with about 1 cm around. Paste one or more prints on a white sheet. 


All artworks made by students of grade 6

zaterdag 13 december 2014

Christmas trees in the snow


By students of grade 2

You need:
  1. large drawing sheets 
  2. liquid watercolour green and red 
  3. oilpastel crayons 
  4. brushes
Draw a wavy line, the ground. Draw several christmas trees. Simple triangles are okay, this lesson is about overlap - not all the trees next to each other. Decorate the trees with balls and garlands and draw presents under the trees. Colour with oil pastels. Use white oilpastel for snowflakes.
Paint with liquid watercolor, the ground has to stay white.

donderdag 11 december 2014

Rudolph with his red nose


All credits for this great lesson and a full step by step instruction on ArtVenturous. I made these cute Rudolphs last year with my grade 1 students.

woensdag 3 september 2014

Giraffes can't dance


You need:
  1. white drawing sheet
  2. soft pastel
  3. oilpastel
  4. scissors
  5. glue
Gerald would love to join in with the other animals at the Junge Dance, but everyone knows that giraffes can't dance ... or can they?

This lesson can be used by the book  'Giraffes can't dance' by Giles Andeae and Guy Parker-Rees.

Read the book of Gerald the Giraffe. After this children draw a giraffe that's trying to dance. Colour with oilpastels. Colour a background with soft pastel. Cut the giraffe and paste it on the background.

Made by students of grade 1 and 2. 

zondag 31 augustus 2014

Buzzzzzing bees


Made by a student of grade 2.

You need:
  1. bubblewrap
  2. paint roller
  3. drawing sheet 
  4. yellow and brown tempera 
  5. yellow pencil
  6. fine black marker 
Roll a piece of bubble wrap in with yellow paint and print it. Let dry.
Make fingerprints in brown paint and let dry.
Draw lines with yellow pencil on the body of the bee.
Draw wings and legs with black fine liner.

donderdag 15 mei 2014

Funny birds like James Rizzi


I came across this great lesson for our first graders on Deep Space Sparkle. What a fun our students had, making these cute little birds in the style of James Rizzi!

James Rizzi was born in 1950 in Brooklyn. He studied art in Florida (Gainesville), where he started experimenting with printing, painting and sculpting. Rizzi’s work often shows his birthplace New York. His paintings look sometimes childishly naive, with the bright colours and brilliant gaiety. In the art press Rizzi is often described as "Urban Primitive Artist '. Rizzi himself says he is influenced byzelf Picasso, Klee and Dubuffet.

Show some paintings of Rizzi and discuss the characteristics:
  • bright colours
  • no gradations within colours
  • evertything is outlined with a black marker
  • the artwork is full and busy
  • background is full and busy too
You need:
  1. white drawing sheets A4 size cut lengthwise
  2. markers
  3. scissors and glue
  4. blue cardboard A1 size for background
Discuss birds in Rizzi's artwork (google onRizzi + birds) and ask students if the typical Rizzi features are in the bird artworks too. 

The goal for this lesson: 
Use oilpastel to draw a bird just like Rizzi did. Use watercolour paint and paint the bird in one or two colours. Paint the background with several colours.

Artworks made by students of grade 1

donderdag 10 april 2014

Sheep in the meadow

Made by a student of grade 2

You need:
  1. drawing sheet 
  2. tempera paint
  3. stippling brushes
  4. masking tape
  5. black and white construction paper
  6. glue
Make a fence on the sheet with masking tape. Draw a horizontal line above the fence. Stamp with different colours the meadow. Do not mix the paint. Stamp some spring flowers too.

Stamp the air in the same way with white and blue.
Remove the masking tape. Do this when the paint is still wet.
Cut some clouds for the body of the sheep out of a white sheet. Cut heads and feet out of black paper. Paste the sheep before the fence. Draw eyes and beak with white pencil.

Source: Artsonia. 

donderdag 6 februari 2014

The best nest


  1. drawing sheet
  2. oilpastel
  3. liquid watercolour paint
  4. brushes
  5. 3D tape
The best nest for birds in winter is a colourful one! This birdhouse will protect birdies against snow and cold.

Students draw a birdhouse and colour it in with oil pastels. Perhaps there's also a  peanut pendulum on the house. Draw  snowflakes (white oil pastel) and also a layer of snow on the house.
Paint the background with liquid watercolor. Leave about 1 cm white on the edges for an extra winter look. Draw (or print) a bird on another piece of paper and cut it. Paste it in the house using 3D tape for a spatial effect (the pads that are used to create 3D cards).

Made by students of grade 1/2

maandag 7 oktober 2013

Singing in the rain

Artwork made by a student of grade 1
You need:
  1. white drawing sheetA2 size
  2. crayons
  3. liquid watercolour
  4. brush
Students draw a person under an umbrella and colour it in with crayons. Then they draw raindrops with white crayon. Paint the entire drawing with liquid watercolour.

Be sure that:
  • rain falls from top to bottom;)
  • under the umbrella is no rain
  • rain is transparent, so we draw with white on white!
  • rain forms puddles on the ground

zondag 25 augustus 2013

Busy bees


You need:
  1. white crayon
  2. markers
  3. liquid watercolour paint
  4. brush
Fold the sheet of paper in half. Draw on both halves a bee. Colour the body with black and yellow marker. Colour the head black, keeping two white dots for eyes. Draw with black marker six legs and two wings. Use white crayon to draw veins in the wings.
Paint the background and the wings with liquid watercolour while keeping the edges white for about one cm.

Made by students of grade 3/4
Source: Artsonia. 

donderdag 22 augustus 2013

This is ME!!!


You need:
  1. drawing sheet A4 size
  2. watercolour paint
  3. brushes
  4. black marker
A great lesson to start a new year of school! Students draw a self portrait using a black marker and colour it with watercolour paint.

Made by students of grade 1

dinsdag 15 januari 2013

Snowmen

Made by a student of grade 4

You need:
  1. blue construction paper
  2. oil pastels
Students draw three or more overlapping snowmen wearing fashionable scarves. Colour with oil pastel and outline with black.

maandag 26 november 2012

Doodling together - group mural


Made by students of grade 6

 You need:
  1. drawing sheets A1 size
  2. tape
  3. tempera paint
  4. brushes
Step 1
Stick some large sheets together with tape and lay them on a group tables of equal height.
Groups of four students at the same time draw little forms or doodles on this sheet using black tempera. The drawings should not touch each other.  When all doodles are finished, have a couple of kids connect them by straight black lines.


Step 2
Paint all surfaces and doodles with tempera. Each student chooses a colour and paints some surfaces or doodles. Be sure to avoid surfaces with the same colour next to each other.


This lesson can be done in every grade by varying subject or colours: choose only primary colours and straight forms to create a  Mondrian version.
Or choose a theme for the doodles, like Christmas, food or sports.

Great success in which variation whatsoever is guaranteed!

The proud artists of grade 6 all together! 

Original idea: Experiments in Art Education.

zondag 18 november 2012

Spider in coloured web

Made by students of grade 2
You need:
  1. white drawing sheet A4 size
  2. blackoilpastel
  3. autumn leaves
  4. liquid water colour in orange and green
Divide the sheet with a black oil pastel in eight parts: two diagonal lines, one vertical and one horizontal. Draw a web between those lines. Draw one or more spiders in the web.

Colour the different parts with liquid water colour in orange and green.

dinsdag 23 oktober 2012

Four season trees

 
You need:
  1. four white drawing sheets A6 size (postcard)
  2. Q-tips
  3. tempera paint
  4. coloured corrugated cardboard
  5. silver and gold markers
  6. fiberfill
  7. glue
How can a deciduous tree tell you what season it is? What colours do they have in spring, summer and fall? What does a tree look like in winter?

Discuss these questions at the beginning of this lesson. Write on the board the colors in the spring heard (light green, green, white, pink - blossom), which belong to the summer (green, dark green, yellow) and the autumn colours (brown, orange, red, yellow). And in winter there aren't any leaves. left of course.

 
The students will make a tree for every season. The colours of the leaves have to show what season it is. The log is "painted" with a Q-tip, the leaves have to be may only be spotted. Remember that in fall there are a lot of leaves on the ground! Use fiberfill (snow) for the tree in winter.
 
Paste the trees next to each other on a piece of corrugated cardboard. Design it with gold or silver marker and write the seasons above the trees.  

Organisation:
Give each groep of six students an eggtray with several colours of paint. Give each student a Q-tip to paint the trunk. Per groep een eierdoos met de verschillende kleuren verf. Geef de leerlingen elk een wattenstaafje voor de boomstam.For the dots: one Q-tip per colour for common use.
 
Artworks made by students of grade 3
 
Thanks to Maureen Kaal