Posts tonen met het label grade 2. Alle posts tonen

vrijdag 31 januari 2020

Son of Man - Like Magritte


You need:
  1. white drawings sheets A3 size
  2. white and blue tempera paint 
  3. paper with stone print
  4. white round paper
  5. camera
  6. bowler hat and black coat 
  7. brushes
  8. small dishes
  9. sponges
René Magritte
Rene Magritte is born in 1898 in Belgium. When Magritte is 13 years old, his mother commits suicide. She jumps in the river Samber and is found with her dress covering her face. This image has been suggested as the source of several paintings from Magritte: people hiding their faces with several objects.
In 1924 Magritte became friends with members of a surrealism group in Brussels: André Breton, Joan Miró and Salvador Dalí. These artists influence Magritte's work. In the end Magritte became famous with surrealistic paintings.
Magritte gave his paintings a realistic effect of surrealism. He painted simple objects, like a shoe, an apple, a pipe or a tree. Magritte took these things out of their ordinary environment and placed them in a special surrounding.
One of Magritte's most famous works is "La Trahison des Images" (The Treachery of Images). This is a very realistic painting from a pipe, with the text: Ceci n'est pas une pipe (This is not a pipe). The painting is not a pipe, but rather an image of a pipe. As Magritte himself commented: "The famous pipe. How people reproached me for it! And yet, could you stuff my pipe? No, it's just a representation, is it not? So if I had written on my picture 'This is a pipe,' I'd have been lying!"
By putting us constantly on the wrong track, Magritte forces us to think about art. Magritte thought it the task of an artist to place reality in a different context.

Look at the artwork
Discuss the painting The son of man. What do you see? What does the man wear? What's on his head? Why can he see little? Can he see nothing of can he peek at the edge of the apple? What's wrong with his left arm? (his arm appears to bend backwards at the elbow). What do you see at the background? What does the sky look like?

How do you make this artwork?
Take photographs of the students wearing a bowler hat and a dark coat; arms hanging beside the body. Students paint their sheet blue and let it dry. Cut a wall out of stoneprint paper and stick it on the blue sky. Stamp white spots on the artwork using a sponge. Let dry againg. Cut the photo neatly along the edges and paste it on the blue sheet in front of the stoneprint paper. Draw a piece of fruit on the circle sheet and show color transitions, just like real fruit. Paste it on the face.


Both artworks are made by students of grade 1

donderdag 7 november 2019

Transport - like Hundertwasser


Friedensreich Hundertwasser (1928-2000) was an Austrian artist and architect who is best known for the colorful buildings he designed, built with attention to the environment and natureThe buildings of Hundertwasser are very recognizablestraight lines are missingthere is use of bright colors and many of his buildings have typical turrets. The influence of architect Gaudi is obvious.
The paintings of Hundertwasser have exuberant colours too and mainly undulating lines.

Show buildings of Hundertwasser on the digital board. Discuss the salient  features: bright coloursundulating linesThen show some paintings and discuss the things that stand out:

 the use of small areas outlined with black
 no straight lines, usually parallel lines
 recurring spiral shapes
 bright colours

Tell students they are going to draw means of transport in the style of Hundertwasser. 

You need:
  1. drawing sheet
  2. pencil
  3. markers
Draw a car, plane, boat or something you think is a mean of transport. Fill it with lines and patterns like Hundertwasser did. Cut your drawing and paste all means of transport on a great colored sheet. 

Source: Dutch website Laat maar zien. 

vrijdag 11 januari 2019

Corneille China

Made by a student of grade 1
You need:
  1. paper plates)
  2. black markers
  3. acrylic paint
  4. small brushes 
  5. jars with water and paper towels
Show some pictures of animals in Corneille's artwork. What do you see? What can you say about the colors? Do you like it? Why or why not? What animals do you see on the china?

Choose an animal. Use a black marker to draw it on your plate. You can also decide to draw just the head of the animal. Your drawing has to be large, it has to fill almost the entire plate. Can you think of anything else? Does the moon shine? Is your animal with others? Or is it in the grass? You can make it!

Color your drawing with acrylic paint and a brush. Choose bright colors and make sure it's opaque. Rinse your brush with each new color and dry it well in a paper towel; the acrylic paint shound not get wet.

Trace the marker lines again if necessary but only if the paint is really dry.

More information about Corneilla and the Cobra group on this blog:  Lesson 1 en lesson 2.

donderdag 23 augustus 2018

The very lonely firefly


You need:

  1. black construction paper
  2. tempera paint
  3. brushes
  4. gold and silver markers
  5. pencils
Book: The very lonely firefly from Eric Carle (also to be found on YouTube)

Students use white tempera to paint two or more jars at the bottom of the black sheet. They mix yellow and blue to paint grass in different shades of green over the jars. Draw fire flies with gold and silver markers and color them with pencils. 


zaterdag 4 maart 2017

Groupwork like Joan Miró

Made by students of grade 3/4

Joan Miró's (Spain, 1893-1983) made paintings, sculptures, textile arts and theater. His paintings contain colorful organic shapes in bright colors: red, blue, yellow, green. The colored surfaces are outlined in black and frequently divided with black lines.

Show some of Miró's artwork. What do you see: bright colors, eyes, shapes outlined in black, divided surfases, stars. Talk about the difference between geometric and organic shapes. Talk about lines: straight, angular, rounded. What do you see in Miró's artwork?

The goal for a group of 4 students is: draw alternately lines on the white sheet with a permanent black marker. Make sure those lines look like Miró. Off course lines may cross! Then draw some elements Miró used too: eyes, stars, divided surfaces etc. Color the artwork. Be sure you're working with 4, so consult each other.

Ready? Sign the work with your personal signature in Miró style!


dinsdag 14 februari 2017

Dali's moustache II

Made by a student of grade 1
You need:
  1. colored sheet A4 size
  2. black marker
  3. white sheet A4 size
  4. black crayon
  5. scissors and glue 
  6. pipe cleaner 
More information about Salvador Dalí, see the lesson High legged elephant in the style of Salvador Dali.

Show some surrealistic artworks of Dali and discuss the surrealistic parts of it.  Show The melting clocks. Discuss the shape of the clocks. What happened to these clocks? Are these clocks that you can hang on the wall? Why not? Why do we call this surreal?
Dali's artwork will surprise you. We see realistic parts, complemented with dreams and fantasy.

Dali was an eccentric man. Show som portraits of Dali and look at all those different ways he wears his moustache.

Students write words about surrealism and Dali with a marker on the colored sheet. Then they draw a portrait of him with crayon on a white sheet. Cut it, paste in on the colored sheet. Puncture two holes under the nose and pull the pipe cleaner through. Shape the moustache in a way that Dali would like!

vrijdag 16 december 2016

Dancing Christmas trees

Made by a student of grade 1
You need:

  1. white drawing sheet
  2. pencil
  3. markers
  4. chalk pastels
Dancing Christmas trees are Christmas trees who look like them only because of the shape (rectangular) and decorations (balls, garlands and stars)! The trunks are much longer than the  the ordinary trees and because of the curves in them it looks they are dancing.  
Draw with pencil, colour with markers, outline with black marker and colour the background with chalk pastels.


zaterdag 5 november 2016

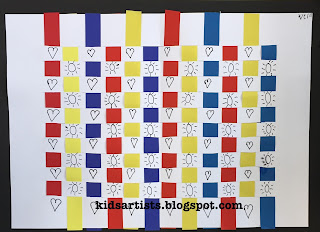
Weaving like Mondriaan

Made by a student of grade 2

You need:
  1. white sheet A4 size
  2. colored paper strips in primary colours
  3. scissors
  4. glue
  5. black fineliner 
Fold the white sheet in half.
Cut evenly-spaced slits starting from the folded edge and continuing up to about a half inch from the opposite. Open up the paper.
Take one paper strip and weave it across the slits, going over and under them. Push the strip to the top and start with another one. The second strip should be woven in an opposite pattern as the first one. If the first strip goes over and under across the slits, the second one should go under and over the slits.
Continue weaving until the white sheet is full. Paste the ends of the strips on the white sheet.
Create a frame by pasting the artwork on black construction paper. Draw small patters on the white strips using a fine black marker. 

zondag 30 oktober 2016

Mondriaan collage with printed lines


You need:

  1. paper in primary colours
  2. white sheet A3 size 
  3. pieces of cardboard 
  4. black tempera paint
  5. saucer
  6. ruler 
  7. pencil 
  8. scissors 
Just like Piet Mondriaan (De Stijl), students draw rectangles and squares using ruler and pencil on construction paper in yellow, blue and red.  After this the drawings have to be cut and pasted on a white sheet. However Mondriaan did not: students may stick colours together.  
Stamp straight lines using a piece of ribbed cardboard and black tempera paint. 

Made by a student of grade 3 

Source: http://artroom104.blogspot.nl/ 

vrijdag 14 oktober 2016

Happy monsters

You need:


  1. drawing sheets A3 size
  2. markers
  3. tempera paint

Draw happy monsters! Not the scary types, but the nice ones with big eyes. Color with markers, background with tempera. Outline with black marker.

Made by students of grade 6

vrijdag 29 april 2016

Birdies on a branch

Made by a student of grade 1

You need:
  1. liquid water color paint
  2. brushes
  3. crayons
  4. white sheet
  5. feathers
  6. glue
Draw a branch with some birdies on it. Their eyes should be big and white! Color the birds with crayons using bright colors. Paint the branch and background with water color paint. Let dry. Draw feet and paste feathers. 

vrijdag 11 maart 2016

Printing African animals


You need:
  1. styrofoam
  2. pencil
  3. block printing ink
  4. paint roller
  5. flat piece of plexiglass
  6. coloured paper
Explain the principle of printing. Why is it that people started to print texts and pictures?


Draw an African animal with a pencil on the styrofoam. Press to get a print in the foam. Squeeze out “toothpaste” amount of ink on plexiglass. Roll ink out. The ink is ready when lines appear. Ink should look wet.
Put the styrofoam on a newspaper. Roll one colour ink onto the foam, working quickly to cover all areas. Lay a sheet on top of foam and press with a flat hand. Take away the sheet and your print is ready. Let dry and cut it with about 1 cm around. Paste one or more prints on a white sheet. 


All artworks made by students of grade 6

woensdag 27 januari 2016

Valentine - like Robert Indiana


Made by a student of grade 2

You need:
  1. drawing sheet 20 by 20 cm
  2. water colour paint
  3. brushes
  4. fine black marker
A lesson about the famous LOVE sculpture of Robert Indiana. I used the Dutch word LIEF (meaning Nice, or I like you) 
Fold the sheet in four squares. Draw hearts in each part. Draw fat letters on the foreground. Fill letters and hearts with patterns and paint with water colour paint. Outline with fine black marker. 

Blogwriter in NY!

zaterdag 13 december 2014

Christmas trees in the snow


By students of grade 2

You need:
  1. large drawing sheets 
  2. liquid watercolour green and red 
  3. oilpastel crayons 
  4. brushes
Draw a wavy line, the ground. Draw several christmas trees. Simple triangles are okay, this lesson is about overlap - not all the trees next to each other. Decorate the trees with balls and garlands and draw presents under the trees. Colour with oil pastels. Use white oilpastel for snowflakes.
Paint with liquid watercolor, the ground has to stay white.

donderdag 11 december 2014

Rudolph with his red nose


All credits for this great lesson and a full step by step instruction on ArtVenturous. I made these cute Rudolphs last year with my grade 1 students.

woensdag 3 september 2014

Giraffes can't dance


You need:
  1. white drawing sheet
  2. soft pastel
  3. oilpastel
  4. scissors
  5. glue
Gerald would love to join in with the other animals at the Junge Dance, but everyone knows that giraffes can't dance ... or can they?

This lesson can be used by the book  'Giraffes can't dance' by Giles Andeae and Guy Parker-Rees.

Read the book of Gerald the Giraffe. After this children draw a giraffe that's trying to dance. Colour with oilpastels. Colour a background with soft pastel. Cut the giraffe and paste it on the background.

Made by students of grade 1 and 2. 

zondag 31 augustus 2014

Buzzzzzing bees


Made by a student of grade 2.

You need:
  1. bubblewrap
  2. paint roller
  3. drawing sheet 
  4. yellow and brown tempera 
  5. yellow pencil
  6. fine black marker 
Roll a piece of bubble wrap in with yellow paint and print it. Let dry.
Make fingerprints in brown paint and let dry.
Draw lines with yellow pencil on the body of the bee.
Draw wings and legs with black fine liner.

donderdag 15 mei 2014

Funny birds like James Rizzi


I came across this great lesson for our first graders on Deep Space Sparkle. What a fun our students had, making these cute little birds in the style of James Rizzi!

James Rizzi was born in 1950 in Brooklyn. He studied art in Florida (Gainesville), where he started experimenting with printing, painting and sculpting. Rizzi’s work often shows his birthplace New York. His paintings look sometimes childishly naive, with the bright colours and brilliant gaiety. In the art press Rizzi is often described as "Urban Primitive Artist '. Rizzi himself says he is influenced byzelf Picasso, Klee and Dubuffet.

Show some paintings of Rizzi and discuss the characteristics:
  • bright colours
  • no gradations within colours
  • evertything is outlined with a black marker
  • the artwork is full and busy
  • background is full and busy too
You need:
  1. white drawing sheets A4 size cut lengthwise
  2. markers
  3. scissors and glue
  4. blue cardboard A1 size for background
Discuss birds in Rizzi's artwork (google onRizzi + birds) and ask students if the typical Rizzi features are in the bird artworks too. 

The goal for this lesson: 
Use oilpastel to draw a bird just like Rizzi did. Use watercolour paint and paint the bird in one or two colours. Paint the background with several colours.

Artworks made by students of grade 1

donderdag 10 april 2014

Sheep in the meadow

Made by a student of grade 2

You need:
  1. drawing sheet 
  2. tempera paint
  3. stippling brushes
  4. masking tape
  5. black and white construction paper
  6. glue
Make a fence on the sheet with masking tape. Draw a horizontal line above the fence. Stamp with different colours the meadow. Do not mix the paint. Stamp some spring flowers too.

Stamp the air in the same way with white and blue.
Remove the masking tape. Do this when the paint is still wet.
Cut some clouds for the body of the sheep out of a white sheet. Cut heads and feet out of black paper. Paste the sheep before the fence. Draw eyes and beak with white pencil.

Source: Artsonia. 

donderdag 6 februari 2014

The best nest


  1. drawing sheet
  2. oilpastel
  3. liquid watercolour paint
  4. brushes
  5. 3D tape
The best nest for birds in winter is a colourful one! This birdhouse will protect birdies against snow and cold.

Students draw a birdhouse and colour it in with oil pastels. Perhaps there's also a  peanut pendulum on the house. Draw  snowflakes (white oil pastel) and also a layer of snow on the house.
Paint the background with liquid watercolor. Leave about 1 cm white on the edges for an extra winter look. Draw (or print) a bird on another piece of paper and cut it. Paste it in the house using 3D tape for a spatial effect (the pads that are used to create 3D cards).

Made by students of grade 1/2