Posts tonen met het label grade 5. Alle posts tonen

woensdag 4 augustus 2021

Insects

 You need:

  1. crayons
  2. black construction paper 20 by 20 cm
  3. black paint
  4. brush
  5. toothpick
Color a drawing sheet with crayons. Paint the entire sheet black and let it dry.  Scratch insects with a toothpick. 

 Paste the artwork on a coloured background.

maandag 2 augustus 2021

Dutch canal houses: indian ink and soft pastels


You need: 

  1. drawing sheets
  2. pencil
  3. ruler
  4. indian ink
  5. dip pen
  6. soft pastels
Dutch canal houses are famous for their facades: stepped gable, neck gable, bell gable, clock gable or spout gable. Show pictures of those five gables and discuss them. Show photographs from canal houses and discuss the other features of canal houses: the stairs, symmetry, windows, ornaments, shutters. 
Students draw a line on their sheet about 5 cm from below. This is the canal. At the end you can glue all drawings together to get a long street full of canal houses. Sketch the houses lightly with a grey pencil. Indicate the places of windows, stairs, doors and shutters. Draw small boats in the canal. Draw the houses with indian ink and color them with soft pastels.

by students of grade  6

maandag 10 mei 2021

Vincent van Gogh's chair


You need:
  1. for prints: colored paper 14 by 14 cm 
  2. for background: colored paper 
  3. linoleum 12 by 12 cm
  4. carbon paper
  5. lino knife
  6. flat piece of glass 
  7. block printing ink
  8. lino roller
  9. lino press
  10. glue

The painting The chair is from 1888 (The National Gallery, London). View this painting and discuss it using elements of art. What do you see? What stands out? What do you on the chair? What can you say about the perspective? What materials did Van Gogh use? What do you think about the colors? Do you like the painting or not, and why is that?  

Print the drawing below as a picture of 12 by 12 cm. 


Transfer the lines from the image to the linoleum using carbon paper and a pen. 


Cut out the lines.


Make two prints in colors you like. You can mix them too! Let dry. 


Stick the works on a matching colored sheet. 

Elements of art: color, space, line. 

zaterdag 8 mei 2021

Tropical birds in chalk pastel


You need:

  1. black construction paper
  2. black oil pastels
  3. chalk pastels
  4. fixative spray
View photo's of tropical birds and discuss them. 
Draw on the black sheet a bird on an branch using black oil pastel. Color with chalk pastels and finish it with fixative spray. 


woensdag 28 april 2021

On Monet's bridge


You need: 

  1. drawing sheet A3 size
  2. tempera paint
  3. brushes
  4. white construction paper
  5. scissors
  6. oilpastels
  7. glue
Claude Monet (1840-1926) is considered one of the most important painters of Impressionism. 

 Typical for Impressionists:

  • they choose subjects from ordinary life 
  • special attention for light and color
  • work in the open air
  • smooth brushstrokes
  • dashes resemble a sketch
  • it's about the impression!
Discuss the term impressionism. Show some paintings by Monet and zoom in on a work with water lilies in Arts & Culture. Do students see the characteristics of impressionism in this artwork?

Monet had a large garden with a pond and a Japanese bridge in Giverny France. He liked to paint in that garden. His works of water lilies are therefore famous and are the basis of this lesson.


Lesson 1
Draw a horizon line above the middle of your sheet. Paint the pond and the sky with short brush strokes, like Monet did. Do not mix the paint, but take two colors on your brush.  Make sure the blue color of the pond is not the same color as the sky.
Paint trees on both sides of the sheet in the same way. Paint water lilies in the pond. Be sure that they are larger in the front of the pond than in the back.  

Lesson 2
Have someone take a picture of you that shows you all the way. Print the photo and cut it out. 
Cut three parallel arcs from about 1,5 cm wide from the construction paper.  Then cut four straight pieces of 1,5 cm wide. Paste the photo on the work and paste the bridge over it. 

All artworks are made by students of grade 6

Source: MaryMaking.blogspot.com

zondag 25 april 2021

Van Gogh's bedroom

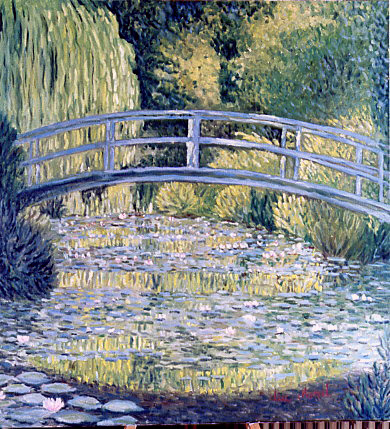
        by a student of grade 6 

You need:
  1. for prints: black and white sheets 18 by 14 cm 
  2. for background: black and white construction paper 31 by 19 cm
  3. linoleum 16 by 12 cm
  4. carbon paper
  5. lino knife
  6. flat piece of glass 
  7. block printing ink
  8. lino roller
  9. lino press
  10. glue

The painting The bedroom is from 1888. View this painting and discuss it  using elements of art. What do you see? What stands out? What do you see on the wall? What can you say about the perspective? What materials did Van Gogh use? What do you think about the colors? Do you like the painting or not, and why is that?  

Print the image below on 12 by 16 cm for each student. 

Transfer the white lines from the image to the linoleum using carbon paper and a pen. Cut out the white lines and parts. 


Cut out your name in mirror writing at the bottom left. 
Make four prints: two with white paint on black paper and two with black paint on white paper. Let dry. 
Stick the white sheets on black paper and the black sheets on white paper. Use 1 cm of the sheets to stick them together.

all artworks of grade 6

Elements of art: color, space, line. 

donderdag 1 april 2021

Paint like an impressionist

This lesson is an exercise for painting an impressionist work.

You need:
  1. white drawing sheet
  2. tempera paint in red, blue and yellow
  3. small brushes
  4. paper towels
View impressionist paintings, for example from Claude Monet or Van Gogh. Zoom into Starry Night from Van Gogh using this link
What do you see?
  • the painting is made out with loose dashes.   
  • the dashes indicate a direction or movement, they are not just placed.
  • you can see the canvas between the dashes. The color of the canvas is therefore part of the painting. 
View a sunset picture. 


What do you see?
  • the sun is reflected in the water 
  • the sun's rays point left, up and right
  • the horizon is half way the photograph 
Exercise before you get started: 
  • Practice painting short strokes on a scrap. To do this, always lift the brush from the paper.
  • Practice with two colors on your brush; do not mix!
  • Make narrow / wide strokes by turning / not turning your brush.
  • Clean the brush for a new color with a paper towel, do not use water!
And now the artwork:

  • Fold your drawing sheet in half lengthwise, this is the horizon line.
  • Draw with pencil a semicircle on the horizon line, this is the sun.
  • Paint the sun orange: apply red and yellow to your brush. Do not mix!
  • Paint the sun's rays with yellow and very little red. Put something on your brush of both colors and make short strokes by lifting the brush from the paper each time. Also leave white between the strokes.
  • Also make the reflection of the sun in the water. Beware: the direction of the brushstrokes is now horizontal, just like the water.
  • Make the sky with blue and white (again add two colors to the brush). Use white to make a lighter blue. Follow the direction of the sun's rays. Don't make the sky completely full, you have to keep seeing paper.
  • Paint the sea with blue, white (and maybe green). Do not mix! The direction is horizontal here. Think of the white space between the lines.
Elements of art: line, color, nuance.

zondag 7 februari 2021

Design a chips bag


 You need:
  1. drawing paper 
  2. pencil
  3. pictures of chips bags 
  4. color pencils
  5. black marker 
Look at chips bags and discuss what stands out. 
  • the name of the chips is usually at the top of the bag
  • the name is large and sometimes in 3D letters 
  • bright colors
  • taste and weight is on it
  • it has an image of one or more chips 
  • special features can be on it, like New, Party Pack or Less Fat 

Draw the wavy outlines of a chips bag. Think of a name and flavor for your chips. Draw the name on the bag in large 3D letters. Draw some chips on the front. Write the weight on the bag and some details. 
Color with color pencils or aquarel pencils. Outline letters and details with a fine black marker. 

Thanks to Pascal Cuijpers and his students (Connect College, Echt - NL) for this lesson. 

donderdag 21 januari 2021

Covid haircut


made by a student of grade 5

You need:

  1. white drawing sheet 
  2. pencil
  3. color pencils
Hairdressers have been closed for a while because of the epidemic …. what consequences does that have? 


How do you look now? Or your parents? Or a famous person? 

Assignment: 
Draw a portrait of yourself or someone else with a Covid haircut. 
Choose which materials you use and whether you draw in black and white or in color.  
Difficult to draw a portrait? No, watch this video about face proportions. 

Beeldaspecten: vorm, lijn, ruimte. 

maandag 28 december 2020

Stained glas animals

 
made by students of grade 5

You need:

  1. black construction paper 
  2. wax paper in several colors
  3. white pencil
  4. ruler
  5. cutting mat 
  6. cutting knife
  7. glue

A stained glass window is a window in which several pieces of (mostly colored) glass are stuck in frames of lead. Stained-glass windows were made in times when it wasn't possible yet to make a window in one piece. We see those stained glass windows in old houses, but especially in churches. The light from outside enters in multiple colors into the church. 

View stained glass windows and tel about their origin and the effect of the colored light.  

Use a white pencil to draw an animal on the black sheet. Draw at least three lines from the animal to all edges of the sheet. Divide the animal into some surfaces. 
Make all lines 1 cm wide. Hatch the surfaces between the 1 cm lines with the white pencil.
Cut the white area's. When ready, use the black sheet as a template to draw the pieces of wax paper. Cut them out with an extra 0,5 cm and stick them behind the window. Make sure that there are no two same colors next to each other. 

Elements of art: line, shape, color. 
Technique: cutting.
Connecting with: history. 

zondag 13 december 2020

3D winter or Christmas scene


made by students of grade 5/6

You need: 

  1. white cardboard 21 by 21 cm
  2. colored glace paper 14,5 by 14,5 cm
  3. cutting knife 
  4. cutting mat
  5. glue

Too difficult or not enough time? Skip step 1 and 2. 

Step 1
Draw a square at 2 cm from the edges, this is the outside of the frame. 

Step 2
Draw in this square another square at 3 cm of the edges: this is the front of the frame.  

Step 3
Draw in the 15 by 15 cm square a simple winter or Christmas scene.  Make the lines 1 cm wide and make sure they are on 4 sides attached to the 1 cm wide frame. See pattern below. 

Step 4
Color the parts you have to cut out grey.  

Step 5
Cut out the grey parts. 

Step 6
Cut the corners diagonally, see pattern. 

Step 7
Fold the lines of the 15 by 15 square. 

Step 8
Stick the corners.

Step 9
Stick the glace paper in the frame. 


Elements of art: line, form, space.


vrijdag 27 november 2020

Scratch a Christmas ball

You need:
  1. drawing sheet
  2. oli pastels or crayons
  3. black tempera paint 
  4. brush
  5. alufoil 
  6. ribbon
  7. toothpick or skewer
Color the sheet with crayons. Paint it over with black tempera paint and let dry. Scratch with a toothpick or skewer a Christmas ball and fill it with patterns. 
Cut a small piece of aluminumfoil and paste it on the ball with a folded ribbon under it. 

made by students of grade 6

Elements of art: line (pattern)


zaterdag 21 november 2020

Winter tree in warm-cool colors

 You need:

  1. drawing sheets 25 x 32,5 cm
  2. crayons
  3. watercolor paint
  4. black tempera 
  5. brushes
  6. jar with water
With crayon: draw a horizonline and a tree trunk from the bottom of the sheet. Draw branches that touch the edges of the sheet. Draw a pattern in the landscape below the horizon. 
With watercolor paint: paint the sky. Paint the surfaces between the branches in warm or cool colors. Paint the surfaces in the landscape: warm if you first chose cool, cool if you first chose warm. 
With tempera: paint the branches and trunk black. 

Elements of art: color (warm and cool), space, line (pattern)

artworks made by students of grade 4

vrijdag 30 oktober 2020

Mondrian, a bit different

 You need:

  1. white drawing sheet
  2. markers
  3. ruler
  4. pencil
Draw a Mondrian, but change one of the elements of art. For example: 
  • do not draw squares and rectangles, choose another geometric shape
  • do not color with primary colors, choose maximum four other colors
Draw your alternative Mondrian and color it with markers. Outline with black marker. 

Elements of art: color, shape, line. 

donderdag 29 oktober 2020

Mondrian in chalk pastels

 You need:

  1. black construction paper 
  2. pencil
  3. ruler
  4. chalk pastels 
  5. Elmer's glue 
  6. fixing spray
Look at and discuss about the artwork of Piet Mondrian.

Draw squares and rectangles on the black sheet using a pencil and a ruler. trace the lines with Elmer's glue. The glue will become transparent when it has dried. 
Color the squares and rectangles with soft pastels in white, black, red, yellow and blue. Instead of black pastels, you can leave some areas open. Be sure you don't get two areas of the same color next to each other. 
Fix the work with hairspray or fixative spray. 

Elements of art: color, shape, line. 

Still life with fruit

door leerlingen van groep 5

You need:
  1. corrugated cardboard
  2. scissors
  3. white drawing sheet
  4. tempera paint
  5. brush
  6. glue
  7. colored construction paper
Vies and discuss still lifes of fruit in different styles (for example Caravaggio and Cezanne). How is the fruit arranged? Why at that way? Which parts are light and which parts are dark? What does that mean? 


Provide each group of students with a bowl of different fruit types. Students paint the fruits (no drawing first!) after a good observation. 
Cut a fruit bowl out of the cardboard. Cut out the fruits with a small white edge. Stick the fruits on a colored sheet, be sure to let them overlap each other. Stick the cardboard bowl. Some fruits will partly disappear in it. 

Elements of art: space, color, value. 

vrijdag 16 oktober 2020

Pumpkins like Yayoi Kusama

made by a student of grade 4

 You need:

  1. black construction paper
  2. colored paper
  3. black marker
  4. black fineliner
  5. scissors
  6. glue
  7. white pencil
Yayoi Kusama (1929) is a Japanese artist. She creates paintings, sculptures and large installations with mirrors and lots of light symbolizing infinity. All her artworks have one thing in common: polka dots. That's why she's affectionately known as 'the princess of polka dots'. 
From an early age Kusama wanted to make art, but her traditional Japanese parents didn't like this. That's why Kusama left for NewYork and joined artists there, including Andy Warhol. 

By adding all-over marks and dots to her paintings, drawings, objects and clothes she feels as if she is making them (and herself) melt into, and become part of, the bigger universe. She said:

‘Our earth is only one polka dot among a million stars in the cosmos. Polka dots are a way to infinity. When we obliterate nature and our bodies with polka dots, we become part of the unity of our environment’.

View and discuss artwork of Kusama. 
  • use of large and small polka dots 
  • backgrounds are often filled with triangles
  • use of bright colors
  • her installations suggest infinity
Draw three pumpkins on the colored sheets and cut them. Draw bigger and smaller dots on the segments with markers. Draw triangels on the black sheet with a white pencil - start with a zigzag line. Paste the pumpkins on the black sheet.


zondag 27 september 2020

Pumpkin, like Burton Morris


 You need:

  1. several colors construction paper
  2. black cardboard 20 by 20 cm
  3. colored cardboard 20 by 20 cm
  4. scissors
  5. glue
  6. black marker
Burton Morris (Pittsburgh, 1964) is an American pop-art artist. He is influenced by pop-art artists from the 60's and 70's, like Warhol, Lichtenstein and Haring. Now he is one of the most famous modern post pop-art artist. Morris's work shows a contemporary twist to traditional pop-art. His work is cheerful, energetic and colourful. His characteristic lines with the bright colors give his work a fantastic energy. Morris's work is known of tv-series like Friends and also appears in major advertising campaigns by U.S. companies like AT & T, Pepsi and Heinz. 

To see a step by step description with photos', see my other post about Burton Morris

And read the mail I got from Burton Morris when he came across my lesson of 2011: 

Dear Jacquelin,

I came across your blog and saw your student's artworks. I am truly touched that you honored my artwork in your teaching lessons and hope it was a success and inspired the children! 

I hope to show again in the Netherlands one day and feel free to keep in touch.

Your friend,
Burton Morris

woensdag 26 augustus 2020

Birthday calendar in one color


You need:

  1. drawing sheet
  2. tempera paint
  3. ruler
  4. pencil
  5. black marker
Draw with pencil a geometric shape in the middle of the sheet. Draw horizontal and vertical lines to divide the background in rectangles. Do the same within the shape. Paint the rectangles in values of one color, using a basic color + black and white. Start with the lightest color. 
Outline all shapes with black marker.

Elements of art: color, line, shape, value