Posts tonen met het label houses. Alle posts tonen

donderdag 25 november 2010

I love Holland

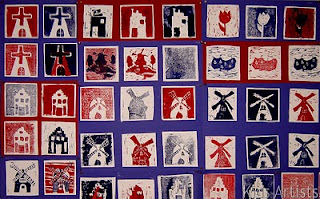
Made by students of grade 6

You need:

  1. two pieces of linoleum of 12 by 12 cm
  2. white drawing paper
  3. lino knives
  4. block printing ink in red and blue
  5. flat piece of glass
  6. linoleum roller
  7. lino press
  8. cardboard in red and blue
  9. scissors
  10. glue
What are typical Dutch things? Make a word web with the children. Think about cheese, canal houses, tulips, wooden shoes, cows etc. 
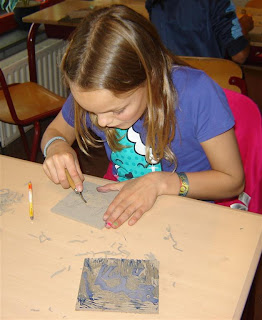
The children create a drawing on a scrap of paper with the theme I love Holland. Not too many details, because the drawing will be printed. The drawing has to be copied on both pieces of linoleum. It doesn't matter if they don't match exactly; this is even fun while making a two colour print, because the drawing seems to shift a bit. Use different linoleum knives. Cut the drawing from the first piece of linoleum. Cut the background from the second piece of linoleum, leaving the object. Lines within the object should be cut too.

Shake the bottle of blockprint carefully to be sure oil will mix with the rest. Drip some red paint on the glass and roll it out with the lino roller. Make 2 prints of your work on a white sheet. Rinse the linoleum clean and make 2 prints in blue in the same way.

Repeat this process with the second piece of linoleum: 2 prints in red and 2 in blue. There will be 8 prints if you're finished.

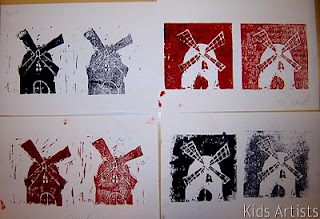
2 pieces of linoleum, 2 colours, 8 prints

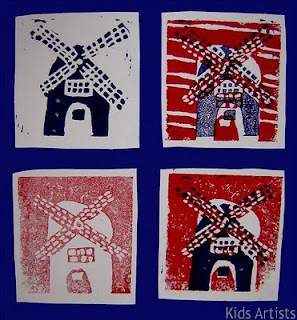
Finally use one or more of those prints to make a two colour print. This has to be done by inking piece 1 red and printing it on a blue print of piece 2. See picture below. Let students choose their best prints and let them decide how many prints they want to use for their final artwork. Cut the prints with 1 cm white aound them. Make a composition on blue or red cardboard and paste the prints with 1 cm between them.

Final composition I love Holland, by Malou, grade 6

maandag 1 november 2010

City waterfront

You need:
  1. blue construction paper A4 size
  2. white drawing paper A3 size
  3. construction paper and/or ribbed cardboard in several colours
  4. scissors
  5. glue
  6. watercolour paint
  7. brushes
  8. jar with water

I found this lesson once on a German school website. The combination of cutting/pasting and painting is exciting! Students paste tight cut houses, and the reflection in the water is made with water colour paint, which is not tight at all - just as it should be!

Students cut rectangles of different heights and widths out of coloured paper. These are the bodies of the houses. Cut several triangles out of red construction paper, these are the roofs. Cut windows and doors.

Draw a line on 1 cm from the bottom of the blue sheet. Make a composition of the houses on this line, starting with the highest ones. Place the shorter houses in front of them (overlap). Paste the houses and roofs on the blue sheet. Paste windows and doors on them in different colours.

When ready, paste the blue sheet with houses on a white A3 size sheet. Use watercolour paint to paint the mirror image of the houses in the water. Paint as precise as possible, but don't use a ruler: reflections in water aren't that straight! Paint the water blue.

Made by students of 10-11 years old

dinsdag 12 oktober 2010

Reflected canal houses

You need:

  1. white drawing sheet A4 size
  2. white crayons
  3. watercolour paint
  4. brushes
  5. jar with water
Dutch canal houses are famous for their facades: stepped gable, neckgable, bell gable, clockgevel or spoutgable. Draw those five gables on the blackboard and discuss them. Search the internet for photographs of canal houses or let the students search them (search canal house or grachtenhuis).

Draw a line at 12 cm from the bottom of the sheet. Draw some low canal house with a white crayon. Draw windows, treps and doors in them. Paint every house with a different colour of watercolour paint. The crayon will resist the paint and become visible. Paint a simplified reflection of the house under the line. Paint water and air.

vrijdag 24 september 2010

There's a ghost in my bedroom!

Made by Maarten, 11 years old

You need:

  1. white drawing paper A5 size
  2. indian ink
  3. dip pen
  4. pencil
  5. paper towel
  6. black paper for background

Help, there are ghosts in my bedroom! Behind the wardrobe, Achter de kast, under the bed, under the rug.... Sketch your room with a pencil: bed, wardrobe, toys, window, door. Draw ghosts on several places. Trace the drawing with indian ink. Leave the ghosts white, and fill the rest of the drawing in with various textures. Look for a lesson on texture at this link: Exercise in drawing texture. Paste the drawing on a black sheet.

Made by Floor, 11 years old

zaterdag 26 december 2009

Fireworks over the city

Made by Oscar, 11 years old
You need:
  1. white drawing paper A3 size
  2. oil pastels
  3. liquid water colour
  4. brushes
  5. coloured paper for background
Children draw a New Years eve in three sections: foreground, middleground and background. At the bottom of the sheet they draw a lot of backs of human heads; these are the people looking to the fireworks. In the middle they draw a street with houses. People are standing in front of those houses, so think about overlapping! The third section is above the houses: beautiful fireworks. Colour everything with oil pastels. Use bright colours for the fireworks, including white. Don't draw too many details, that isn't easy to colour because of the oilpastels. Whey ready, paint the whole drawing with dark liquid watercolour, because new years fireworks are at night! The oil pastels will resist the watercolour.

zondag 22 november 2009

Dutch December skyline

The Dutch website juf Lisette has a lesson we do every year: the December skyline! 5 December is the day Sinterklaas visits all Dutch children to give them presents. You can read more about Sinterklaas and his Black Petes in the category Dutch folklore.

You need:

  1. construction paper A4 size in dark blue, yellow and black
  2. paperclips
  3. scissors
  4. knives
  5. cutting blade
  6. glue

Draw the skyline of a street on the black paper. Add a tree if you want to, or draw a black pete near the chimney.

Put the black sheet on the yellow one and attach them to each other with four paperclips. Cut out the skyline; you'll cut two sheets at the same time. When ready, remove the paperclips and cut some windows out of the black sheet.

Cut a moon out of the rest of the yellow sheet. Stick the black and yellow skyline together and shift the black sheet one millimeter to emerge the yellow one. Look carefully to the position of the moon: you'll see the yellow edges there were the moon shines. Glue the moon on the blue sheet and glue the skyline below. Your December skyline is finished!

dinsdag 20 oktober 2009

Haunted houses

You need:
  1. white drawing paper A4 size
  2. tissue paper in two colours
  3. brush and water
  4. black markers
  5. white chalk pastel
  6. hairspray
  7. black construction paper for background
Haunted houses…. there are many exciting stories in the internet to start this lesson! Discuss the characteristics of a haunted house: partly collapsed, on a quiet place, spider webs, torture tools, graves, bats, black cats, ghosts etc. The background is made with tissuepaper. Kids have to wet their white drawing sheet with a brush and water. Strips of torn tissue paper are put on this - the torn edges must be on the paper, not the straight ones. Make sure the tissue papers overlap a little, so no white paper is to be seen. When ready, wet the whole sheet again. Take a look under one of the tissue strips to see if the bleeding is ready. If so, take of the strips. Then wait till the sheet is completely dry. With a pencil, kids sketch a haunted house on their coloured sheet. They have to thing about the fact that everything has to be coloured in black, so they have to draw just contours. When sketching is ready, the drawing has to be traced with a black fineliner. Then everything has to be coloured with a black marker. Ghosts are drawn in and around the house using white chalk pastel. Fix the ghosts with hairspray and glue the artwork on a black background.

Made by students of 10-11 years old

zaterdag 5 september 2009

Dutch canal houses

Made by Anne, 10 years old

You need:

  1. white drawing paper A4 size
  2. indian ink or fine black marker
  3. dip pen
Dutch canal houses are famous for their facades: stepped gable, neck gable, bell gable, clock gable or spout gable. Search the internet for photographs from canal houses and discuss the features of canal houses: the facades, the stairs, symmetry, windows, ornaments, shutters. 
Let students draw a line on their sheet about 5 cm from below. This is the canal. Sketch the houses lightly with a grey pencil. Indicate the places of windows, stairs, doors and shutters. Draw the houses with indian ink.
At the end stick all drawings together to get a long street full of canal houses.

vrijdag 22 mei 2009

Newspaper city

By students from 10-11 years old

You need:
  1. white drawing sheets A4 size
  2. tempera paint
  3. newspapers
  4. scissors and glue
  5. brushes
  6. black paper for background

Paint a blue or grey blue sky on a white sheet with clouds in it. Use different colours of blue and grey. Cut some typical city center buildings in various forms out of newspaper. Paste them on a white sheet. In front of the high buildings we see smaller ones (overlap). Outline the buildings with black tempera paint. Paint windows and doors. Paint the sides black; think carefully about which side is really visible. Hang all artworks together to create a long street.

zondag 17 mei 2009

Just like James Rizzi

Houses in the style of James Rizzi, group work, grade 6

James Rizzi was born in 1950 in Brooklyn. He studied art in Florida (Gainesville), where he started experimenting with printing, painting and sculpting. Rizzi’s work often shows his birthplace New York. His paintings look sometimes childishly naive, with the bright colours and brilliant gaiety. In the art press Rizzi is often described as "Urban Primitive Artist '. Rizzi himself says he is influenced by Picasso, Klee and Dubuffet.

Show some paintings of Rizzi and discuss the characteristics:
  • bright colours
  • no gradations within colours
  • evertything is outlined with a black marker
  • houses have human faces/characteristics
  • the artwork is full and busy
  • background is full too
You need:
  1. white drawing sheets A4 size cut lengthwise
  2. markers
  3. scissors and glue
  4. blue cardboard A1 size for background
Students draw a house in Rizzi style, a house with human characteristics like cloths, limbs, eyes etc. It must be a house, that means students must not draw a square human being! This can be done by drawing basic elements of a house in any case, like windows, doors etc.
Colour the house with bright colour markers. Outline the details with black fine marker. Cut the house and outline it with a black marker. Draw things in the air: stars, a moon, globe, hot air balloon, ufo's etc. Look carefully at Rizzi's paintings to discover what he has made.
To make a group work, every student has to draw one house at least. Make a composition of all those houses and paste them on blue cardboard. Start pasting with the second row of houses, so the first row can be pasted overlapping the second one. Be sure you don't paste two houses with the same colours next to eachother.
Paste the stars and ufo's on the background.     

Rizzi houses group work, grade 5