Posts tonen met het label painting. Alle posts tonen

maandag 6 december 2010

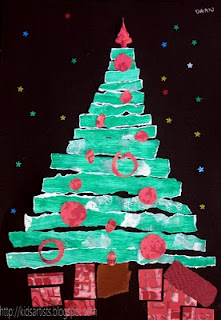
Christmas tree in strips

Made by a student of 11 years old

You need:
  1. white drawing sheet A4 size
  2. black construction paper A4 size
  3. tempera paint
  4. brush
  5. advertising leaflet with Christmas decorations or aluminum foil or scrapbooking paper
  6. glue
  7. glitter stars
  8. small piece of brown paper
Paint a white sheet with a broad brush and undiluted green tempera paint. Apply patches or streaks of different colours, to make the green sheet more vivid. Let the sheet dry.

Tear a trunk out of brown paper. Tear strips of the painted sheet that are about the same width. Place the paper strips on a black sheet in the form of a Christmas tree; the strips have to become slightly shorter. Put the trunk below the bottom strip and paste it. Paste the green strips, so that the trunk disappears partly under the lower strip.

Cut balls and a peak out of aluminium foil or advertising leaflets. You can also use scrapbooking paper. Paste balls and peak on the tree. Cut squares and rectangles (presents!) of coloured paper and paste them under the tree. Paste glitter stars around the tree.
vrijdag 26 november 2010

Paper bag city

Made by a student of grade 2

You need:
  1. white drawing sheets A3 size
  2. tempera paint in blue, white and black
  3. brown paper bag
  4. scissors and glue
  5. brushes
Torn some typical city center buildings in various forms out of brown paper bags. Paste them on a white sheet. In front of the high buildings we see smaller ones (overlap). Paint a blue or grey blue sky on the sheet. Use different colours of blue and grey. Outline the buildings with black tempera paint. Paint windows and doors. Hang all artworks together to create a long street.

maandag 1 november 2010

City waterfront

You need:
  1. blue construction paper A4 size
  2. white drawing paper A3 size
  3. construction paper and/or ribbed cardboard in several colours
  4. scissors
  5. glue
  6. watercolour paint
  7. brushes
  8. jar with water

I found this lesson once on a German school website. The combination of cutting/pasting and painting is exciting! Students paste tight cut houses, and the reflection in the water is made with water colour paint, which is not tight at all - just as it should be!

Students cut rectangles of different heights and widths out of coloured paper. These are the bodies of the houses. Cut several triangles out of red construction paper, these are the roofs. Cut windows and doors.

Draw a line on 1 cm from the bottom of the blue sheet. Make a composition of the houses on this line, starting with the highest ones. Place the shorter houses in front of them (overlap). Paste the houses and roofs on the blue sheet. Paste windows and doors on them in different colours.

When ready, paste the blue sheet with houses on a white A3 size sheet. Use watercolour paint to paint the mirror image of the houses in the water. Paint as precise as possible, but don't use a ruler: reflections in water aren't that straight! Paint the water blue.

Made by students of 10-11 years old

zondag 24 oktober 2010

Whirling leaves

You need:
  1. white drawing sheet A4 size
  2. watercolour paint
  3. brushes
  4. jar with water
  5. small and broad black marker
  6. col0ured construction paper for background
  7. glue

Ask students a week before this lesson to take some flat dried leaves. Every student chooses one of his own leaves and outlines it several times with a pencil. Remember to draw not all the leaves in the same way on the paper, because they whirl down from the tree. Make sure some leaves go over the edge; those leaves will later be finished on the background.

Paint the leaves with watercolour paint. Use water to dillute the paint less or more. Choose real warm fall colours and try to make transitions in the colours by using wet in wet technique.

Paint the background blue. Use again the wet in wet technique, and/or choose for wet on dry. You don't have to paint exactly against the leaves, because they will be outlined with a marker.

Leave the work to dry and paste in on a coloured background. Outline the leaves with a thick black marker. Use a fine black marker for drawing the veins, while observing carefully the real leaves. Don't stop with outlining and drawing veins when you reach the background, but go on with it there.

Both artworks are made by students of 11 years old

vrijdag 22 oktober 2010

Autumn leaves in cubist style

You need:
  1. white drawing paper A4 size
  2. pencil
  3. ruler
  4. tempera paint
  5. brushes
  6. gold colour marker

Ask students to take autumn leaves. Watch them together, paying particular attention to the form: heart-shaped, oval, round, oblong, etc. The composition of the leaves may vary: a leave can be single or composed of several leaflets (pinnate or palmately).

Students draw several leaves on their sheet. The leaves should not overlap. Draw parts of leaves against the edges. Only the outer form of the leaves have to be drawn, so no veins. If the leaves are drawn and the sheet is largely filled, draw four diagonal lines with pencil and ruler: two lines from left to right and two lines from top to bottom. Make sure these lines pass through the leaves. Do not press too hard with the pencil, otherwise they'll come through the paint!

The drawing has to be painted with four warm colours tempera: two colours for the leaves and two for the background. Paint the leave parts within a square in one colour and the background in a different colour. In the box next paint the leaves in a third colour and the background with colour four. See diagram below.

When the artwork is dry, trace the contour lines of the leaves and the diagonal lines with a gold marker.

Made by a student of 11 years old

zaterdag 11 september 2010

Animals like Corneille

You need:
  1. white drawing paper A3 size
  2. tempera paint
  3. brushes
  4. paper towels
  5. jar with water
  6. coloured paper for background
  7. glue or stapler
Life and work of Corneille
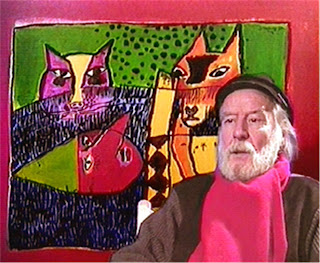
Guillaume Cornelis Beverloo (1922 - 2010), Corneille, was a Dutch artist, born in Belgium and died in France. He is buried on the same cemetery as Vincent van Gogh, a painter he highly admired . 

Corneille was an autodidact. In his early years he painted realistic: still lifes, people and landscapes. In 1948 Corneille was involved in the creation of the CoBrA Group, a group of Danish (Copenhagen), Belgian (Brussels) and Dutch (Amsterdam) artists. Even writers and poets belong to the CoBrA group. The artists' group only existed for three years, but has been very important for Corneille's work. 
According to Corneille, the CoBRA artists want to express themselves on a expressionistic way, like children, by playing open-minded with colours and shapes. Since 1950 Corneille lived and worked in Paris. His paintings are bright and colourful. The sun, women, paradise, trees and birds are recurring elements. He is particularly fond of birds. His artist name Corneille is French for 'crow'.

What to do?
Show examples of Corneille's work. What subjects do you often see in his paintings? What do you notice about his style? Discuss the features: bright colours, thick black outlines, few details, painted as if it was made by a child, an image that sometimes is not complete (missing parts at the edges).
 

In this lesson students have to sketch very briefly (maximum 5 minutes!), to avoid drawing too many details and to force them to work big. Students may  also choose to sketch with a small brush and light yellow paint. This will automatically result in working big with little details. The yellow lines can easily be painted with different colours later.
 
Sketching with yellow paint

Sketch the outline of a cat or bird and make sure this animal reaches at least three edges of the sheet: it should be big! Paint the animal in bright colours and/or patterns. Paint the background too. Leave the work to dry and outline everything using a small brush and black paint. Paint your name in black somewhere at the artwork, like Corneille did. Stick the painting on a coloured sheet.
 
All artworks made by students of 11 years old

zaterdag 4 september 2010

Exercise in colour mixing

You need:

  1. white drawing sheet A3 size
  2. yellow, red and blue tempera paint
  3. brushes
  4. pencil
  5. ruler

Purpose of this lesson to learn students how to make secondary colours. Show Itten's colour circle and discuss it. Tell about primary and secundary colours and show how to make the secundary colours.

Students make a simple drawing on their sheet. In this lesson is chosen for a still life of vases , but you can also opt for houses. After this a 5 cm grid has to be drawn using pencil and ruler. The squares of the objects are painted with primary colours red, yellow and blue; be sure there is never the same color next to each other. The background squares are painted with the secondary colours orange, purple and green. Again: alternate, not the same colour next to each other. To avoid errors, it is useful to write the first letter of the colours in the squares before painting.

vrijdag 20 augustus 2010

Selfportrait in black and white

You need:
  1. canvas
  2. digital photograph
  3. acrylic paint
  4. brushes
  5. carbon paper
  6. pen
Show portraits made by Andy Warhol and discuss them. What is remarkable about those portraits? Would you recognize a Warhol? Why is that?
To make this selfportrait each child needs a digital portrait of himself. Use a photo editor to make the photo black and white. I used Corel Paint Shop Pro. Choose for 'image' and then 'grayscale'. Then click on 'effects', choose 'artistic effects' and then 'posterize'. Choose for four or five layers.
Print the photograph and trace it with a pen and carbon paper on a canvas. Paint the portrait with acrylic paint in greyscale. Paint the background in your choice of colours.

zondag 25 juli 2010

Redecorate your chair

You need:

  1. wooden chair for each student or one chair for two students
  2. water-based paint in various colours
  3. paint trays
  4. paint rollers
  5. brushes
  6. sandpaper
  7. ammonia
  8. newspapers

Redecorating chairs is a nice activity for older kids. Ask students to bring an old wooden chair or buy some old ones in a recycle store. Discuss how to redecorate a chair. How do you manage that? Do you choose a theme, for instance flowers or sports, or do you want to decorate it with motives? You can even choose an artist. How about a Keith Haring chair, or a Piet Mondrian table? What colours do you use? How do you draw the design on the chair? Just drawing or is it better to use a template?

Create a design on paper, on which you see colours and patterns / designs clearly. 

Put the chairs on newspapers. Sand the chair and make it completely greaseproof with a cloth and ammonia water. Let dry. Draw the design first with pencil and paint it. 

The table below is redecoratied by a group of students. For the tabletop they used chalkboard paint. This table is still in our classroom as an instruction table. Useful, because we can write on it!

All furniture is redecorated by students of 11-12 years old

maandag 5 juli 2010

Tropical fish

You need: 1.white drawing sheet A3 size 2.tempera paint 3.brushes 4.saucers 5.jars with water 6.drawing sheet A4 size 7.markers 8.paper towels 9.pieces of sponge 10.magazines 11.scissors 12.glue After a visit to a marine aquarium, children of our school made their own ocean with tropical fish. Dilute tempera paint with water on a saucer. Paint the A3 sheet blue and leave it to dry. Stamp paper plants and corals on the sheet using a piece of sponge or a wad of paper. Use undiluted tempera for the stamping.

Draw a fish on a folded piece of drawing paper. Cut the fish, so you'll have two of them. Colour these two fish with bright colors, just like the tropical fish in the aquarium. Draw and cut a few more fish. Colour them like the first two; all fish must be the same color, they should only vary in size. Create a beautiful composition of the fish on the blue-painted sheet. Stamp some strings of aquatic plants before the fish. Or cut green strips from magazines and paste on the artwork.

All artworks are made by children of 10-12 years old

zaterdag 26 juni 2010

I scream for ice cream

Made by students of grade 1

You need:

  1. coloured cardboard A2 size
  2. brown construction paper
  3. white drawing paper A4 size
  4. tempera paint
  5. brushes
  6. saucers
  7. tissue paper
  8. salt
  9. scissors
  10. gold markers
  11. fiber fill or cotton wool

In this lesson, children use each other's work.

Divide the class into six groups. Give each group of children some white sheets, a saucer, one colour tempera paint, salt, brushes, a jar with water and blotting paper in a slightly darker colour than the paint. Mix tempera on a saucer with a lot of water to get a light (ice cream) colour. Each group paint a few sheets of drawing paper with this diluted tempera. Salt can be applied to create texture and small pieces of blotting paper with water will suggest chocolate chips or fruit in the ice. Be sure there are so many sheets of each colour that every student can get half a sheet of all six colours.

Hang the sheets outside to dry.

Cut the large sheets of coloured cardboard lengthwise into three, so you get three large strips of approximately 15 by 60 cm. Give each child a coloured strip and a sheet of brown construction paper. Each student cuts a cone out the brown craft paper by folding the paper and cutting a triangle from the fold . Then the draw a wafer pattern on the cone with a gold marker.

Give each student half sheet of painted paper of all six colours. Let them draw circles on the sheets by outlining a cup. Cut the circles. Paste the ice-cream cone on the large sheet of cardboard, and paste six different circles on it. Remember that the first scoop of ice cream has to be pasted partly in the cone. Finally cream may be added, by cutting half a circle out of fiberfill or some cotton wool.

zaterdag 1 mei 2010

Hidden butterflies

You need:

  1. white drawing paper A4 size tempera paint
  2. brushes jar with water
  3. paper towels
  4. glue
  5. scissors

Divide the paper with small stripes in different sections. Colour the sections with mixed colours using two different colours tempera and white. In the example is chosen for red and blue and white, resulting in different tints of purple and pink. Do not dilute the paint, to be sure to get bright colours.

Fold a second drawing sheet and draw one or more butterflies against the fold. Cut these butterflies. Paint them in the same colours as the background, leaving an edge from 1 cm white. When dry, paint white stripes around the body of the butterfly and around the decorations.

Paste the background on a larger piece of white paper. Then paste the butterflies. Paste only the body and fold the wings a bit up for a 3d effect.

Made by children of 10 years old

dinsdag 13 april 2010

Symmetrical flowers

You need:

  1. transparent drying hobby glue
  2. liquid watercolour
  3. brushes
  4. white cardboard cut in squares of 20 by 20 cm
After a short explanation about symmetry, students draw a symmetrical fantasy flower on their cardboard. When ready, the lines have to be traced with glue. After drying (take a day for this), the several flower parts are painted with liquid watercolour. The glue will resist watercolour.

zaterdag 27 maart 2010

From bone to bone

Made by Felix, 11 years old

You need:
  1. black construction paper
  2. white drawing paper A4 size
  3. white and black tempera
  4. brushes
  5. pictures of animal skeletons
  6. black fine marker

The children search the Internet for a picture of a skeleton of an animal. It has to be an image in which the various components are to be seen. The higher the resolution, the larger the picture is and clearer it will be. Print this pictures. Then the students search the Latin name of the animal and write it down.

Children draw the skeleton of the animal with a pencil on black paper. This requires them to study the skeleton carefully. Then the individual elements of the skeleton have to be painted with undiluted white paint and a small brush. Any errors can be corrected later with black paint. The Latin name next to it (with brush, or if this is to difficult with a white pencil), will make the artwork complete.

Paste the black sheet on a white background and let the students decorate the edges, for example with bones or footsteps.

Made by Tanita, 11 years old

donderdag 11 maart 2010

Flowers in fingerpaint

You need:

  1. tempera paint
  2. saucers
  3. white drawing sheet A2 size cut in three
  4. coloured paper for background
  5. green crepe paper
  6. scissors
  7. glue
Give all students a saucer with tempera paint in blue, yellow, red and white. Let them experiment with mixing colours with their fingers. Show them that if they mix to many colours together, they'll get aa kind of brown. Mix blue and yellow to show this makes green. Show them to make colours lighter using white. Children can practice this on a scratch sheet.

Every child gets a strip white drawing paper (A2 size, cut lengthwise in three parts). Fingerpaint your own flower. Realistic or not, it's all right. The only restriction: the stalk and leaves must be green. The flower should be as high as the sheet.

Cut the flower leaving a white edge from about 0,5 cm. Paste all flowers on a coloured background. Cut a strip of grass from crepe paper and paste this in front of the flowers.

vrijdag 5 maart 2010

What's for supper tonight?

Made by Lotte, 10 years old

You need:
  1. drawing paper A3 size
  2. colour pencils
  3. tempera and brushes
  4. or coloured paper and glue

Talk about food. What do you like most? What is healthy food? Why do we have to eat vegetables and fruit? What about burgers and fries? Talk about china and cutlery and how a table has to be set.

Draw the meal you like most. Draw everything from above; so a glass is just a circle. Draw your plate with food, a saucer, a glass, knive, spoon, fork and colour everything with colour pencil. Then cut out all parts. Paint a sheet with a pattern and colours that fits to your china; your placemat. You may also use coloured paper and glue to decorate your placemat. When your placemat is ready, paste all cut-out parts on it.

Made by children from 10-11 years old

maandag 1 maart 2010

Marvelous Medusa?

You need:
  1. black construction paper A3 size
  2. tempera paint in blue, green, black and white
  3. brushes
  4. jars with water
  5. paper towels
  6. paper towels and newspapers
Medusa is a woman from Greek mythology. She used to be a beautiful woman. She lived in a country where to her sorrow the sun never shone. Medusa begged goddess Athena to be allowed to move to a sunny region. When this was refused by Athena, Medusa humiliated the goddess. Medusa told everywhere that Athena would not let her go, because otherwise no one would pay attention anymore to the beauty of Athena. In another version of the myth Medusa would have made Athena mad because she kissed Poseidon in Athena's temple. The enraged Athena took revenge by changing Medusa's beautiful hair into a nest of snakes. Atrhena also ensured that everyone who looked at Medusa Medusa would freeze immediately . Finally Medusa is killed and decapitated by Perseus, with help from Athena. From Medusa's blood the winged horse Pegasos and a giant are born. After this Medusa's head is offered by Perseus to Athena. Athena put the head on her shield to freeze her enemies.

This myth is the basis for this drawing lesson: draw Medusa's head with snake hair in cold colours. Every child gets a black sheet and four colours tempera paint: blue, green, black and white. After scetching the head (not too many details) and the snakes, the drawing has to be painted in cool colours. Mixing colours is required. Tell the students how to mix the colours: bright colours are created by mixing a few drops of dark paint into light paint, and not the other way.

All artworks are made by children from 10-11 years old

zondag 7 februari 2010

Monochromatic painting

You need:
  1. white drawing sheet A3 size
  2. tempera paint
  3. brushes
  4. black marker

Children choose a geometric shape and draw this overlapping and in different sizes on their sheet. Then they choose one colour tempera to colour their shapes. Mixing is only allowed with white and black, because the painting has to be monochromatic. When ready, outline everything with black marker.

maandag 1 februari 2010

Carnival portraits

You need:
  1. a shelf
  2. balloon
  3. newspaper strips
  4. wallpaper paste
  5. toilet rolls, bottle caps, polystyrene etc.
  6. toilet paper or paper towels
  7. acrylic paint or tempera paint
  8. brushes
  9. glitter
  10. confetti
  11. black marker

Blow the balloon. Paste newspaper strips on the half of the ballon. Be sure you have at least eight layers. Let the work dry. Take the balloon uit. Cut the edges and lay this half balloon on the shelf. Use costless things like toilet rolls, bottle caps or polystyrene to shape the face. Fix these parts with newspaper strips and wallpaper paste. The last layer has to be toilet paper or paper towel. Let the work dry again. Paint the portrait with acrylic paint or undiluted tempera. Give the face a body. Sprinkle glitter or confetti in the wet paint.

This lesson and photographs were sent to me by Ghislaine Aarts.

dinsdag 26 januari 2010

Design your own clock!

You need:
  1. plywood plate
  2. coping saw
  3. sandpaper
  4. carbon paper
  5. pencil
  6. clock
  7. tempera paint
  8. brush
  9. things to symbolize figures
  10. picture hook
Children first make a design for their clock on paper. With carbon paper this design has to be copied on the jigsaw. Saw the clock and sand it smooth. Don't forget the edges. Paint the clock with tempera. Paste figures or other things to symbolize the figures on your clock. Fix a hook on the backside and hang your clock.
All clocks are made by students of 11-12 years old.
Thanks to Ton Sommers.