woensdag 28 oktober 2009

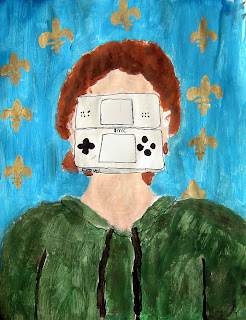
In the style of René Magritte

Made by Nikki, 11 years old

Rene Magritte is born in 1898 in Belgium. When Magritte is 13 years old, his mother commits suicide. She jumps in the river Samber and is found with her dress covering her face. This image has been suggested as the source of several paintings from Magritte: people hiding their faces with several objects.

In 1924 Magritte became friends with members of a surrealism group in Brussels: André Breton, Joan Miró and Salvador Dalí. These artists influence Magritte's work. In the end Magritte became famous with surrealistic paintings.

Magritte gave his paintings a realistic effect of surrealism. He painted simple objects, like a shoe, an apple, a pipe or a tree. Magritte took these things out of their ordinary environment and placed them in a special surrounding.

One of Magritte's most famous works is "La Trahison des Images" (The Treachery of Images). This is a very realistic painting from a pipe, with the text: Ceci n'est pas une pipe (This is not a pipe). The painting is not a pipe, but rather an image of a pipe. As Magritte himself commented: "The famous pipe. How people reproached me for it! And yet, could you stuff my pipe? No, it's just a representation, is it not? So if I had written on my picture 'This is a pipe,' I'd have been lying!"

By putting us constantly on the wrong track, Magritte forces us to think about art. Magritte thought it the task of an artist to place reality in a different context.

Nikki working on her version of Magritte

You need:
  1. drawing sheets A3 size
  2. brushes and water containers
  3. old newspapers
  4. tempera paint
  5. (black markers)
Show Magritte's work and talk about surrealism. Ask children to tell what they see in those surrealistic paintings. Talk about realism and show realistic paintings. What are the differences between these two styles? How do you recognize surrealistic art? Show the painting The son of man and tell about the covered faces we'll see in a lot of Magritte's paintings.

Made by Kiki, 11 years old

Children sketch a portrait, just like Magritte did. It doesn't have to be someone special, just a person. Instead of an apple, they choose a present-day object to cover the face. This object has to be about as large as a face, so a piano or a coin can't be used! Options: an Ipod, cell phone, candy or something. When sketching is finished, the drawing has to be painted. When necessary, students can outline the covering object with a fineliner.

Made by Jetse, 12 years old

Happy Halloween

You need:
  1. orange construction paper
  2. black construction paper
  3. black fineliner
  4. black marker
  5. correction fluid
  6. scissors and glue
Children are drawing a Halloween party at night. They work with black marker on orange paper. Brainstorm what things make you think of Halloween: spiders, skeletons, witchas, bats, black cats, dark, cemetary, pumpkins etc. Vandaag worden alleen contouren getekend. Wat zijn contouren en hoe teken je die? Every child gets an orange construction paper. Draw the width of a ruler on the top and bottom of the sheet. Draw a halloween party, using markers in various sizes. Use correction fluid to make eyes. Glue a strip of black construction paper on top and bottom of your drawing.

zaterdag 24 oktober 2009

Puzzle trees

You need:
  1. black paper A4 size
  2. black paper 23 by 32 cm
  3. oilpastel crayons
  4. scissors and glue
Students draw with a pencil on a black A4 sheet a simple mountain landscape under the moon. Colour it with oilpastel crayons and outline the mountains and moon with black crayon. Show the students that the colour of the air around the moon is lighter. Use white and yellow to brighten up blue colours, or black to darken them. Make sure your colours in the air will blend.
When colouring is finished, turn around the sheet. Draw a tree on the back, with five branches: one tho the right, one to the right edge of the paper, one to the middle above, one to the left edge of the sheet and one to the left. Branches have to be small at the end and wide near to the trunk. You've got six puzzlepieces now. Cut them out and place them on the larger black sheet. Use the cut tree to check if your pieces lie well. Pate all parts on the black sheet, exept the tree of course. Maybe you can do something fun with it?

woensdag 21 oktober 2009

Spider web

You need:

  1. white drawing paper from 20 by 20 cm
  2. oil pastel crayons
  3. black paint
  4. brushes
  5. toothpicks
  6. coloured construction paper
In fall you will find beautiful spider webs in the garden and around the school. Especially when the morning dew is glistening on the wires in the sun, a web seems a work of art. In this lesson the students scretch a spider web with a spider, after they first have looked carefully at those webs. How is the web built? How many basic threads do you see? What does a spider look like? How many legs has he? How do they look? Colour a drawing sheet with oilpastels. Choose autumn colours, like orange, yellow and brown. Paint the entire sheet black and let it dry.

Scratch a spider web with a toothpick. Of course you may add the spider! Paste the artwork on a coloured background.

dinsdag 20 oktober 2009

Haunted houses

You need:
  1. white drawing paper A4 size
  2. tissue paper in two colours
  3. brush and water
  4. black markers
  5. white chalk pastel
  6. hairspray
  7. black construction paper for background
Haunted houses…. there are many exciting stories in the internet to start this lesson! Discuss the characteristics of a haunted house: partly collapsed, on a quiet place, spider webs, torture tools, graves, bats, black cats, ghosts etc. The background is made with tissuepaper. Kids have to wet their white drawing sheet with a brush and water. Strips of torn tissue paper are put on this - the torn edges must be on the paper, not the straight ones. Make sure the tissue papers overlap a little, so no white paper is to be seen. When ready, wet the whole sheet again. Take a look under one of the tissue strips to see if the bleeding is ready. If so, take of the strips. Then wait till the sheet is completely dry. With a pencil, kids sketch a haunted house on their coloured sheet. They have to thing about the fact that everything has to be coloured in black, so they have to draw just contours. When sketching is ready, the drawing has to be traced with a black fineliner. Then everything has to be coloured with a black marker. Ghosts are drawn in and around the house using white chalk pastel. Fix the ghosts with hairspray and glue the artwork on a black background.

Made by students of 10-11 years old

maandag 19 oktober 2009

Wacky witches

You need:
  1. charcoal
  2. chalk pastels
  3. white drawing paper A4 size
  4. black construction paper for background
  5. hairspray

How do you recognize a withc? What animals or things do you associate with a witch? What does an angry witch look like? Think of characteristis like mouth, eyes and eyebrows.

Tell children to practice first in drawing with charcoal. Explain how differences in colours have to be made. Tell them to use an eraser to erase the charcoal lines, and a tissue or your fingers to sweep out the colour.

The instruction is: draw an angry witch with charcoal and use a cold colour for the face. Draw the contours of the face first with charcoal. Then colour the face with chalk pastel. After this mouth, eyes and nose can be drawn with charcoal. Finish the drawing with charcoal. Make sure you add some typical witchy things like a cat, a bat, a spiderweb etc.

woensdag 14 oktober 2009

Take a walk with a line

You need:

  1. white drawing sheet A4 size
  2. markers
  3. fineliner

Start with a thick black marker and draw an interesting line horizontally across the paper. Repeat your line with rainbow colors to show emphasis and repetition. Fill your paper up with interesting line patterns in the background. Use a black fineliner. When ready it seems the coloured line looks like jumping off the page. This could also be a nice group project. Children have to discuss with eachother about the places their lines will come together and continuing the patterns.

dinsdag 13 oktober 2009

Autumn prints

You need:
  1. pieces of linoleum from 15 x 15 cm
  2. lino knife
  3. mat
  4. block printing ink
  5. flat piece of plexiglass
  6. linoleum roller
  7. construction paper
  8. lino press
After searching autumn leaves and taking them in the classroom, we take a careful look. What can you tell about the form, the veins, the colour etc.
Draw a leave or mushroom on your linoleum. Remember what you cut away will not print. It is not important to carve deeply into linoleum, just enough so that carved area is lower than the linoleum surface. Always carve away from your hand, always keep your hand behind the back edge of linoleum. When you want to check your printing block, place a piece of paper on the linoleum and rub over the paper with a crayon. This will create a “rubbing” and will give you an idea of what the final print will look like. Squeeze out “toothpaste” amount of ink on plexiglass. Roll ink out. Ink is ready when lines appear. Ink should look wet. If ink starts to look velvety/dry, sprinkle a little bit of water over the ink and add more ink. Put your linoleum block on a newspaper. Roll ink onto linoleum printing block, working quickly to cover all areas. Lay the block on a sheet in the printing press and press. Take away the block and your print is ready.
To make a group work, all kids have to cut out their prints. Ask some students to make a collage of all autumn leaves.


maandag 12 oktober 2009

Polka dots from Staphorst, Holland

Table cloth, group work
Staphorst is a a town in the eastern Netherlands. The town is famous for about 600 women who are still wearing traditional dress. Until now, utensils and cloths are designed with characteristic 'Staphorster Stipwerk', translated: Staphorst polka dots. Staphorster stipwerk is made by nails stuck in corks and then tipped in paint. The stipwerk is mostly done on a dark surface.

Benodigdheden:
  1. black fabric
  2. textile paint
  3. nails in different sizes
Show some examples of Staphorster Stipwerk (Google image searcher). Discuss what you see: colour use, size of the dots, motives, patterns etc. Let children practice first in making patterns. Use a scratch paper and colour pencils for this. If they understand the principle of making flowers out of polka dots, they can start stamping with the nails. This lesson can be done individually, but making a group table cloth is maybe much more fun! And: in stead of stamping on cotton, it is also possible to stamp on wooden utensils, like a small chipboard box or a wooden plate. Before stamping, the box has to be painted black of course. And, don't use textile paint but use tempera. Lacquer with vernish for shiny result.

Part of the table cloth

zaterdag 10 oktober 2009

Building sandwiches

Texture, balance and variety were elements students concentrated on as they created this collage of a big sandwich! You need:
  1. half a piece of coloured card board A3 size
  2. leftovers coloured paper
  3. ribbed cardboard
  4. noodles in different shapes
  5. seeds or tealeaves
  6. crepe paper
  7. glue
  8. scissors
  9. yarn
  10. pieces of cotton

Children create a table cloth from leftovers of cotton or paper. A plate has to be cut and glued on the table. The sandwich is made of ribbed cardboard. Now building can start!

Discuss with the kids what kind of food they like on their sandwich and how to represent this with the materials they have. Examples: yellow paper with holes in it will represent cheese; red yarn can be ketchup and am enrolled piece of pink cotton represents a slice of ham.

The artwork must partly be 3-D. Don't glue everything just flat, but try to work spatial and let things overlap. Make sure kids do this by showing three dimensional glueing before kids start working.

When there is enough food on the sandwich, it has to be closed with the top of a sandwich out of ribbed cardboard.

dinsdag 6 oktober 2009

Ghosts in the air

You need:
  1. black construction paper A4 size
  2. leftover cardboard
  3. scissors
  4. white chalk pastel
  5. hairspray
  6. white pencil
Kids have to cut ghosts and trace the outlines of them with chalk pastels. The ghosts are haunting around a fence. The fence has to be cut from leftovers cardboard. It doesn't need to be as straight as a line, because it's an old fence, so it is crooked and broken. Then three ghosts have to be cut. The instruction is: one ghost is flying above, one behind and one before the fence. Children lay the fence and ghosts on the black paper.Then they scratch with white chalk around the cutout parts and wipe it out. Finally they have to cut a moon and do the same. Draw eyes and a mouht with a white pencil. Fix the work with hairspray.

maandag 5 oktober 2009

Positive negative pumpkin faces

You need:
  1. black construction paper A4 size
  2. orange construction paper A5 size
  3. scissors
  4. knives and cutting blades
  5. glue
Each child gets a black paper and an orange that is half the width of the black. Kids have to divide the black paper in four rectangles by drawing thin lines on the sheet. Than the four rectangles each have to be divided in two rectangles. The orange paper has to be divide in four rectangles, so that each rectangle is as big as a half black one.
Starting on the middle line of the orange rectangle, kids have to to draw half of a pumpkin. Next, one eye and one half of a mouth are drawn. Then the eye and mouth are cut out with a cutting blade.
The half orange pumpkin has to be glued down to the middleline of one of the squares on the black paper. Eye and mouth have to be glued down on the opposite side of the pumpkin.

zondag 4 oktober 2009

Pumpkins in moonlight

You need:

  1. black constructionpaper A4 format
  2. pastel crayons
  3. pumpkins or pictures of pumpkins
  4. hairspray
  5. papertowels
  6. construction paper for background

Look with the kids to some brought pumpkins or pictures of them. Discuss shape, texture, size, colours, stem and leaves. Children have to draw at least two pumpkins, and one of them has to overlap another. Kids have to use pastel crayons on black construction paper. Tell them working with pastels will give a lot of smudge: be careful with smudgy fingers. Wipe them on a towell, and not on your artwork! Tell kids also to mix different colours. This will deepen the colours. Using brightr colours on dark ones will suggest the moonlight!

When the artworks are finished, you have to fix it with hairspray. Glue the work on a green or orange construction paper.

Made by students of 11-12 years old

dinsdag 29 september 2009

Autumn leaves with tissue paper

You need:
  1. white drawing sheet A4 format
  2. tissue paper in autumn colours
  3. brush
  4. jar with water
  5. white crayons
Show different shapes of leaves. Discuss those shapes and the colours those leaves have in autumn. Kids draw with white crayons different leaves on their drawing sheet. When finished, they tear parts of the different colours of tissue paper (not too small). Use autumn colours like orange, red, yellow and brown. Those pieces must be sticked by wetting the drawing sheet part by part and laying the tissue paper pieces in it. Watch out: no two same colour pieces next to eachother. Be sure the tissue paper is wet enough to bleed.

Let the artwork dry a little. When it's still moist a bit, pull of all parts of tissue paper. Wait until your work is totally dry and press it flat by laying it under a heavy book.

maandag 28 september 2009

Beautiful anemones

You need:
  1. white drawing sheet A4 size
  2. tissue paper in different colours
  3. brush
  4. can with water

With tissue paper you can make beautiful flowers without painting! In this lesson I chose anemones, but any flower will work. To make an anemone, fold a tissue paper three times until you have a rectangle. This rectangle has six lows now. Cut two petals out of this rectangle; this makes twelve petals totally. Six petals make one anemone. Cut petals from different colours tissue paper. Cut small and bigger ones. Take the white sheet and wet the place for the first flower with a brush. Put the petals one by one around an imaginary white circle (this is for the heart of the flower) on the wet spot. The petals will tighten themselves on the wet drawing sheet. Stich all petals this way. Overlap is allowed, working on the edge too. Cut little circles (flowerhearts) out of black tissue paper and stick them with water. The tissue paper has started 'bleeding' yet. The brighter the colour of tissue paper, the better it bleeds. Light colors bleed less. The colours of the tissue paper will blend together. If all is well, you'll see rays from the black heart into the petals. If not, wet the flowers again with a brush and water. Be careful, petals might shuffle. Let the artwork dry a little. When it's still moist a bit, pull of all petals. Your beautiful anemones are ready!

Anemones with tissue paper
Print, without tissue paper

zondag 27 september 2009

Landscape of tissue paper

You need:
  1. tissue paper in several colours
  2. wallpaper glue, made with extra water
  3. glue brushes
  4. white drawing paper A4 size
Look with the students at pictures of different landscapes: mountains, volcanic landscape, coastal landscape, river landscape, hills, flat landscape. Discuss the differences between those landscapes.

Students are going to make a landscape out of tissue paper. They may just tear the sheets, so no scissors! The landscapes have to be constructed from behind, so the front sheets have to be glued at last. While doing it this way, colours can be glued overlapping, which gives more tints. Explain the students to use white tissue paper to make colours lighter. The glaciers on the mountains in the example are created by not glueing the white tissue paper entirely. Dry parts will stay white, wet parts take over the colour that's underneath.

zaterdag 26 september 2009

Mothers finest

You need:
  1. coloured paper A4 size
  2. scissors
  3. glue
  4. leftovers coloured paper
  5. leftovers yarn, wire, pipe cleaner
  6. buttons, feathers etc..
  7. leftovers of cotton

Traditionally, people love to decorate themselves. With what do people decorate themselves? Is this the same in all countries? What kind of decorations can you mention? Discuss decorations and write different kinds of decorations on the blackboard.

Each student gets two coloured sheets of paper; one for the background and one for the face. Fold the sheet for the face lengthwise and draw half a face against the fold. Don't forget the ears! Cut the face and glue it on a background, letting a bit space between face and background. uit en plak het op de achtergrond met een beetje ruimte eronder. So don't glue it flatly. Cut eyes, nose and mouth out of leftover paper and glue them on the face. Decorate the face with different materials. Thing of earrings, glasses, hair, make-up, chain, necktie etc.

(Photographs: Willem Wienholts)

Autumn trees near the water

You need:
  1. light blue drawing paper A4 size
  2. oilpastel crayons
  3. tempera in autumn colours
  4. brushes

Fold the paper in half. Above the fold is the country, below the fold is the water. Students draw with oilpastels some trees without leaves in the grass. Those trees have to be coloured firmly. Below the fold is the reflection of the trees in the water. The trees have to be drawn again, but mucht less thick coloured.

When the trees are ready, students get a plate with five colours of tempera: yellow, orange, red, brown and green. leaves have to be made by tamponning with the brushes. Tell your students to tampon with two or more colours at the same time, so don't mix up the colours.

When the leaves are ready and the paint is still wet, fold the paper again. There is now a lighter print of the foliage at the bottom of the sheet: the reflection in the water. The branches of the tree will now be visible again, because part of the paint is now on the bottom of the sheet.

donderdag 24 september 2009

Leave collection


You need:

  1. white drawing sheet A4 size
  2. tempera and brushes
  3. metallic pens and fine markers in several colours
Ask students to bring autumn leaves. Talk about the colours and the shape of the leaves, feel the veins and discuss the patterns of the veins.
Children make a composition of autumn leaves, considering variation between large and small leaves and different leaf shapes. The leaves may overlap eachother. To print the leaves, cover the bottoms with undiluted tempera in fall colours. Press the leaves with a book. If you want to make a print over another printed leave (overlap), you have to wait until the former print has dried. This won't take long , because the veins will give just thin prints.
When all prints are ready, the leave collection has to be complemented with drawn leaves. Use fine colour markers, including metallic. Draw the veins close together. Paste the work on a coloured background sheet.

Both artworks are made by students of grade 5

maandag 21 september 2009

A spider and his web

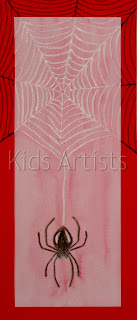
In fall you will find beautiful spider webs in the garden and around the school. Especially when the morning dew is glistening on the wires in the sun, a web seems a work of art. In this lesson the students draw a spider web with a spider, after they first have looked carefully at those webs. How is the web built? How many basic threads do you see? What does a spider look like? How many legs has he? How do they look?

You need:

  1. white drawing sheet A4 size cut lengthwise
  2. crayons
  3. water paint
  4. brushes
  5. jar with water
  6. black finepointed marker or white pencil
  7. coloured paper
Draw at the top of a half sheet a web with a white crayon (be sure the point is sharp). One of the base threads have to be drawin in the middle, because the spider will hang out there. Draw a spider with black crayon and connect him with the web by drawing the middle white base thread down. Paint the whole sheet with water paint in a colour you like. Use lots of water. Crayonlines will resist the paint. Let the work and see the dewdrops on the web! Glue the work on a coloured background. Draw the web further on the background, with black fineliner or white pencil.