Wednesday, July 17, 2024

Stamping with Mondrian


Goal: reducing the visible world in horizontal and vertical lines and primary colors.   
Technique: stamping. 

What do you need?
  • black cardboard 
  • sponges cut in different sizes (squares and rectangles) 
  • tempera paint in red, blue and yellow 
  • brushes
  • white crayons 
About the artist
View these artworks of Mondrian and talk about how he abstracted a tree. 

Also talk about Victory Boogie Woogie, the painting in which you can see part of the map of New York. Tell students we are going to make our own Mondrian map. Discuss the terms primary colors, square, rectangle, vertical and horizontal lines.


Instruction 
Brushes will not be rinsed, but will remain the same color.
Show how to use a brush to rub the sponge with paint. 
Show how to stamp: do not slide the sponge, but lift it off the paper. This way you'll get a tight shape.  
Stamp horizontally or vertically only. 
Do not stamp two of the same colors next to each other. 
Make sure the shapes don't touch each other. You must be able to see the black roads between them. 

When the work is dry, draw stripes on the black roads using a white crayon. 

Artworks are made by students of grade 1/2. 

Saturday, June 15, 2024

Monet's waterlilies pond

What do you need?

  • drawing paper A3 size
  • tempera paint in green, blue, white, red and yellow
  • two brushes per student
  • two spunges per student
  • paper towels
  • oil pastel crayons 
  • saucers 
About the artist
Claude Monet (1840-1926) is considered one of the most important painters of Impressionism. Typical for Impressionists:

  • they choose subjects from ordinary life 
  • special attention for light and color
  • work in the open air
  • smooth brushstrokes
  • dashes resemble a sketch
  • it's about the impression!
Discuss the term impressionism. Show some paintings by Monet and zoom in on a work with water lilies in Arts & Culture. Do students see the characteristics of impressionism in this artwork?

Monet had a large garden with a pond and a Japanese bridge in Giverny France. He liked to paint in that garden. His works of water lilies are therefore famous and are the basis of this lesson.

What should you do?
Lesson 1
  1. Squeeze blue, green and white paint onto a saucer. 
  2. Dip your sponge into the blue paint. Stamp on the sheet. 
  3. Do the same with green paint and stamp all over the sheet. 
  4. Finally do this with white. You can use the green side of your sponge,  to get a light green color also. 
  5. Let the work dry.
Lesson 2
  1. To paint the water lilies: mix a little bit of red with white paint. Paint ovals spread across the sheet. Not too neat, it's all about impression!
  2. Paint a green border at the bottom of the ovals: the leaf. To make it fresher, you can mix some light green paint. You don't have to clean the green brush first. 
  3. Paint a yellow heart in the flowers. 
  4. Let the work dry. 
  5. Finally draw lines in your lily with a dark red or purple oil pastel: the petals. 
Artworks made by students of grade 1 and 2.

Tuesday, April 2, 2024

Mexican amate

What do you need?
  • brown paper bag
  • tempera paint in fluorescent colors and white
  • brushes
  • jar with water
  • black marker
  • colored paper for background
  • glue 
 
Instruction

Amate is a way of making paper, done for centuries by Mexican Indians. Amate paper is made by cooking the inner bark of various trees. At the beginning of the 20th century the Nahua Indians of Mexico started making amate paintings as a form of folk art, especially in order to exchange and sell them to tourists.
Show pictures of Mexican amate paintings. Discuss the features: birds, flowers, bright colors, black outlines and a frame with a pattern in bright colors.

What should you do?
  1. Tear the edges off the paper: use thumb and fingers of both hands and tear slowly. 
  2. Draw some birds and flowers with pencil and draw a patterned frame.
  3. Paint the drawing with fluorescent tempera. 
  4. Let dry and outline everything with a black marker. 
  5. Paste the artwork on colored construction paper.
Artworks made by students of grade 5-8. 

Thursday, March 7, 2024

Mix and match with Mondrian

What do you need?

  • white sheet 21 by 21 cm
  • black sheet 23 bij cm
  • paper strips 3 by 6 cm in yellow, red and blue
  • black squares 3 by 3 cm
  • glue

I did this lesson in grade 5, students worked in pairs. The figures are cut  before class. Per artwork you need 4 black squares and 16 colored rectangles. Students from higher groups can measure and cut the figures themselves. 

What should you do?
  1. Make a composition of 4 squares, each consisting of 4 colored rectangles and a black square in the middle. No two of the same colors next to each other!
  2. Paste the composition on the white sheet with a small edge visible around each shape. 
  3. Paste the artwork on a black sheet. 
It was a difficult task and not everyone succeeded! 

Artworks made by students of grade 3.

Tuesday, March 5, 2024

Grey, like Theo van Doesburg

What do you need?
  • white drawing sheet
  • black construction paper
  • ruler
  • charcoal
  • pencil
  • glue

About the artist
Theo van Doesburg (1883-1931) was a Dutch painter, architect and writer. He was charmed by the abstract art of Kandinsky and the cubism of Picasso. In 1917 he founded the magazine De Stijl (The Style), in which he and other artists could publish their innovative ideas. Well-known artists who also belong to De Stijl are Piet Mondrian, Bart van der Leck and Gerrit Rietveld.

Characteristics of the Stijl artists:

  • use of primary colors and non-colors 
  • horizontal and vertical lines
  • use of geometric shapes 
  • strive for balance and harmony in the artwork

Van Doesburg, Composition 12 - abstraction of a landscape, 1918

Instruction
In this lesson we discuss Van Doesburg's Composition in grey, made in 1919 and now in the Guggenheim New York. No primary colors, just black and white and everything in between.
The goal for this lesson is not to copy the work, but to practice the technique of working with charcoal. 

Look at the painting and discuss what stands out:
  • no color, only non-colors
  • geometric shapes with some rounded corners
  • suggestion of depth: some surfaces appear to rise through the use of light and dark next to each other 
  • only horizontal and vertical lines 

What should you do? 
  1. First practice drawing with charcoal on a scrap. Press hard, soft, wipe. Get to know the material this way.  
  2. Divide the sheet into rectangles using a pencil and ruler. 
  3. Color with charcoal. Make sure that lines between the rectangles are clearly visible. Create color nuances by pressing harder or softer, rubbing and wiping. 
  4. Stick the work on a black sheet. 
Artworks made by students of grade 5.

Tuesday, May 30, 2023

A lesson in color theory

What do you need?

  • 4 cards of drawing paper, 10 by 7 cm
  • pencil
  • ruler
  • markers of color pencils 
  • black construction paper
Instruction
Discuss the words primary and secundary colors using the color wheel.  
What are primary colors and why are they called so? What are secondary colors, how do you make them and why are they called so? What are the neutral colors? Explain also the word nuance

What should you do?
  1. Draw a frame on the cards at 2 mm from the edge using a thin black marker.
  2. Draw a pattern of your choice on each card.
  3. Color the cards according to the terms discussed.
  4. Outline the patterns with a thin black marker.
  5. Stick the cards on a black background.
  6. Add the learned words.

Thursday, May 25, 2023

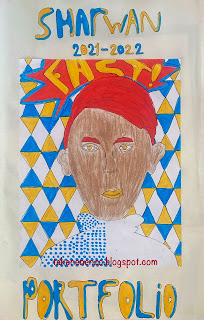
Selfportrait like Roy Lichtenstein

In my school we keep artwork at school until the of the school year. Students make a portfolio in june to take their work home. On front of it is a drawing in the style of one of the art movements we studied that year. 
These are the grade 6 Popart portfolio folders with a self portrait in the style of Roy Lichtenstein. 

What do you need? 
For the folder: paper A1 size, folded in half
For the drawing

  • white drawing sheet 
  • markers
  • skin color pencils 
  • fine black marker 
About the artist
Show artwork of Lichtenstein and discuss the important features: use of primary colors (sometimes with green), grid dots, black outlines, speech bubbles and slogans (onomatopoeia).

contents portfolio folder grade 6

What should you do?
  1. Draw a self portrait on the small sheet. 
  2. Add a text in a speech bubble that suits you. 
  3. Color your face using skin color pencils. Use markers for the rest of your drawing. 
  4. Fill one part of your drawing with dots. 
  5. Fill the background with a pattern. 
  6. Outline everything with a black marker. 
  7. Paste your work on the large sheet. 
  8. Draw in large letters: portfolio + your name + the school year. 


Artworks are made by students of grade 6.