Wednesday, April 1, 2026

Half chicken


In this lesson students draw one chicken together. 

What do you need? 
  • drawing sheet 
  • oil pastels
  • blue liquid water color
  • brush
  • jar with water
What should you do? 
  1. Fold a sheet in half.
  2. Draw  half a chicken against the fold. 
  3. Color with oil pastels. 
  4. Draw with white oil pastel one or more eggs. 
  5. Mark with two little lines the places where your classmate has to connect and draw a mark for the hight of the horizon line.
  6. Give the sheet folded to your classmate; be sure he doesn't see your drawing. Tell him whether he should draw a head or a body. 
  7. When your classmate is ready, unfold the sheet. Hilarious!
  8. Paint the whole drawing with blue water color paint and lots of water. The oil pastels will resist the water.
Artworks made by students of grade 3.

Thursday, March 26, 2026

Fancy chicken

 What do you need?

  • drawing sheet A3 
  • oil pastels
  • tempera paint
  • brushes
  • colored paper for background 
What should you do?
  1. Draw a horizon line on the drawing sheet. 
  2. Draw a chicken.
  3. Color with oil pastels in bright colors. 
  4. Paint a background with tempera paint.
Works of art made  by students of grade 6.

Sunday, March 22, 2026

What's in your egg?

 
What do you need?
  1. white drawing sheet A5 
  2. charcoal
  3. yellow sheet for background 
  4. hairspray
Surprise!
Imagine you crack your egg on Easter Sunday and it turns out to contain something completely different than egg white and egg yolk ... Draw this fantasy with charcoal on a white sheet. 

Practice first 
Never worked with charcoal? Then practice on a scrap paper first. 
Draw lines, blur them by swiping with your fingers, create shadows, erase the charcoal with a kneaded eraser. Charcoal stains quickly, so clean your  fingers regularly.

What should you do?
  1. Draw two halves of an egg. 
  2. Draw in between what you imagine is in the egg.  
  3. Draw the surrounding. 
  4. Fix your drawing with hairspray. 
  5. Paste the drawing on a yellow sheet. 
Made by students of grade 3.

Thursday, March 19, 2026

Charming chicken

What do you need?
  • blue and yellow construction 
  • oil pastels
  • glue
What should you do?
  1. Draw a chicken on the blue sheet, using the tutorial on How to draw a chicken
  2. Color in bright colours. 
  3. Draw a horizon line and color the ground. 
  4. Draw something on the horizon line, for example a fence or farm. 
  5. Tear the edges of the blue sheet and paste the chicken on a yellow sheet. 

Drawings made by students of grade 6.

Wednesday, March 18, 2026

April showers will bring us flowers

What do you need?
  1. white drawing sheet
  2. water color paint
  3. ruler
  4. white crayon 
  5. paint brush
  6. water
Before
Dutch weather in spring is a weather type with showers, alternated with sunny periods. We call those typical spring showers 'Maartse buien' (March Showers), while English meteorologists speak about 'April showers who bring us flowers'. 
In this lesson students have to draw spring flowers (tulips, daffodils etc.) during a rain shower.
 
What should you do?
  1. Sketch some spring flowers on a white sheet. Make sure your lines are extremely thin. 
  2. Draw vertical lines with one centimeter between them using a ruler and a white crayon. Make sure your crayon has a sharp point. 
  3. Paint your drawing with diluted watercolor paint. Use a lot of water to make bright colors. The crayon will resist the water paint, so your shower will be very clear!


Saturday, February 7, 2026

Athletes in motion


What do you need?

  • colored construction paper
  • white drawing sheet 
  • paperclips
  • scissors
  • cutting mat and cutting knife
  • glue
  • marker
  • printed silhouette of an athlete 
What should you do?
  1. Put three colored sheets together with the printed athlete on top. Fix with paper clips. 
  2. Cut out the athlete and the colored sheets at the same time. Keep moving the paperclips to be sure the four sheets stay together. Use a cutting knife for areas the scissors can't reach.
  3. Make a composition that suggests movement and stick the athletes on the white sheet. 
  4. Use a marker to fill the background with patterns. 
Artworks made by students of grade 6.
Thanks to A faithfull attempt for this great lesson. 

Wednesday, February 4, 2026

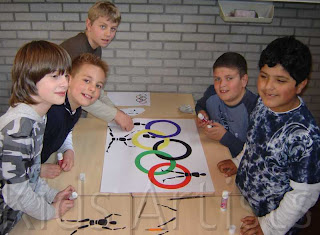
Olympic athletes

Before
Start with the symbol of the Olympics: the colored rings. What do these rings mean? What colors do they have? How are they placed together? 
Ask some students to assume the position of an athlete, for example a skater or skier. Look at their posture: what is the position of their legs, arms and body? 

What do you need?
  • scissors
  • glue
  • white drawing paper A1 size
  • cardboard in Olympic colors
  • copy of athlete
  • compasses


What should you do?
This is a group work for five students. 
Take a big white sheet, cardboard in the colors of the Olympic rings and at least five copies of the athlete.
  1. Each group member cuts an Olympic ring, using compasses and scissors. Be sure all rings have to be the same size.
  2. Cut the ring in one place. Take a good look at which one should go forward and which should go behind it. Make sure the cut ends up under another ring so that you don't see it. 
  3. Cut out the parts of the sports figure. Stick them in different sports positions around, behind, through and in front of the rings.