dinsdag 14 februari 2017

Dali's moustache II

Made by a student of grade 1
You need:
  1. colored sheet A4 size
  2. black marker
  3. white sheet A4 size
  4. black crayon
  5. scissors and glue 
  6. pipe cleaner 
More information about Salvador DalĂ­, see the lesson High legged elephant in the style of Salvador Dali.

Show some surrealistic artworks of Dali and discuss the surrealistic parts of it.  Show The melting clocks. Discuss the shape of the clocks. What happened to these clocks? Are these clocks that you can hang on the wall? Why not? Why do we call this surreal?
Dali's artwork will surprise you. We see realistic parts, complemented with dreams and fantasy.

Dali was an eccentric man. Show som portraits of Dali and look at all those different ways he wears his moustache.

Students write words about surrealism and Dali with a marker on the colored sheet. Then they draw a portrait of him with crayon on a white sheet. Cut it, paste in on the colored sheet. Puncture two holes under the nose and pull the pipe cleaner through. Shape the moustache in a way that Dali would like!

maandag 19 december 2016

Xmas angels

Made by students of grade 3
You need:
  1. white drawing sheet
  2. watercolour paint
  3. brushes 
  4. black marker
  5. glitter 
Outline a saucer on a white sheet and cut it out. Draw an angel. Paint with watercolour paint. Outline with a fine glitter marker. 
Paste the artwork on another circle. 

vrijdag 16 december 2016

Dancing Christmas trees

Made by a student of grade 1
You need:

  1. white drawing sheet
  2. pencil
  3. markers
  4. chalk pastels
Dancing Christmas trees are Christmas trees who look like them only because of the shape (rectangular) and decorations (balls, garlands and stars)! The trunks are much longer than the  the ordinary trees and because of the curves in them it looks they are dancing.  
Draw with pencil, colour with markers, outline with black marker and colour the background with chalk pastels.


woensdag 30 november 2016

Landscape with chalk pastels

Made by students of grade 5

You need:
  1. black construction paper
  2. black oil pastels
  3. soft pastels
  4. hairspray
Show several hillsides and discuss what you see:  light/shadow, depth, overlapping, colours, pointed/rolling. 

Students draw with pencil a simplified hillside on the black sheet. In the blogpost 'Peaks and Valleys' a step by step explanation how to draw this. Give students a maximum of 5 minutes for this part of the lesson, to prevent them of drawing all kinds of details.

Trace the pencil lines with black oil pastel. Colour the hills and sky using chalk pastels. Color and mix, smear and blend until you're satisfied. Be sure the difference can be seen between the light-iluminated parts of the hills and the parts that are in shadow. 
Trace after coloring the black lines again if necessary. Fix the artwork with hairspray. 

maandag 21 november 2016

Tea light holder The Style

Made by a student of grade 4

You need:
  1. black construction paper  41 by 12 cm 
  2. wax paper in red, blue and yellow
  3. cutting mat and cutter
  4. glue
Tell students about art the movement The Style and two of its most famous contributors Piet Mondriaan and Theo van Doesburg. 

Draw 4 lines with 10 cm between them from bottom to the top of the black sheet. The last strip (1 cm) is the glue strip. 
Draw four squares or rectangles on the black sheet. Then draw lines from about 1 cm wide. Cut the spaces between the lines and paste wax paper behind them. 
Finish the lantern by folding the four lines and pasting it. 

maandag 14 november 2016

Moon behind tree

Made by a student of grade 6
You need:
  1. white drawing sheet 
  2. charcoal
  3. chalk pastels 
  4. indian ink
  5. brush 
Use a saucer to draw a moon in the center of the sheet. Colour it with yellow chalk pastel. Colour the rest of the sheet grey using charcoal: around the moon it's brighter than further away.
Draw a branch and paint it with Indian ink.

zaterdag 5 november 2016

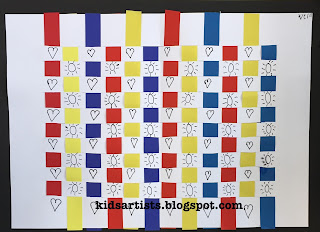
Weaving like Mondriaan

Made by a student of grade 2

You need:
  1. white sheet A4 size
  2. colored paper strips in primary colours
  3. scissors
  4. glue
  5. black fineliner 
Fold the white sheet in half.
Cut evenly-spaced slits starting from the folded edge and continuing up to about a half inch from the opposite. Open up the paper.
Take one paper strip and weave it across the slits, going over and under them. Push the strip to the top and start with another one. The second strip should be woven in an opposite pattern as the first one. If the first strip goes over and under across the slits, the second one should go under and over the slits.
Continue weaving until the white sheet is full. Paste the ends of the strips on the white sheet.
Create a frame by pasting the artwork on black construction paper. Draw small patters on the white strips using a fine black marker. 

zondag 30 oktober 2016

Mondriaan collage with printed lines


You need:

  1. paper in primary colours
  2. white sheet A3 size 
  3. pieces of cardboard 
  4. black tempera paint
  5. saucer
  6. ruler 
  7. pencil 
  8. scissors 
Just like Piet Mondriaan (De Stijl), students draw rectangles and squares using ruler and pencil on construction paper in yellow, blue and red.  After this the drawings have to be cut and pasted on a white sheet. However Mondriaan did not: students may stick colours together.  
Stamp straight lines using a piece of ribbed cardboard and black tempera paint. 

Made by a student of grade 3 

Source: http://artroom104.blogspot.nl/