zaterdag 5 november 2016

Weaving like Mondriaan

Made by a student of grade 2

You need:
  1. white sheet A4 size
  2. colored paper strips in primary colours
  3. scissors
  4. glue
  5. black fineliner 
Fold the white sheet in half.
Cut evenly-spaced slits starting from the folded edge and continuing up to about a half inch from the opposite. Open up the paper.
Take one paper strip and weave it across the slits, going over and under them. Push the strip to the top and start with another one. The second strip should be woven in an opposite pattern as the first one. If the first strip goes over and under across the slits, the second one should go under and over the slits.
Continue weaving until the white sheet is full. Paste the ends of the strips on the white sheet.
Create a frame by pasting the artwork on black construction paper. Draw small patters on the white strips using a fine black marker. 

zondag 30 oktober 2016

Mondriaan collage with printed lines


You need:

  1. paper in primary colours
  2. white sheet A3 size 
  3. pieces of cardboard 
  4. black tempera paint
  5. saucer
  6. ruler 
  7. pencil 
  8. scissors 
Just like Piet Mondriaan (De Stijl), students draw rectangles and squares using ruler and pencil on construction paper in yellow, blue and red.  After this the drawings have to be cut and pasted on a white sheet. However Mondriaan did not: students may stick colours together.  
Stamp straight lines using a piece of ribbed cardboard and black tempera paint. 

Made by a student of grade 3 

Source: http://artroom104.blogspot.nl/ 

vrijdag 14 oktober 2016

Happy monsters

You need:


  1. drawing sheets A3 size
  2. markers
  3. tempera paint

Draw happy monsters! Not the scary types, but the nice ones with big eyes. Color with markers, background with tempera. Outline with black marker.

Made by students of grade 6

vrijdag 24 juni 2016

A day at the beach


Artworks made by students of grade 5

You need:
  1. drawing sheet A3 size
  2. white drawing sheets
  3. tempera paint
  4. brushes
  5. scissors
  6. markers and/or pencils
  7. glue
  8. pencils
Talk about a day at the beach: things (to do) on the sand, things (to do) in the water and things (to do) in the air. Talk about people standing in the water: they seem to have half legs!

Cover four tables with newspaper and put three containers with paint on it:
  • yellow and a little brown besides (beach) + two big brushes
  • blue and a little green (seawater) + two big brushes
  • blue and white (air) + two big brushes 
  • white (surf) + two brushes to stamp
Show how to paint the beach: a lot of yellow on the brush and a little brown for the beach (do not mix!). Do the same with blue and white for the air, and blue with green for the sea. Make wavy motions with the brush to accentuate the water. Finish with a white stamping brush for the surf.
While four students are painting, the others can start with the drawing part of this lesson: draw people and things you see on the beach. Color with markers or color pencils. Cut those little drawings and paste them on the beach, the water or in the air.


donderdag 16 juni 2016

Oscar the Octopus


You need:
  1. drawing sheet A2 size
  2. oilpastels
  3. liquid watercolor paint
  4. jar with water
  5. brushes
  6. salt
After a story about Oscar the Octopus and viewing some pictures of squids, students draw a squid in the sea. Big head, big eyes at the bottom of the head, eight tentacles that go over and under each other. These things should be seen in the drawing.

Color with oil pastels and draw patterns. Be sure the tentacles are going over and under each other - this has to be seen in the patterns.  Outline when necessary with a dark color.
Drip some liquid water color on the background after you made it wet. Sprinkle salt  for a great 'watery' effect.
All artworks are made by students of grade 3

dinsdag 14 juni 2016

Olympic athletes

You need:
  1. scissors
  2. glue
  3. white drawing paper A1 size
  4. cardboard in Olympic colors
  5. compasses
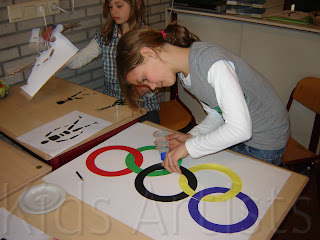
Start this lesson with the symbol of the Olympics: the colored rings. What do these rings mean? What colors do they have? How are they placed together?
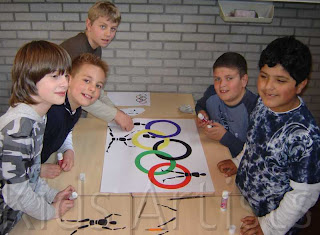
 Ask one or two children to take the position of an athlete. What is the position of the legs, arms and body? Ask another student to show another position and discuss it again.
This is a group work for five students. Every group gets a big white sheet, five sheets of colored cardboard (in the colors of the rings: black, yellow, red, blue and green) and at least five copies of the athlete.
Step one: each group member cuts an Olympic ring, using compasses and scissors. Paste this five rings on the big white sheet. Look carefully which ring has to be pasted in front or back, and which ones have to be pasted through each other. Be sure the little cutting line is pasted underneath another ring.

  Step two: Every student takes a copy of the body and cuts every part of it. Then these bodyparts have to be pasted around, in, behind and in front of the Olympic rings.

zondag 5 juni 2016

Japanese notans


Made by a student of grade 6

You need:
  1. white paper 20 by 20 cm
  2. black paper 10 by 10 cm
  3. scissors
  4. glue
  5. cutter and cutting mat
Show pictures of notans  -  there are symmetrical notans, and also non symmetrical. Some notans are abstract, others are figurative.

Discuss the pictures with the students.
What stands out? Is there symmetry in the picture or not? Is the artwork abstract or figurative? Is there harmony in this notan?

Students make their own notan: figurative or abstract. There shouldn't remain any paper!

vrijdag 13 mei 2016

Patterned peacock

Artworks made by students of grade 4

You need:
  1. drawing sheet 20 by 20 cm
  2. color pencils
  3. markers
  4. colored construction paper
  5. glue
Draw a small peacock on the bottom of the white sheet. Draw lines from peacock to the sides and top of the sheet. Color patterns with color pencils or markers or a combination of them. Outline peacock and 'feathers' with a black marker.
Cut the peacock (look at the pictures) and paste it on a colored sheet.

donderdag 12 mei 2016

Fruit in complementary colors


You need:
  1. white sheets 20 by 20 cm
  2. pencil
  3. ruler
  4. oilpastels
  5. watercolor paint
  6. brushes
  7. jar with water

This lesson is originally from Miriam Paternoster's fantastic art lesson website: Arteascuola. 
Follow the link for a description of this lesson and be sure to look around there for more great art lessons!

By students of grade 4