Posts tonen met het label collage. Alle posts tonen

donderdag 13 september 2018

Patterned trees collage

You need:
  1. white drawing sheet A3 size
  2. liquid water color paint
  3. brush
  4. construction paper in several colors
  5. scissors and glue
  6. black fine marker
Fold the sheet in two. Paint the upper half blue, the  lower half green. Leave the edges white. 
Cut several shapes from construction paper: ovals, 'clouds', circles.   
Use a fineliner to draw the trunk and fill the shapes with a variety of patterns.  
Paste the shapes on the painted sheet and be sure the shapes overlap each other to suggest depth.

dinsdag 14 februari 2017

Dali's moustache II

Made by a student of grade 1
You need:
  1. colored sheet A4 size
  2. black marker
  3. white sheet A4 size
  4. black crayon
  5. scissors and glue 
  6. pipe cleaner 
More information about Salvador Dalí, see the lesson High legged elephant in the style of Salvador Dali.

Show some surrealistic artworks of Dali and discuss the surrealistic parts of it.  Show The melting clocks. Discuss the shape of the clocks. What happened to these clocks? Are these clocks that you can hang on the wall? Why not? Why do we call this surreal?
Dali's artwork will surprise you. We see realistic parts, complemented with dreams and fantasy.

Dali was an eccentric man. Show som portraits of Dali and look at all those different ways he wears his moustache.

Students write words about surrealism and Dali with a marker on the colored sheet. Then they draw a portrait of him with crayon on a white sheet. Cut it, paste in on the colored sheet. Puncture two holes under the nose and pull the pipe cleaner through. Shape the moustache in a way that Dali would like!

zondag 30 oktober 2016

Mondriaan collage with printed lines


You need:

  1. paper in primary colours
  2. white sheet A3 size 
  3. pieces of cardboard 
  4. black tempera paint
  5. saucer
  6. ruler 
  7. pencil 
  8. scissors 
Just like Piet Mondriaan (De Stijl), students draw rectangles and squares using ruler and pencil on construction paper in yellow, blue and red.  After this the drawings have to be cut and pasted on a white sheet. However Mondriaan did not: students may stick colours together.  
Stamp straight lines using a piece of ribbed cardboard and black tempera paint. 

Made by a student of grade 3 

Source: http://artroom104.blogspot.nl/ 

dinsdag 14 juni 2016

Olympic athletes

You need:
  1. scissors
  2. glue
  3. white drawing paper A1 size
  4. cardboard in Olympic colors
  5. compasses
Start this lesson with the symbol of the Olympics: the colored rings. What do these rings mean? What colors do they have? How are they placed together? Ask one or two children to take the position of an athlete. What is the position of the legs, arms and body? Ask another student to show another position and discuss it again.
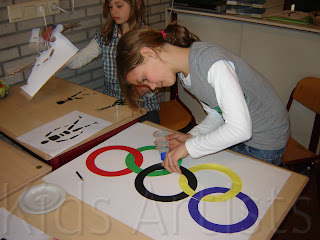
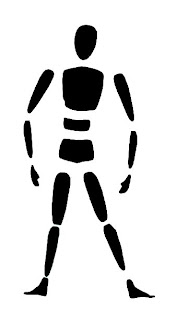
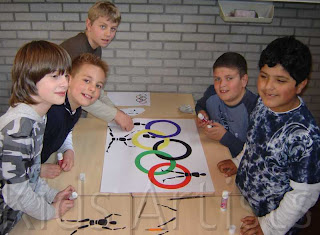
This is a group work for five students. Every group gets a big white sheet, five sheets of colored cardboard (in the colors of the rings: black, yellow, red, blue and green) and at least five copies of the athlete.
Step one: each group member cuts an Olympic ring, using compasses and scissors. Paste this five rings on the big white sheet. Look carefully which ring has to be pasted in front or back, and which ones have to be pasted through each other. Be sure the little cutting line is pasted underneath another ring.

  Step two: Every student takes a copy of the body and cuts every part of it. Then these bodyparts have to be pasted around, in, behind and in front of the Olympic rings.

zondag 5 juni 2016

Japanese notans


Made by a student of grade 6

You need:
  1. white paper 20 by 20 cm
  2. black paper 10 by 10 cm
  3. scissors
  4. glue
  5. cutter and cutting mat
Show pictures of notans  -  there are symmetrical notans, and also non symmetrical. Some notans are abstract, others are figurative.

Discuss the pictures with the students.
What stands out? Is there symmetry in the picture or not? Is the artwork abstract or figurative? Is there harmony in this notan?

Students make their own notan: figurative or abstract. There shouldn't remain any paper!

donderdag 5 juni 2014

Flowers in front of the windows

You need:
  1. coloured construction paper  
  2. tin foil (cut in pieces before lesson starts)
  3. strips of white paper, 2 cm 
  4. black  construction paper 
  5. white drawing sheets 
  6. tempera paint
  7. brushes
  8. scissors
  9. glue 

This lesson is about the flower pots you'll see in spring and summer.
The students get a large piece of oloured construction paper  for the background. Paste the window in the middle of it, with the white strips on it as a inner frame. Cut a pot from black paper. Draw and paint flowers on the white sheet. Cut them after drying with an edge of 1 cm. Paste them in front of the window. Paste the pot on the flowers. Decorate the pot with paint.

Source: Pinterest.

dinsdag 1 oktober 2013

One colour city - group work like Alisa Burke

You need:
  1. drawing sheet A1 size
  2. drawing sheets 10 by 20 cm (A4 size cut in three) 
  3. various colouring materials: crayons, oilpastel, colour pencils, watercolour paint, markers, tempera etc. 
  4. fine black marker 
  5. liquid water colour paint 
  6. big brush
  7. scissors
  8. glue
An artwork I came across on Pinterest from Alisa Burke was the inspirations for this lesson. Show Burke's work and discuss it: all houses in the same colour, windows are white, everything is outlined with black marker, houses uizen hebben één kleur, de ramen zijn wit, alles is zwart omrand, the houses aren't just next to each other but behind each other and (overlap). That means you cannot see the bottom of the houses that are not on the first row. 

Students form groups of four and discuss together the colour they'll choose. One of the students paints the background: use white crayon to draw stars or clouds and then paint the entire sheet with with liquid watercolor. Leave about one inch white along the edges.

On the smaller sheets students draw high houses, with windows and doors and decorations. Colour with the material of you choice. Outline the house and windows with black fineliner and cut it out. Be sure the group draw together about 15 houses.
Lay the painted houses on the large sheet to get a beautiful collage. Note that you do not see undersides of the houses that are not in the front row.

Made by students of grade 5/6

zondag 24 maart 2013

Surrealism with eyes


You need:
  1. camera
  2. drawing sheet A3 size 
  3. aquarelle pencils 
  4. markers 
  5. brush
  6. jar with water 
  7. scissors and glue 
Surrealists like Dali painted images in a hyper realistic style accompanied often with unexpected surprising or even shocking additions. Surrealists let their imagination run wild and painted dreams.   

In this lesson students will make a surrealistic artwork with eyes. Paul Miró, the Spanish surrealistic artist, painted often eyes in his work.

Eyes are meant to look with,  but how can we use eyes in our imagination? Maybe you can play soccer with them ... Or they are on the shelves of a refrigerator .... What tot think about a bouquet of eye flowers to give your mother...


Each student invents a surreal situation of which he or she is part of, and draws it. On a separate sheet several eyes have to be drawn, coloured in bright coloures with markers. The teacher takes a picture of the child as it sees itself in that situation and prints it. The drawing has to be coloured with aquarell pencils. Use water and a brush to smoothe the colours. Paste the photograph in the drawing and then paste the eyes. 

All arworks made by students of grade 4. 

donderdag 22 november 2012

Typical Dutch design (group work)

Made by students of grade 4
 
You need:
  1. white drawing sheet A6 size (postcard)
  2. pencil
  3. markers in red, blue and silver
  4. coloured cardboard
  5. scissors and glue
Discuss with the students things that are typically Dutch : tulips, windmills, clogs, cheese, canal houses, red white blue, etc. Look at  pictures of typical Dutch patterns (google 'Dutch fabrics): red- white or blue-white small squares or stripes or combinations of them.
Let students draw examples of cups and mugs on the digital board: narrow, wide, high, low, with belly, straight, angled, with or without foot, different ears etc.

The goal is to design cup and mugs with a Dutch design. Colour with marker and only use red and blue. Cut and paste all cups stacked on a sheet of coloured cardboard. Outline the stack with  silver.

vrijdag 12 oktober 2012

Owls in the moonlight

Background of dilluted water colour paint 

You need:
  1. drawing sheet 60 by 25 cm
  2. white drawing sheets
  3. brown wrapping paper
  4. indian ink 
  5. liquid water colour paint
  6. brushes
  7. pieces of styrofoam
  8. pencil
  9. flat piece of glass
  10. paint roller
  11. block printing ink
  12. chalk pastel
  13. saucer
Background of dilluted water colour paint  mixed with a drop indian ink  

Part one:
Put a saucer on the big sheet. This piece of paper remains white; the moon. Paint with highly diluted indian ink or liquid watercolor (also dilute it with water) and a large brush in one direction. Make sure the dish does not move. Paint with big strokes and leave the edges a little white. Let this dry.

Part two:
Divide the class into two groups. Group 1 paints the branch, group 2 is going to print owls.

Branch painting:
Paint with indian ink a branch with side branches on the painted sheet. Remember that a branch becoming thinner towards the end. Do not paint around the moon, but through it. If the branch stands out too little against the gray background, outline the branches later with white chalk for a better contrast.

Printing the owls:
Group 2 will start with the owls. Give each student two pieces of styrofoam. Students have to press two different owls in the foam. Put some blockprint paint on a glass plate. Roll the paint on the piece of foam. Then place a sheet (remember to write names on each sheet!) and rub with flat hand over it. Pull off the paper. Create several prints in different colors and on different kinds of paper. In this lesson we used white paper and brown wrapping paper.

A student who has finished printing, takes place on the painting table and paints his branch. Students who have completed the branch, follow up with printing.

Next day:
When the owls are dry (with block print this takes at least a day), they have to be cut leaving one millimeter space around. Use yellow chalk to draw a circle around the moon. Paste the owls on the branches.

Background of dilluted indian ink, branches outlined with white chalk pastel 

All artworks are made by students of grade 4

woensdag 3 oktober 2012

Owls in the tree

Made by a student of grade 5
You need:
  1. grey construction paper
  2. white drawing paper A1 size and A4 size
  3. tempera paint
  4. brushes
  5. scissors
  6. glue
  7. linoleum 10 by10 cm
  8. lino knives
  9. flat piece of glass
  10. block printing ink
  11. lino press
  12. linoleum roller
I found this great lesson on Artsonia!

Before the lesson: ask two students to paint an A1 size sheet with brown tempera and a few yellow and red. This painted paper will be used for tearing branches and tree stumps by all students. 
Another A1 sheet should be painted in warm autumn colours; this sheet is used for cutting out leaves.

Each students draws an owl on linoleum. Cut the outlines, the wings, eyes and beak. Decorate with small patterns. Print the owl several times in two colours and leave them to dry.

Take a second lesson to finish the artwork. Tear stumps and branches from the brown painted paper and paste them on the grey sheet. Cut leaves from the autumn sheet. Cut the owls with a little edge (1 mm). Look for a great composition and paste everything.

maandag 11 juni 2012

Comics like Roy Lichtenstein

 
Artworks are made by students of grade 3

A lesson based on a lesson from Phyl's site, There's a dragon in my artroom, but instead of painting I decided to choose for collage. Check out Phyl's site for the paintings!

You need:
  1. coloured paper A4 size
  2. white drawing sheet A4 size
  3. newspaper
  4. ruler and pencil
  5. glue
  6. crayons
  7. glitter
  8. colour markers
Roy Lichtenstein (1923 - 1997) was an American popart artist. He is best known for his enormously enlarged cartoons. After his art studies in New York and Columbus Liechtenstein teached art himself. In his spare time he painted abstract paintings and made parodies of American art from the twenties. In1960 he came into contact with Claes Oldenburg and the style elements from advertising and comic strips. He started to use use grids, dots, black outlines and bright colours, the style who made him famous. From 1962 Lichtenstein used the works of Monet, Picasso and Mondrian as the inspiration for his art and he paints sunsets in their style. Most of his work however is based on advertisements and cartoons.

Show artwork of Liechtenstein on the digital board and discuss the characteristics: primary colours sometimes with green, text balloons, raster dots as we know from newspaper photographs and thick black outlines. Show comic balloons from Lichtenstein and discuss them.

In this lesson students create a comic balloon like Lichtenstein did. Choose for a basic form, a star or cloud. See my 'how to draw a star step by step' below.
Cut this or cloud out of coloured paper. Cut another cloud or star from a newspaper. Draw an action word on the white sheet and colour with markers. Cut this word. Create composition and paste the parts of the artwork. Draw action stripes with black crayon or use glitter.

How to draw a star:
1. Draw a circle.
2. Draw lines from the edges to the circle, using pencil and ruler. See the black lines in the picture.


3. Draw lines from the same places but make them diagonal. See the red lines in the picture.
4. Cut the parts between the triangles, the blue pieces in the picture.

vrijdag 2 maart 2012

Astronaut in space

Made by a student of grade 3
You need:
  1. black construction paper
  2. white drawing sheets 
  3. water colour paint
  4. brushes
  5. jar with water
  6. crayons
  7. salt
  8. glitter
  9. scissors
  10. glue
  11. picture of yourself
  12. picture of an astronaut
Fold two sheets of drawing paper in half. Paint the four halves with different colours watercolour. Allow the paint to blend together; you may first draw patterns with crayons or use salt for a nice texture. Let both sheets dry.
Cut circles in various sizes from the painted paper. Swap painted paper with someone else if you like to. Create a composition of space on the black sheet. Paste some planets at the edge and cut them, to the endlessness of space even better.
Cut the astronaut and paste a picture of yourself on it. Paste planets and the astronaut. Use glitter or confetti to add stars.

zaterdag 5 november 2011

Building a burger


I did this lesson in October 2009, and soon saw it on many blogs. It's still one of my favorite lessons.
This week we had the Dutch Week of School Breakfast, a good reason to build a lot of new burgers with students of grade 4.
How to do this? Look at this post.

zondag 29 mei 2011

Sailboat regatta

You need:
  1. two sheets of white drawing paper
  2. sandpaper
  3. tempera paint in blue, green and white
  4. brush
  5. coloured paper
  6. brown paper (grocery bag)
  7. glue
  8. blue paper A1 size
Spray paint stripes in blue, green and white on a saucer. Lay a sheet of white drawing paper before you, with the small size up. Paint it with coloured waves. Don't mix the colours on the saucer, but dip the brush in two or three colours. Leave the sheet to dry.
Take the second white sheet and lay it before you with the small side up. Cut a piece of sandpaper as wide as the sheet and 8 cm high. Paste the sandpaper on the bottom of the sheet.
Tear the painted sheet in wavy strips. Tear the straight sides of the first and last strip too, so that all strips have two wavy sides. 
Place the strips overlapping on the white sheet. Start below. Place the second strip partly under the first one, the third under the second etc. Paste down the short sides of the waves on the left and right.
Cut boats out of a brown paper bag; bigger ones below, smaller ones at the top (perspective). Cut masts out of the paper bag and sails out of coloured paper. Paste the boats between the waves and paste the long sides of the waves at the same time. Paste sails and masts on the boats.  
Paste or staple all works together on large blue sheets (A1 size) to create a beautiful group work.

Artworks made by students of grade 4

woensdag 20 april 2011

Origami tulips


You need:
  1. origami sheets 10 by 10 cm
  2. strip of green cardboard
  3. scraps of green paper
  4. scissors
  5. glue
Fold the sheet twice, open and turn around.

Fold two diagonal lines and open it.
 
Fold the sheet double at a straight fold,
push the ends inward and push it flat.

It is a double square now.

Fold one point down.

Fold two points to the side.

Fold four tulips in different colours. Paste them on a piece of cardboard. Cut stems and leaves and paste them.

zaterdag 26 maart 2011

The princess and the pea

You need:
  1. coloured construction paper
  2. fabrics
  3. a pea
  4. glue
  5. scissors
  6. scraps of construction paper, including gold and silver
  7. markers and/or colour pencils
Read the fairy tale 'The princess and the pea' of Hans Christian Andersen. Discuus after this what a princess bed would look like. The students make the bed of the princess in this story. The bed has to be made of stripes of paper. At the bottom of the bed is a real pea, of course. Cut strips of fabrics for the matrasses (use special scissors for fabrics) and make a princess on top of this whole pile. Maybe the bed has even curtains or a little golden crown?

Made by students of grade 1

donderdag 6 januari 2011

Artist Trading Cards

Some weeks before Christmas, I was contacted by Amy Baldwin, art teacher at St. Pauls Lutheran School in Millington (Michigan). She wrote me she was a fan of my weblog. We emailed for a while, wondering if we could do a little project together. I read about exchanging ATC's on many art blogs, so I proposed to let our students make those little cards for eachother. This seemed to her very nice, so we got started!

Amy's students made ATC's for my students, my Dutch students did the same for hers. A couple of days before Christmas I sent an envelope filled with 50 ATC's of my 23 students to Millington.

Yesterday we received the big envelope, full of ATC's! How exciting for my students to get those beautiful cards from the other side of the world! They admired the cards and were surprised about the Dutch words on some of them. Thank you very much Amy and thank you all, St. Paul's students!

vrijdag 26 november 2010

Paper bag city

Made by a student of grade 2

You need:
  1. white drawing sheets A3 size
  2. tempera paint in blue, white and black
  3. brown paper bag
  4. scissors and glue
  5. brushes
Torn some typical city center buildings in various forms out of brown paper bags. Paste them on a white sheet. In front of the high buildings we see smaller ones (overlap). Paint a blue or grey blue sky on the sheet. Use different colours of blue and grey. Outline the buildings with black tempera paint. Paint windows and doors. Hang all artworks together to create a long street.

maandag 1 november 2010

City waterfront

You need:
  1. blue construction paper A4 size
  2. white drawing paper A3 size
  3. construction paper and/or ribbed cardboard in several colours
  4. scissors
  5. glue
  6. watercolour paint
  7. brushes
  8. jar with water

I found this lesson once on a German school website. The combination of cutting/pasting and painting is exciting! Students paste tight cut houses, and the reflection in the water is made with water colour paint, which is not tight at all - just as it should be!

Students cut rectangles of different heights and widths out of coloured paper. These are the bodies of the houses. Cut several triangles out of red construction paper, these are the roofs. Cut windows and doors.

Draw a line on 1 cm from the bottom of the blue sheet. Make a composition of the houses on this line, starting with the highest ones. Place the shorter houses in front of them (overlap). Paste the houses and roofs on the blue sheet. Paste windows and doors on them in different colours.

When ready, paste the blue sheet with houses on a white A3 size sheet. Use watercolour paint to paint the mirror image of the houses in the water. Paint as precise as possible, but don't use a ruler: reflections in water aren't that straight! Paint the water blue.

Made by students of 10-11 years old