Posts tonen met het label cut and glue. Alle posts tonen

zondag 2 december 2018

Colourful Christmas trees


This lesson is seen more than 133,000 times. 
If you use it on your own website, please mention your source: kidsartists.blogspot.com
And if you want to make money out of this lesson, realise it's my work. 
So ask me before sending it to Teachers pay teachers, Twinkle and all that other sites. 

You need:
  1. two drawing sheets A4 size
  2. watercolour paint
  3. brushes
  4. jar with water
  5. tissue paper
  6. scissors
  7. glue
  8. ruler
  9. pencil
  10. gold or silver marker
  11. white correction marker
  12. glitter
Paint a background for the Christmas trees with water paint. Use different colours and let them blend into each other. Use plenty of water for nice bright colours.
Choose three colours of tissue paper. Fold the sheets several times and cut triangles and squares. Take a sheet of drawing paper and make it wet with a brush and water. Lay the pieces of tissue paper on this wet sheet. If the tissue paper is not wet enough, it won't bleed. Then make it wet again with a brush with water. Fill the sheet with these tissue paper parts and leave it to dry. Remove the pieces of tissue paper from the sheet when it is completely dry. The sheet will look like this:
Cut long triangles from the sheet that was coloured with tissue paper. You may use the schedule above (based on A4 size sheet of 21 by 29 cm - half cm will remain on both sides then). You can cut a piece from the bottom of the triangles if you want trees of various heights. Paste these three trees with overlap on the water paint background. Don't paste the trees all at the same height, so you get depth. Cut some smaller triangles from the left overs if you want more trees.
Outline the trees with silver or gold marker. Draw a simple branch structure. Draw the strains with brown pencil or use the metallic pins. Draw snowflakes around and on the trees with a white (correction) marker or use chips from the punch. rond en op de bomen. Paste the artwork on a coloured background. Sprinkle some glitter on the forest floor.
All artwork is made by students of 11-12 years old

dinsdag 25 september 2018

Mondriaan: from 2D into 3D

You need:
  1. white construction paper  A4 size
  2. ruler
  3. pencil
  4. colored construction paper in yellow, blue and red
  5. black marker
  6. cutting mat and cutter 
  7. glue
Show artworks of Piet Mondriaan and De Stijl and discuss them.

Fold the white sheet in 5 columns. The columns don't have the be the same width. Divide the sheet with pencil and ruler in three rows (thin, the lines have to be erased later).
Cut rectangle and squares out of colored paper. Make sure they are not wider as the columns. Paste  the rectangles and squares between the folded lines and outline them using a ruler and a black marker. Connect each one with its 'neighbour' with a marker. The lines should be horizontal or vertical.

Then cut two horizontal lines from the start of column 2 towards the end of column 4 (see picture).

zaterdag 22 september 2018

Mondriaan cube


You need:
  1. white cardboard
  2. ruler
  3. pencil
  4. cutting mat and knife
  5. markers
  6. glue
After a lesson about the work of Piet Mondriaan, students draw a template of a cube (nice goal for the math lesson!). The surfaces are 8 by 8 cm, the stick edges are 1 cm.

Cut the template with a cutting knife. Use a black fine marker to draw squares at 1/2-1 cm from the edges. Within these squares you draw straight lines to get some rectangles and squares. Color these using Mondriaan colors: red, yellow and blue. Leave some surfaces white.


Fold the stick edges and paste them to get the Mondriaan cube!


maandag 21 november 2016

Tea light holder The Style

Made by a student of grade 4

You need:
  1. black construction paper  41 by 12 cm 
  2. wax paper in red, blue and yellow
  3. cutting mat and cutter
  4. glue
Tell students about art the movement The Style and two of its most famous contributors Piet Mondriaan and Theo van Doesburg. 

Draw 4 lines with 10 cm between them from bottom to the top of the black sheet. The last strip (1 cm) is the glue strip. 
Draw four squares or rectangles on the black sheet. Then draw lines from about 1 cm wide. Cut the spaces between the lines and paste wax paper behind them. 
Finish the lantern by folding the four lines and pasting it. 

zondag 30 oktober 2016

Mondriaan collage with printed lines


You need:

  1. paper in primary colours
  2. white sheet A3 size 
  3. pieces of cardboard 
  4. black tempera paint
  5. saucer
  6. ruler 
  7. pencil 
  8. scissors 
Just like Piet Mondriaan (De Stijl), students draw rectangles and squares using ruler and pencil on construction paper in yellow, blue and red.  After this the drawings have to be cut and pasted on a white sheet. However Mondriaan did not: students may stick colours together.  
Stamp straight lines using a piece of ribbed cardboard and black tempera paint. 

Made by a student of grade 3 

Source: http://artroom104.blogspot.nl/ 

dinsdag 14 juni 2016

Olympic athletes

You need:
  1. scissors
  2. glue
  3. white drawing paper A1 size
  4. cardboard in Olympic colors
  5. compasses
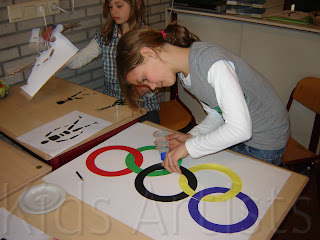
Start this lesson with the symbol of the Olympics: the colored rings. What do these rings mean? What colors do they have? How are they placed together?
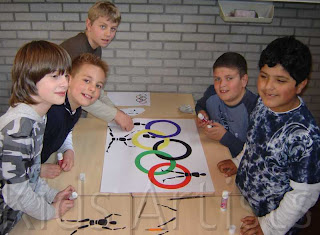
 Ask one or two children to take the position of an athlete. What is the position of the legs, arms and body? Ask another student to show another position and discuss it again.
This is a group work for five students. Every group gets a big white sheet, five sheets of colored cardboard (in the colors of the rings: black, yellow, red, blue and green) and at least five copies of the athlete.
Step one: each group member cuts an Olympic ring, using compasses and scissors. Paste this five rings on the big white sheet. Look carefully which ring has to be pasted in front or back, and which ones have to be pasted through each other. Be sure the little cutting line is pasted underneath another ring.

  Step two: Every student takes a copy of the body and cuts every part of it. Then these bodyparts have to be pasted around, in, behind and in front of the Olympic rings.

zondag 5 juni 2016

Japanese notans


Made by a student of grade 6

You need:
  1. white paper 20 by 20 cm
  2. black paper 10 by 10 cm
  3. scissors
  4. glue
  5. cutter and cutting mat
Show pictures of notans  -  there are symmetrical notans, and also non symmetrical. Some notans are abstract, others are figurative.

Discuss the pictures with the students.
What stands out? Is there symmetry in the picture or not? Is the artwork abstract or figurative? Is there harmony in this notan?

Students make their own notan: figurative or abstract. There shouldn't remain any paper!

dinsdag 28 oktober 2014

Halloween cat and window


Made by a student of grade 4
You need:
  1. white drawing sheet
  2. liquid water colour paint 
  3. brush
  4. black construction paper 
  5. cutting knife and mat
  6. glue
  7. black marker 
  8. white chalk pastel
  9. carbon paper
  10. pattern
Paint a white sheet with yellow and orange liquid water colour paint. Enlarge the pattern and trace it on the black sheet using carbon paper. Put a cross in the parts that have to been cut. Cut the pattern and paste it on the coloured sheet.
Draw Halloween details with black marker. Use the white chalk pastel for details on the black paper. 


Source: halloweenwitchesflyinmachine.blogspot.nl/

donderdag 5 juni 2014

Flowers in front of the windows

You need:
  1. coloured construction paper  
  2. tin foil (cut in pieces before lesson starts)
  3. strips of white paper, 2 cm 
  4. black  construction paper 
  5. white drawing sheets 
  6. tempera paint
  7. brushes
  8. scissors
  9. glue 

This lesson is about the flower pots you'll see in spring and summer.
The students get a large piece of oloured construction paper  for the background. Paste the window in the middle of it, with the white strips on it as a inner frame. Cut a pot from black paper. Draw and paint flowers on the white sheet. Cut them after drying with an edge of 1 cm. Paste them in front of the window. Paste the pot on the flowers. Decorate the pot with paint.

Source: Pinterest.

donderdag 10 april 2014

Sheep in the meadow

Made by a student of grade 2

You need:
  1. drawing sheet 
  2. tempera paint
  3. stippling brushes
  4. masking tape
  5. black and white construction paper
  6. glue
Make a fence on the sheet with masking tape. Draw a horizontal line above the fence. Stamp with different colours the meadow. Do not mix the paint. Stamp some spring flowers too.

Stamp the air in the same way with white and blue.
Remove the masking tape. Do this when the paint is still wet.
Cut some clouds for the body of the sheep out of a white sheet. Cut heads and feet out of black paper. Paste the sheep before the fence. Draw eyes and beak with white pencil.

Source: Artsonia. 

dinsdag 29 januari 2013

Suburb for birds

Made by students of grade 4

You need:
  1. coloured cardboard 
  2. wallpaper 
  3. wrapping paper
  4. tempera paint
  5. black marker
  6. brushes
  7. scissors and glue
Students draw a birdhouse with a special entrance on brown wrapping paper. This entrance can be a heart, a star of even a bird. Cut this entrance and outline the hole with a black marker.
Paint the house with cheerful colours.
Paste it on a piece of wallpaper and cut it out with 2 cm around. Paste a strip of black paper on the cardboard, this is the standard for birdhouse. Paste the birdhouse on the standard. Outline the house with black marker.

All birdhouses together will make a colourfull suburb for birds!

Thanks to Maureen Kaal 

donderdag 13 december 2012

Happy new year


Made by students of grade 3 and 4 

You need: 
  1. white drawing sheet A4 size
  2. blue liquid water colour paint 
  3. brush
  4. crayons
  5. black and yellow or orange construction paper
  6. yellow chalk pastel
Show pictures or movies about fireworks and discuss what this looks like. Use crayons to draw fireworks on a white sheet. Paint this with blue liquid water colour paint. Let dry.
Cut a skyline out of half a sheet of black paper. Paste this on the blue sheet. Cut windows from yellow or orange paper.
Draw a yellow chalk line on the roofs and smudge it.   

woensdag 3 oktober 2012

Owls in the tree

Made by a student of grade 5
You need:
  1. grey construction paper
  2. white drawing paper A1 size and A4 size
  3. tempera paint
  4. brushes
  5. scissors
  6. glue
  7. linoleum 10 by10 cm
  8. lino knives
  9. flat piece of glass
  10. block printing ink
  11. lino press
  12. linoleum roller
I found this great lesson on Artsonia!

Before the lesson: ask two students to paint an A1 size sheet with brown tempera and a few yellow and red. This painted paper will be used for tearing branches and tree stumps by all students. 
Another A1 sheet should be painted in warm autumn colours; this sheet is used for cutting out leaves.

Each students draws an owl on linoleum. Cut the outlines, the wings, eyes and beak. Decorate with small patterns. Print the owl several times in two colours and leave them to dry.

Take a second lesson to finish the artwork. Tear stumps and branches from the brown painted paper and paste them on the grey sheet. Cut leaves from the autumn sheet. Cut the owls with a little edge (1 mm). Look for a great composition and paste everything.

maandag 11 juni 2012

Comics like Roy Lichtenstein

 
Artworks are made by students of grade 3

A lesson based on a lesson from Phyl's site, There's a dragon in my artroom, but instead of painting I decided to choose for collage. Check out Phyl's site for the paintings!

You need:
  1. coloured paper A4 size
  2. white drawing sheet A4 size
  3. newspaper
  4. ruler and pencil
  5. glue
  6. crayons
  7. glitter
  8. colour markers
Roy Lichtenstein (1923 - 1997) was an American popart artist. He is best known for his enormously enlarged cartoons. After his art studies in New York and Columbus Liechtenstein teached art himself. In his spare time he painted abstract paintings and made parodies of American art from the twenties. In1960 he came into contact with Claes Oldenburg and the style elements from advertising and comic strips. He started to use use grids, dots, black outlines and bright colours, the style who made him famous. From 1962 Lichtenstein used the works of Monet, Picasso and Mondrian as the inspiration for his art and he paints sunsets in their style. Most of his work however is based on advertisements and cartoons.

Show artwork of Liechtenstein on the digital board and discuss the characteristics: primary colours sometimes with green, text balloons, raster dots as we know from newspaper photographs and thick black outlines. Show comic balloons from Lichtenstein and discuss them.

In this lesson students create a comic balloon like Lichtenstein did. Choose for a basic form, a star or cloud. See my 'how to draw a star step by step' below.
Cut this or cloud out of coloured paper. Cut another cloud or star from a newspaper. Draw an action word on the white sheet and colour with markers. Cut this word. Create composition and paste the parts of the artwork. Draw action stripes with black crayon or use glitter.

How to draw a star:
1. Draw a circle.
2. Draw lines from the edges to the circle, using pencil and ruler. See the black lines in the picture.


3. Draw lines from the same places but make them diagonal. See the red lines in the picture.
4. Cut the parts between the triangles, the blue pieces in the picture.

donderdag 15 maart 2012

Henhouse

You need:
  1. coloured cardboard for the henhouse
  2. white cardboard for the chicken
  3. yellow cardboard for the eggs
  4. red cardboard for the wing
  5. fabric from onion or potato bag
  6. hay
  7. scissors or cutter+mat
  8. glue (possibly a glue gun)
  9. markers
  10. pattern henhouse
  11. pattern chicken
  12. carbon paper
Print the pattern of the henhouse. Use carbon paper to copy the henhouse on the cardboard. Cut the house twice. Place the onion bag fabric between the two houses and paste the houses together with the fabric in between. Cut away the fabric parts that hang out the house. Print the pattern of the chicken or ask children to draw one.
Use carbon paper to copy the chicken on white cardboard and cut it out. Colour the comb, beak and eye with a marker. Copy the wing with carbon paper on red cardboard or draw a wing. Cut it out and paste it on the chicken. If you use a glue gun, drop some glue on the wing to harden. After this paste the wing on the dollop of glue to create some space between wing and body. Cut out some eggs of the yellow cardboard. Paste the hen in his house, and paste hay on the bottom. Put the eggs in the hay and paste them.

vrijdag 2 maart 2012

Astronaut in space

Made by a student of grade 3
You need:
  1. black construction paper
  2. white drawing sheets 
  3. water colour paint
  4. brushes
  5. jar with water
  6. crayons
  7. salt
  8. glitter
  9. scissors
  10. glue
  11. picture of yourself
  12. picture of an astronaut
Fold two sheets of drawing paper in half. Paint the four halves with different colours watercolour. Allow the paint to blend together; you may first draw patterns with crayons or use salt for a nice texture. Let both sheets dry.
Cut circles in various sizes from the painted paper. Swap painted paper with someone else if you like to. Create a composition of space on the black sheet. Paste some planets at the edge and cut them, to the endlessness of space even better.
Cut the astronaut and paste a picture of yourself on it. Paste planets and the astronaut. Use glitter or confetti to add stars.

dinsdag 7 februari 2012

Winter mittens and cap

Made by a student of grade 2
You need:
  1. coloured construction paper
  2. markers
  3. white sheet
  4. glue
  5. scissors
  6. oil pastel
Students draw a face on a large sheet of white paper and colour it with oil pastels. Be sure the eyes are not on top of the head, but in the middle. The space between the two eyes is as wide as an eye.
From coloured paper students cut mittens and a hat (or trace templates first and cut them). Draw patterns on the hat and mittens with marker. The patterns on both mittens should be similar, as well as the patterns on the hat.
Paste hat and mittens on the drawing. Make sure the thumbs point to each other!

zaterdag 26 november 2011

Amsterdam by night

You need:
  1. white drawing sheet A4 size
  2. liquid water colour
  3. brush
  4. jar with water
  5. indian ink
  6. straw
  7. black and yellow construction paper
  8. scissors
  9. glue
Paint the white sheet blue or orange with liquid water colour; add water to get a brighter blue / orange above. Let dry. Drip some indian ink and blow it upwards with a straw. Cut a row of canal houses out of black paper and paste it on the coloured sheet. Cut and paste windows and a moon out of yellow paper.
Paste the artwork on a black sheet.
Artworks made by students of grade 4

zaterdag 5 november 2011

Building a burger


I did this lesson in October 2009, and soon saw it on many blogs. It's still one of my favorite lessons.
This week we had the Dutch Week of School Breakfast, a good reason to build a lot of new burgers with students of grade 4.
How to do this? Look at this post.

donderdag 13 oktober 2011

Burton Morris!!!

Made by a student of grade 6

In February I posted a lesson about Burton Morris. It is a tutorial to make artwork in his style.
Today I was highly surprised when I got an email of the artist himself! Burton Morris wrote me! You'll all understand how excited I was!!!

Dear Jacquelin,

I came across your blog and saw your student's artworks. I am truly touched that you honored my artwork in your teaching lessons and hope it was a success and inspired the children!

I hope to show again in the Netherlands one day and feel free to keep in touch.

Your friend,
Burton Morris


If you want to check it out again, follow this link: http://kidsartists.blogspot.com/2011/02/in-style-of-burton-morris.html

To see his wonderful website: www.burtonmorris.com