Posts tonen met het label drawing. Alle posts tonen

zondag 26 augustus 2012

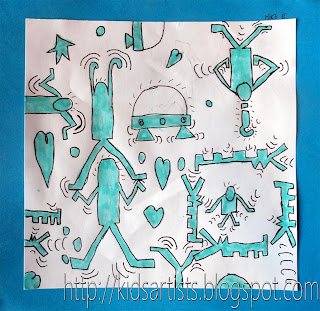
Turning around with Keith Haring


You need:
  1. drawing sheets 20 by 20 cm
  2. pencil
  3. markers
  4. coloured contruction paper 
  5. glue
I found this lesson on Pinterest, it's originally from DaVinci's Wings.
Show artwork of Keith Haring (1958-1990) and talk about the characteristics of his work:
 
people are drawn as in cartoons
fewdetails
thick black lines and contours
bright colors
• dashes indicate movement
Students draw figures in Keith Haring style. The sheet must be filled completely and also rotatably: the figures are not all the same way, but are crisscrossing the drawing. Furthermore, also figures on the edge of the sheet, to make the drawing more exciting (what happens beyond the edges?)
All figures have to be coloured with marker; choose just one colour. Outline with a black fineliner and then add motion dashes.
Paste work on construction paper that is the same color as the marker colour.

See also my other lessons about Keith Haring:
 
Artworks made by students of grade 4
zondag 24 juni 2012

On the beach - collage


You need:
  1. drawing sheet 40 by 35 cm
  2. white drawing sheets
  3. tempera paint
  4. brushes
  5. scissors
  6. markers
  7. glue
  8. pencils
Draw a word web with words about the beach. Think of things (to do) on the sand, things (to do) in the water and things (to do) in the air. Talk about people standing in the water: they seem to have half legs!

Cover four tables with newspaper and put three containers with paint on it:
  • yellow and a little brown besides (beach) + two big brushes
  • blue and a little green (seawater) + two big brushes
  • blue and white (air) + two big brushes 
  • white (surf) + two brushes to stamp
Show how to paint the beach: much yellow on the brush and a little brown for the beach (so do not mix!). Do the same with blue and white for the air, and blue with green for the sea. Make wavy motions with the brush to accentuate the water. Finish with a white stamping brush for the surf.


While about four students are painting, the others can start with the drawing part of this lesson.

Draw people and things you see on the beach. Colour them with markers, and use a skin colour pencil for the bodies. Cut all those little drawings and paste them on the beach, the water or in the air.
Hang all work together for a great group work.

All artworks are made by students of grade 3

donderdag 10 mei 2012

Art cows

 
Artworks made by students of grade 2

You need:
  1. 3 sheets of drawing paper 15 by 15 cm
  2. colour pencils
  3. coloured paper for background
  4. glue
Students have to draw three different cows: a realistic one, a cubistic one and a cow in just blue colours like the Dutch pottery from Delft.
Paste those three works on a strip of coloured construction paper.

maandag 26 maart 2012

What's in your egg?

 
You need:
  1. white drawing sheet A5 size 
  2. charcoal
  3. yellow sheet for background 
  4. hairspray
A great lesson for Easter, to be done in several grades. 

Start this lesson with a yeaser: Imagine you break your egg on Easter, and it shows something very different than just the egg.... Draw this imagination with charcoal on a white sheet.
Give instruction on how to work with charcoal. Point out that charcoal stain quickly, and give students tissues with water to clean. Show that the charcoal stripes could be blurred by smearing. In this way the shadows on the egg can be made. Tell charcoal can be erased with kneaded eraser.

Let the children first practice to experience for their self how you work with charcoal.
Then they draw the two  seperated halves of an egg with that's what in it between them. The egg should not just hang not in the air, but has to lie somewhere on or in (grass, cloth or similar).

Fix the drawing with hairspray and staple or paste it on a yellow background.
Made by students of grade 3

zaterdag 28 januari 2012

Pastel planets


You need:
  1. black construction paper A4 size
  2. chalk pastel
  3. hairspray
During our school project about Space, students of grade 5 made these fantasy solar system. Spheres were drawn with attention towards an imaginary light source creating light and dark values. Overlap was required to suggest depth. To suggest the endlessness of the universe, parts of planets had to be drawn at the edge of the sheet.
 
Draw circles by tracing round subjects or use compasses. Colour with chalk pastel. Note the technique of the chalk: colour, smear and blend until you're satisfied. Fix the artwork with hairspray.
 

dinsdag 27 december 2011

Snowmen mandala


You need:
  1. white drawing sheet 
  2. compasses
  3. scissors 
  4. crayons or oil pastels 
  5. indian ink
  6. brush
Step 1.
This lesson is a variaton on 'Autumn leaves mandala'. Click the link for full description.
Focus in this lesson: make sure the snowmen are really coloured white with crayons or oil pastels, otherwise they will turn completely black with ink after step 2.

Step 2.
Crumple the picture into a ball. Make flat again. Paint the entire drawing with indian ink. Rinse the ink immediately after it in the sink and let the work dry. The ink will rest in the folds of the paper  and creates a great "antique" effect.

zondag 18 december 2011

Golden Christmas

Made by a student of grade 6
You need:
  1. white drawing sheet 20 by 20 cm
  2. ruler
  3. pencil
  4. silver and gold marker
  5. black construction paper
  6. glue
Children divide their sheet with ruler and pencil in 16 squares from 5 by 5 cm. In each square they draw a Christmas figure: tree, candy, snowman, skates, mitten, sock, candle etc. These figures have to be coloured , just like a checkerboard, with gold and silver marker.  Paste the drawing on a black sheet.

dinsdag 25 oktober 2011

Autumn leaves mandala


You need:
  1. white drawing sheet A4 size
  2. compasses
  3. pencil
  4. oil pastels
Draw a circle with a diameter of 20 cm. Draw within about 1 cm another circle (the edge of the mandala). Cut out and fold into 8 pieces. Draw against one of the folds half of an autumn leaf using black oil pastel.


Fold the sheet and press firmly with the hands to get a print of the leaf on the other side of the fold. Trace this half with black oilpastel. Repeat this and draw the other three leaves. Colour the leaves and background with oil pastels in warm colours. Colour the edge with a nice pattern.

dinsdag 11 oktober 2011

Halloween scene


Made by a student of grade 6
You need:
  1. white drawing sheet A4 size
  2. liquid water colour yellow and orange 
  3. brush
  4. jar with water
  5. black markers
  6. black construction paper for backgroud
  7. glue or stapler
This lesson is about silhouettes. A silhouette is a shadow, you can only see the outside lines. Show  some silhouettes or shapes made with your hands. Show that sometimes the light comes through openings in the silhouette, so it is not just black.
Make the drawing sheet wet and paint it yellow and orange with liquid water colour to suggest a sunset. Draw a horizon line. Draw a house or a tree, and draw Halloween things around. Colour the silhouettes black and let light where it can. Paste or staple the artwork on a black sheet.

vrijdag 16 september 2011

Same animal, different colours

Made by a student of grade 1
You need:
  1. two white drawing sheets A4 size
  2. oil pastels
  3. liquid water colour
  4. brush
  5. jar with water
A lesson about cool and warm colours.
Draw an animal on a white drawing sheet. Be sure it's not too small. Ask the teacher to make a copy of this drawing. Colour the first animal with oil pastels in warm colours, the second one in cool colours. Paint the background with liquid water colour, using warm and cool colours as well.
Paste both drawings below or next to each other on a large white sheet. 


zaterdag 10 september 2011

Outstanding name

By Vincent, grade 3
You need:
  1. white drawing sheet A5 size
  2. waterproof black marker
  3. colour markers
  4. black fine marker
Every year we make a birthday calendar in the classroom. For the calendar of this year, we used this lesson. The drawings were pasted on a coloured sheet with the date of the anniversary of the student.

Write your name in elegant letters with a black waterproof marker on a white sheet. Outline the letters with markers in different colors. Divide the background into pieces, by drawing lines from top to bottom and from left to right. Fill out the individual surfaces with patterns drawn with a black fine marker. Make sure that your name really stands out!

donderdag 25 augustus 2011

Sunflower batik


You need:
  1. white drawing sheet A4 size
  2. oil pastels
  3. pencil
  4. tempera paint brown or black
  5. liquid soap
  6. brushes
Draw some sunflowers on the sheet and on the edges. Colour them with oilpastels, press heavily. Wrinkle the sheet into a ball; make sure the picture is on the inside.


Smooth the paper out. Use black or brown tempera with a tiny bit of liquid handsoap, and paint over the entire paper.


Then rinse the paper under cool water. The paint sticks in the little crinkle wrinkles giving it that batik look.


Leave the work to dry and press it flat between two books.

Made by students of grade 4

zondag 21 augustus 2011

Sunflowers in five different materials

You need:
  1. sunflowers or pictures of them
  2. white drawing sheet A1 size, cut in strips of 30 by 65 cm
  3. five different colouring materials, like colour pencils, tempera paint, watercolour paint, oil pastels, crayons, coloured ink, aquarell pencils etc.
  4. brushes
  5. pencil, ruler
  6. coloured paper
  7. scissors
Look with the students at some sunflowers or pictures of them. How thick is the stem, what can you tell about the leaves, how are the petals divided, what colours do you see in the heart of the flower, etc.

Divide the sheet with thin lines into five strips of 13 cm high. Draw some sunflowers. Make sure the flowers themselves are drawn at the demarcation of the strips. Make sure too that in each compartment at least half a sunflower or leave is drawn.
Choose five different colour materials. Use in every compartment a different material. Consider yourself the order of the materials, for example from bright (markers) to less bright (aquarelle pencils).
Paste the work on a coloured background. Or cut the five compartments and paste them with some space between on a coloured background.
Made by students of grade 5

zaterdag 18 juni 2011

Group work like Keith Haring

Group work, made by students of grade 3

You need:
  1. drawing sheet A1 size 
  2. pieces of cardboard 10 by 15 cm
  3. pencil
  4. scissors
  5. glue
  6. colour markers
  7. permanent black marker 
We worked in groups of five students.
Each student draws a figure on a piece of cardboard in the style of Keith Haring: no details, movement, a figure like in a comic. Cut the figures and trace them several times on the big sheet. Working together is required!


Instructions:
- Do not draw twice the same figure next to each other.
- Vary the position: upright, horizontally, diagonally. Turn the cardboard to get a mirror figure.
- Do not start in the middle, but work from the side and place the figures as close to each other.
- Outline all figures with a permanent black marker.
- Divide the intervening areas into smaller areas by straight lines drawn with black marker.
- Choose one colour per person and colour the areas with these five colours.  
- Put your signature on the work like Keith Haring did!

maandag 13 juni 2011

Connected shells

Warm colours, made by Emmy, grade 6

You need:
  1. white drawing sheet 20 by 20 cm
  2. colour markers
  3. fine black marker
  4. pencil
Draw a few lines on the sheet to divide the paper into sections. Draw several shells on those lines. Be sure the shells touch eachother. Trace the shells with a fine permanent black marker. Colour the sections between the shells with colour markers in warm or cool colours.
    Cool colours, made by Bjorn grade 5

maandag 23 mei 2011

Filled with fruit

Made by a student of grade 3

You need:
  1. white drawing sheet A4 size
  2. oil pastels
Choose four fruits and draw many of them on the drawing sheet. The fruit should overlap. Colour them with oil pastels and outline with black.

vrijdag 13 mei 2011

MOMA

Made by Debbie, grade 6
You need:
  1. drawing sheet A4 size
  2. colour pencils
  3. ruler
A lesson about drawing one point perspective.

Students draw a square in the middle of their sheet and draw four lines from the corners to the middle, see schedule. These are the floor and ceiling lines. Draw two lines from both short sides to the middle. Between these two lines the paintings has to be drawn. Draw lines from the bottom to the middle for tiles or parquet.
It's nice to draw artworks that students have made this schoolyear or to choose for artworks of famous painters.
Colour with colour pencils.

maandag 25 april 2011

Fantastic felines like Laurel Burch


You need:
  1. pink or purple constrution paper A3 size
  2. oilpastels
  3. tempera paint
  4. brushes
  5. gold and silver markers
  6. glitter
  7. glue

Laurel Burch (1945 –  2007) was an American artist, designer and businesswoman. As a 20-year-old single mother she found metal in junkyards to hammer into jewelry to support her two children, and went on to launch her business, now called Laurel Burch Artworks, in the late 1960s with the help of a small staff that worked out of her house. She began making paintings and was commissioned by restaurants, businesses and private collectors. Burch designed, among other things, beads, jewelry, paintings, T-shirts, scarves, coffee mugs and tote bags, but 90% of her designs derived from her original paintings.

Especially Burch's cats are recognizable. Few some of her paintings on the website of Laurel Burch and discuss the salient features: bright colours, bold pattersn, eyes and nose are drawn out of one line. use of silver and gold.
 
Students draw a cat on purple or pink paper in the style of Laurel Burch. Colour the cat using different materials like tempera, oilpastels, gold and silver markers. Outline the cat with silver or gold. Draw a frame around the artwork. Use glitter to accentuate lines.

All artworks are made by students of grade 5


donderdag 21 april 2011

Easter eggs with lines


You need:
  1. cardboard egg shape 10 cm high
  2. pencil
  3. white drawing sheet
  4. several colour materials, like markers, colour pencils, crayons, chalk pastel 
  5. coloured paper 20 by 14 cm
  6. gekleurd papier 14 cm hoog, 20 cm breed
  7. glue
  8. scissors
  9. fine black marker 
What kind of lines do we know? Let students draw them on the blackboard: straight - horizontal, vertical, diagonal; angular, like zig-zag and curved lines.
Students have to make four Easter eggs. Ouline the template with a pencil. Draw straight lines in the first egg, curved lines in the second one and zig-zag lines in the third one. The fourth egg may is made with lines of their own choice. Trace the lines with a fine black marker. Colour them with four different materials: colour pencils, markers, chalk pastel and crayons. Cut the eggs and paste them on a coloured sheet.


Made by students of grade 3

zondag 17 april 2011

Charming chicken

Made by a student of grade 5

You need:
  1. blue and yellow construction paper A4 size
  2. oil pastels
  3. glue
Draw a chicken on blue construction paper, using the tutorial on How to draw a chicken. Make it a charming chicken by colouring it in bright colours. Mix colours to create smooth transitions. Draw a horizon line and colour the ground. Draw somethin on the horizon line, Teken een horizonlijn en kleur de grond. Teken iets op de horizonlijn, for example a fence or a farm. 
Tear the edges of the blue sheet away and paste the chicken on a yellow undersheet. Draw eggs around it.

Made by students of grade 6