zondag 14 augustus 2022

Landscape like Ton Schulten


You need:

  1. drawing sheet 
  2. tempera paint in primary colors, black and white  
  3. ruler
  4. pencil
  5. brushes
Ton Schulten (1938) is a Dutch painter, born and living in the small town Ootmarsum. He worked as a graphic designer and decided in 1989 to devote himself entirely to painting. His main source of inspiration is the landscape of Twente, a region in the east of Holland. This is a semi-open landscape that, due to the planting of hedges and wooded banks, looks like a stage with wings.  

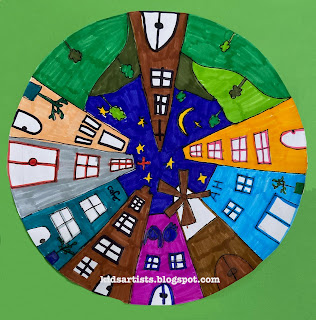
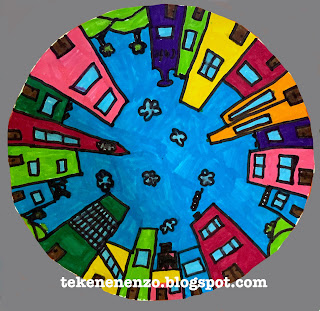
Show artworks from Ton Schulten and discuss them.
  • Schulten's use of colors  
  • horizon line
  • the 'curtains' on the sides - the picture is darker there than in the middle
  • simple shapes
  • divided in rectangles
by students of grade 6

What should you do? 
You're going to draw a landscape like Ton Schulten. First draw a horizon line on about half of the sheet. Draw one or some simple houses. Then draw some draw trees. Divide the drawing with horizontal and vertical lines into small rectangles.  
Paint the rectangles with tempera. Mix your own colors, starting with the brightest one. For example: start with white and add a drop of blue to get light blue; add more drops to get a darker blue.  
Perhaps you can draw 'curtains', just like Ton Schulten: the sides are darker than those in the center. 

Elements of art: shape, line, color, nuance.  

maandag 28 maart 2022

Matisse meets Haring


In this lesson we combine Keith Haring and Henri Matisse.

Benodigdheden:

  1. white drawing sheet
  2. colored construction paper
  3. black construction paper
  4. scissors
  5. glue
Show some of the later artwork from Matisse (fauvism, 1869-1954), his cut-outs and discuss them. What do you see? What shapes did Matisse use? What are the organic shapes? And the geometric shapes? What's the difference between them? What colors do you see?

Look at the human figures in Keith Harings artwork (popart, 1958-1990). What stands out? How are human beings drawn? Which parts of the body do you see, which parts nog? How do you see that people are moving?

What to do? 

  1. Cut organic and geometric shapes from colored paper.  
  2. Cut a human figure from black paper,  (do not draw first!). Be sure you can clearly see he's moving.  
  3. Arrange the geometric and organic shapes on the white sheet. Overlap is allowed.   
  4. Search for a good place where the human figure fits well and where you can see he's moving, for example because he steps on a geometric shape or dances between the organic shapes. 
  5. Satisfied about your composition? Then glue on all the cut out shapes .

vrijdag 18 maart 2022

Circle City


You need: 

  1. white drawing sheet
  2. compass
  3. ruler
  4. pencil
  5. markers
  6. colored sheet
  7. glue

Explain the one-point perspective: objects further away appear smaller. If we draw a street towards the horizon, it narrows and trees get smaller. 

In one-point perspective you draw all lines parallel to the viewing direction to one point. You literally put a dot on the horizon. 

What to do? 

  • Draw a circle of 20 cm in diameter using the compass. Mark the hole in the center with a dot.  
  • Draw lines form the edges of the circle to the dot in the middle, using ruler and pencil. 
  • Draw buildings in different heights using the lines.  Draw doors and windows. 
  • Color with markers. Outline everything with a fine black marker. 
  • Cut the circle and stick it on a colored sheet. 

Art work made by students of grade 4. 

dinsdag 15 maart 2022

Henna hands

 You need:

  1. white drawing sheet
  2. colored sheet
  3. Indian ink or fine black marker 
  4. glue
  5. scissors 

Henna art is making temporary decorations on the skin using dye from dried henna leaves. Henna decorations are applied during festive occasions in North-African and Asian countries. Used symbols are those of strength, luck, fertility and protection. Patterns and symbols vary per country.  

Trace your hand on a white sheet. Decorate with patterns. Cut oud and stick on a colored sheet. Cut the hand again with an edge of approximately 1/2 cm. 


dinsdag 26 oktober 2021

Wire portrait like Alexander Calder

made by teacher Wouter 

During a study day on art education our teachers made portraits of wire. This can also be done in higher grades. If you want to make wire figures in lower grades, then choose a simpler shape, for example fruit/veggies or an animal. 

This activity can be done in a lesson about Alexander Calder, known for his wire portraits and mobiles. 

You need:

  1. 3 meters wire thickness 1,3 mm
  2. wire cutter
  3. printed selfie 30 by 40 cm
  4. black marker
  5. painters tape

Take a picture of yourself and print it. 

Outline your face, eyes, nose, mouth and hair using the black marker. Turn the sheet over, the lines can be seen on the back of it now.  

Wrap 3 m of wire around your fingers into a bunch. 

Start at the neck. Lay the wire flat on the photo and follow the lines of your face. Try to lay out the portrait without cutting the wire. If this doesn't work out, you may smuggle by cutting the wire and go on with a new piece. Give the portrait more strength by doubling the wire on some places. Stick the wire now and then on the photo with painters tape. 

Finished? Remove the pieces of tape. Fix the places where wire comes up by making connections with small pieces of wire. See detail photo.  

outline photo with marker

turn over, marker lines have been pushed through

follow the outlines with wire, stick with tape

make stronger

artworks on the table

hang up for beautiful shadows on the wall