Posts tonen met het label painting. Alle posts tonen

maandag 27 mei 2013

Houses - like Ton Schulten

Made by a studenty of grade3

You need:
  1. drawing sheet A4 size
  2. tempera paint in red, yellow, blue and black
  3. brushes
  4. jar with water
  5. pencil 
  6. ruler
Ton Schulten (1938) is a Dutch painter living in Ootmarsum. After his work as a graphic designer, he decides in 1989 to try to make a living as a painter. His main inspiration is the open landscape of Twente (a part of Holland):  an open landscape divided in parts by hedges and hedgerows, looking like a stage with curtains.

Painting like Ton Schulten in lower classes can be done, but you have to keep it simple. Show artworks from Ton Schulten and discuss them.
  • his use of colours  
  • the 'curtains' on the sides
  • simple shapes
  • divided in rectangles
The students divide the sheet of drawing paper in 24 squares (4 by 6). With the primary colours yellow, red and blue and the mixed colours, they paint the squares. Each colour may be used just three times. If the work is dry, paint simple houses across the dividing lines with a small brush and black paint.

maandag 8 april 2013

Starry night, like Vincent van Gogh


Artworks made by students of grade 4

You need:
  1. rectangular canvas
  2. acrylic paint
  3. brushes
  4. color page Starry Night
      Vincent van Gogh (1853-1890) was a Dutch post impressionistic painter. His work falls under the Post-Impressionism. When he starts painting, he paints ordinary people like poor farmers who do heavy work. The colours of his paintings are dark (The Potato Eaters).
      He moved to Paris and is impressed by the work of French painters: light and colours are the important things in their work. Van Gogh exchanged the darker colours for brighter colours. The painter Pissaro learns him to paint like the impressionists. Van Gogh changes the dots into stripes.
      After two years in Paris, Van Gogh moved to southern France, where he paints orchards and cornfields.
      In the garden of the hospital in Arles, where he's treated for his depressions, he paints his most beautiful and famous artworks: Starry Night. In 1890 Van Gogh commits suicide.


      Show images of Van Gogh's artworks on the digital board, including Starry Night. Discuss these works: bright colours, litte dashes next to each other in stead of mixed coloures. 

      The students use a colouring sheet of Starry Night to draw on their canvas. This has to be painted like Van Gogh did: short brushstrokes (lift your brush always if you have put a dash)! Do not mix the colours, but put two colours simultaneously on your brush to get the Van Gogh effect. The key is: do not paint like you always do, make little dashes!
      Note: when using acrylics - rinse your brushe is okay, but be sure to dry that brush! The paint is the best when it is used undiluted.

      dinsdag 29 januari 2013

      Suburb for birds

      Made by students of grade 4

      You need:
      1. coloured cardboard 
      2. wallpaper 
      3. wrapping paper
      4. tempera paint
      5. black marker
      6. brushes
      7. scissors and glue
      Students draw a birdhouse with a special entrance on brown wrapping paper. This entrance can be a heart, a star of even a bird. Cut this entrance and outline the hole with a black marker.
      Paint the house with cheerful colours.
      Paste it on a piece of wallpaper and cut it out with 2 cm around. Paste a strip of black paper on the cardboard, this is the standard for birdhouse. Paste the birdhouse on the standard. Outline the house with black marker.

      All birdhouses together will make a colourfull suburb for birds!

      Thanks to Maureen Kaal 

      vrijdag 21 december 2012

      Doodling together group mural part 2


      What to do with that great group mural (see Doodling together group mural) if it has to make place for other artworks and everybody wants to have it? Exactly! Cut it in equal pieces and paste those pieces on black sheets of construction paper.  That awsome mural turns out in a lot of great artworks; one for all groupmembers!

      maandag 26 november 2012

      Doodling together - group mural


      Made by students of grade 6

       You need:
      1. drawing sheets A1 size
      2. tape
      3. tempera paint
      4. brushes
      Step 1
      Stick some large sheets together with tape and lay them on a group tables of equal height.
      Groups of four students at the same time draw little forms or doodles on this sheet using black tempera. The drawings should not touch each other.  When all doodles are finished, have a couple of kids connect them by straight black lines.


      Step 2
      Paint all surfaces and doodles with tempera. Each student chooses a colour and paints some surfaces or doodles. Be sure to avoid surfaces with the same colour next to each other.


      This lesson can be done in every grade by varying subject or colours: choose only primary colours and straight forms to create a  Mondrian version.
      Or choose a theme for the doodles, like Christmas, food or sports.

      Great success in which variation whatsoever is guaranteed!

      The proud artists of grade 6 all together! 

      Original idea: Experiments in Art Education.

      maandag 3 september 2012

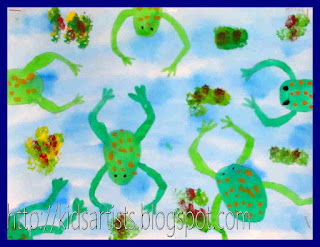
      Frogs in the pond


      1. white drawing sheet A4 size
      2. blue liquid water colour
      3. water
      4. brushes
      5. water colour paint
      6. tempera paint
      7. stencil brush
      Make the sheet wet with a large brush. Drip a few drops of ink on the sheet and spread it by moving the sheet or by painting with the brush. Let dry.
      Paint some frogs with watercolour paint. Use a pear as the basic form. Painter parts of frogs on the edges of the sheet. Stamp with a stencil brush and some green and yellow tempara aquatic plants in the water.
      Staple the art work on a coloured background.

      Artworks made by students of grade 4

      zondag 24 juni 2012

      On the beach - collage


      You need:
      1. drawing sheet 40 by 35 cm
      2. white drawing sheets
      3. tempera paint
      4. brushes
      5. scissors
      6. markers
      7. glue
      8. pencils
      Draw a word web with words about the beach. Think of things (to do) on the sand, things (to do) in the water and things (to do) in the air. Talk about people standing in the water: they seem to have half legs!

      Cover four tables with newspaper and put three containers with paint on it:
      • yellow and a little brown besides (beach) + two big brushes
      • blue and a little green (seawater) + two big brushes
      • blue and white (air) + two big brushes 
      • white (surf) + two brushes to stamp
      Show how to paint the beach: much yellow on the brush and a little brown for the beach (so do not mix!). Do the same with blue and white for the air, and blue with green for the sea. Make wavy motions with the brush to accentuate the water. Finish with a white stamping brush for the surf.


      While about four students are painting, the others can start with the drawing part of this lesson.

      Draw people and things you see on the beach. Colour them with markers, and use a skin colour pencil for the bodies. Cut all those little drawings and paste them on the beach, the water or in the air.
      Hang all work together for a great group work.

      All artworks are made by students of grade 3

      zaterdag 5 mei 2012

      Sunrise like Roy Lichtenstein

      A lesson is originally from Phyl's site, There's a dragon in my artroom. Check out her site for more!

      You need:
      1. drawing sheet A3 size
      2. tempera in red, blue, yellow, white and black
      3. brushes
      4. jar with water
      Roy Lichtenstein (1923 - 1997) was an American popart artist. He is best known for his enormously enlarged cartoons. After his art studies in New York and Columbus Liechtenstein teached art himself. In his spare time he painted abstract paintings and made parodies of American art from the twenties. In1960 he came into contact with Claes Oldenburg and the style elements from advertising and comic strips. He started to use use grids, dots, black outlines and bright colours, the style who made him famous. From 1962 Lichtenstein used the works of Monet, Picasso and Mondrian as the inspiration for his art and he paints sunsets in their style. Most of his work however is based on advertisements and cartoons.

      Show artwork of Liechtenstein on the digital board and discuss the characteristics: primary colours sometimes with green,  text balloons, raster dots as we know from newspaper photographs and thick black outlines. Show at the end the work 'Sunrise'. Ask students how they can recognize this work as a Lichtenstein.

      The students are instructed to paint a sunrise in the style of Lichtenstein. All Lichtenstein characteristics as discussed so, have to be seen in their painting.

      Artworks are made by students of grade 5

      donderdag 22 maart 2012

      Henhouse

      Made by students from kindergarten
      You need:
      1. box
      2. brown tempera paint
      3. brush
      4. paper plate
      5. white paper 
      6. red paper
      7. black marker
      8. straw
      Paint the outside of the box with brown tempera paint. Fold the plate. Outline your hand and cut it twice out of a white sheet. Paste the hands on both sides of the chicken. Cut a comb and a beak out of red paper and paste them. Paste some feathers for the tail. 
      Put the box on its side. Put some straw in the box and put the chicken in it. Stack the boxes of several students for a big hen house!

      zaterdag 18 februari 2012

      Patchwork landscape

      By a student of grade 3.
      You need:
      1. white drawing sheets
      2. tempera paint
      3. brushes
      This is an easy lesson in perspective for younger students. Talk about perspective and show the picture of the disappearing railway.
      Do a step by step guide on the blackboard to make this drawing:


      1. Put the sheet in the width for you.
      2. Draw a wavy line on 2/3 of the bottom.
      3. Place a dot in the middle on the top of the sheet.
      4. Draw lines with a ruler from the bottom and sides of the sheet to the dot.
      5. Divide the strips in squares.
      6. Draw houses and trees on the horizon line.


      After this the students can finish their artwork independently. Paint the squares all different and use different patterns. Stpale or paste the artwork on a coloured background.

      maandag 26 september 2011

      Dutch canal houses groupwork

      Part of the groupwork, made by students of grade 4

      You need:
      1. white drawing sheets
      2. tempera paint
      3. brushes
      4. pencil
      5. glue plakkaatverf
      After a request of Amy Baldwin, art teacher in Millington, my 4th graders painted Dutch canal houses for the Empty Bowl fundraiser in Millington (Mi).
      Before starting to paint, we talked about the Dutch Golden Age, a period roughly spanning the 17th century, in which Dutch trade, science and art were among the most acclaimed in the world. In this century many of the typical canal houses were built, in that age used as store houses. We looked at pictures of canal houses, discussed the different kinds of gables (neck gable, trep gable, bell gable) and details of the houses (windows, year it was built, stairs).

      Every students gets a sheet of paper and has to draw a line on 8 cm of the bottom - this is for the canal. On the left side of the sheet there must remain a white strip of 2 cm (to paste all paintings together).
      Every student draws his own canal house. Stop drawing after 5 minutes, to avoid drawint to many details. Paint the house with tempera paint. Mix colours, or for even better results: take two colours of paint on your brush and mix a little while painting.


      Paste all paintings together to make a long street. Paint the canal. You might even add the words  'Groeten uit Holland'!

      Click to see full site.

      zondag 21 augustus 2011

      Sunflowers in five different materials

      You need:
      1. sunflowers or pictures of them
      2. white drawing sheet A1 size, cut in strips of 30 by 65 cm
      3. five different colouring materials, like colour pencils, tempera paint, watercolour paint, oil pastels, crayons, coloured ink, aquarell pencils etc.
      4. brushes
      5. pencil, ruler
      6. coloured paper
      7. scissors
      Look with the students at some sunflowers or pictures of them. How thick is the stem, what can you tell about the leaves, how are the petals divided, what colours do you see in the heart of the flower, etc.

      Divide the sheet with thin lines into five strips of 13 cm high. Draw some sunflowers. Make sure the flowers themselves are drawn at the demarcation of the strips. Make sure too that in each compartment at least half a sunflower or leave is drawn.
      Choose five different colour materials. Use in every compartment a different material. Consider yourself the order of the materials, for example from bright (markers) to less bright (aquarelle pencils).
      Paste the work on a coloured background. Or cut the five compartments and paste them with some space between on a coloured background.
      Made by students of grade 5

      donderdag 11 augustus 2011

      Coffeepots like Klaas Gubbels

      Made by a student of grade 5

      Klaas Gubbels (Netherlands, 1934) is a Dutch artist. He is best known for his still lifes of tables, chairs and coffee pots. He also makes sculptures, mostly with the same subjects.

      Gubbels attended various art schools and teached art at the Art Academy in Rotterdam.
      Gubbel's work became more abstract over the years. A characteristic of Klaas Gubbels is that he avoids all that is 'beautiful'. Beauty is unreal to him and keeps us away from the truth. The subject isn't interesting, but the humour, agression or dullness of this subject, that's what it's all about. The utensils, if they are freed from their jobs, end up with a mood or emotion.
      Gubbels uses various techniques in his works: painting, drawing, graphic techniques, but also photographs, collages, assemblages and sculptures in glass and metal.
      You need:
      1. canvas A4 size
      2. acrylic paint
      3. brushes
      4. jar with water
      5. pencil
      Show artwork from Klaas Gubbels. Discuss the subjects of his paintings. What stands out? Much or little detail? Depth? Perspective? Use of colour?

      Students work on canvas with acrylic paint. Tell them about the properties of this paint: it dries quickly and is paintable.

      Students have to make a painting with one of the topics that Gubbels frequently paints: chair, table or coffee pot. Unlike the real Gubbels works, the children in this task, however, have to paint a background. White is out of the question!

      Made by a student of grade 5

      maandag 2 mei 2011

      Painting while listening to classical music

      By Marrit (gr. 6, right part) and Luuk (gr. 1, left part)
      You need: 
      1.  cd's with classical music
      2. cd-players
      3. drawing sheet A2 size
      4. brushes
      5. tempera paint
      6. jar with water
      During a school project about music, students of grade 1 and 6 painted together while listening to classical music. We had five classrooms to work in. In every classroom was a cd-player with classical music: Bolero of Ravel, Four Seasons of Vivaldi, the Carneval of the Animals of Camille Saint-Saëns and two more. On the tables big sheets, paint and brushes.

      Every first grader came to the sixth graders and asked a student to work with. Each pair was sent to a classroom where they listened to a piece of classical music. By talking together, 'What do you think of while hearing this?' 'What do you feel?' students had to make a painting. One student on the right side, the other on the left side of the sheet. It wasn't nesessary to make one painting, but they might do it. I was all about interpretation of the music.
      Marrit (left, grade 6) and Luuk (grade 1) working together on their fishbowls

      Students made great artworks together. Some worked together to make one painting, like the one above: two fishbowls, painted while listening to the Four Seasons - Spring of Vivaldi. It is clear the right bowl is painted by the grade 6 student. Other couples chose to paint tow different interpretations, as you can see below.
      A great project, worth to give it a try!

      woensdag 30 maart 2011

      Puss in boots?


      You need:
      1. drawing sheet A4 size
      2. pencil
      3. ruler
      4. indian ink
      5. brush
      6. saucer
      7. dip pen
      Master Cat or The Booted Cat commonly known as Puss in Boots, is a French literary fairy tale about a cat who uses trickery and deceit to gain power, wealth, and the hand of a princess in marriage for his penniless and low-born master. The tale was published in 1697 by Charles Perrault as part of his collection Mother Goose's Tales.

      How would it be if the animal you like most, wears boots? What kind of boots would he wear - rain boots, cowboy boots, thigh boots, high-heeled boots?

      Draw a frame at 1 cm from the edges with a pencil. Sketch the contours of an animal in boots with pencil. Make sure the boots stand out well. Trace the pencil lines with a dip pen and indian ink. Draw details and a simple background.
      The colouring has to be done with indian ink too. Put a few drops of ink on a plate and dilute it with water. More water will give a ligth grey, a little water will give dark grey. Finally, fill the page edge with a pattern or a shade of gray.
      Both artworks are made by students of grade 6

      zondag 27 maart 2011

      Rapunzel

      Made by a student of grade 1
      You need:
      1. drawing sheet A4 size
      2. fine black marker, waterproof
      3. watercolour paint
      4. brushes
      5. jar with water
      6. wool
      7. cutter
      8. cutting mat
      9. scissors
      10. magazine
      11. glue
      Rapunzel is a German fairy tale in the collection assembled by the Brothers Grimm, and first published in 1812. The Grimm Brothers' story is an adaptation of the fairy tale Persinette by Charlotte-Rose de Caumont, originally published in 1698.
      In the tale, an enchantress separates Rapunzel from her parents and puts her away in a room at the top of a tower in a remote part of a forest. The tower has no door or stairs and only a window. The enchantress would climb Rapunzel's long braid of golden hair to visit her. The enchatress would call out to Rapunzel saying: "Rapunzel, Rapunzel, let down your hair, so that I may climb the golden stair". One day a prince hears Rapunzel's beautiful singing voice and wants to meet her. He secretly observes how the enchantress is able to visit Rapunzel in the tower. The prince climbs in the tower, meets Rapunzel and they fall in love. The wicked enchantress attempts to separate them, but eventually they reunite, and live happily ever after.
      After telling the fairy tale, students start to make Rapunzel's braid of wool threads. Then they draw a tower with a top hatch, using a waterproof fine black marker. Colour it with waterpaint colour. Cut the sides of the hatch (teacher has to do this!!) and fold them. Cut a picture of a woman of girl out of a magazine and paste it on a piece of paper. Paste the braid on the head. Paste the piece of paper behind the hatch, looking carefully to get the woman's head in the middle of it and hanging the braid through the hatch.
      Made by students of grade 1

      dinsdag 1 maart 2011

      In the style of Gaston Chaissac

      You need:

      1. drawing paper A3 size
      2. tempera paint in primary colours
      3. brushes
      4. jar with water
      5. paper towels
      6. bold black marker
      7. black construction paper
      8. glue or stapler

      The French painter and writer Gaston Chaissac was born in 1910. He came from a poor family and was often ill. In 1934 Chaissac moved to Paris and worked as a shoemaker. He lived in the same house as the German artist Otto Freundlich. It was through the friendship with Freundlich that Chaissac developed the desire to become an artist. He trained himself as an autodidact, supported and promoted by Freundlich. Freundlich also introduced him to the Parisian art scene.

      Chaissac exhibited his works in 1938. During his stays at a sanatorium because of his tuberculosis in 1938 and 1939, Gaston Chaissac used the time to paint and draw. After his wedding he moved to the Vendée.

      The artist bridged this isolation in the countryside through lively correspondence with gallery owners, authors and artists in Paris. Although Chaissac endeavored to establish a connection with the artist community, he was only valued as an artist by a small circle of gallery owners, journalists, and friends.

      As a result, he didn't receive the expected recognition during his lifetime. Chaissac worked as a tireless experimenter and used materials that he found for his works of art - newspapers, shells, peels etc. He painted on every substrate available to him, created pen and ink drawings, watercolours, oil paintings, collages and unusual three-dimensional works. The artist was sometimes classified by Jean Dubuffet with the 'Art brut'. Chaissac himself called his work rather rustic modern.

      Gaston Chaissac died in 1964.

      Without title, © Gaston Chaissac

      View photos of the work of Chaissac and especially the work above. Discuss the salient features: bold black lines that separate colour planes, little depth, simply drawn faces, white planes. What would those white planes mean?

      I chose this painter also to repeat colour mixing skills. The students draw on their sheet one head and one or more limbs. Put a pencil mark in these planes, because they have to stay white. Then divide the sheet with wavy lines into small areas. Students choose two primary colours and use them to mix several colours. Paint the different planes with these mixed colours. Start with the brightest colour and and add more and more of the darker colour.

      When the work is dry, outline every colour with a black marker. Bumps will disappear. Finally draw eyes, nose and mouth in the face. Paste or staple the work on black paper.

      In the style of Gaston Chaissac, by students of grade 3

      zondag 27 februari 2011

      Making masks

      You need:
      1. white cardboard
      2. rectangular aluminum containers
      3. paint
      4. brushes
      5. scissors
      6. glue
      7. cutting knife
      8. oil pastels

      We look at masks from Venice, masks from Africa and the culture of the Incas, Mayans and Aztecs through photos on the internet. We discuss the form of the masks and look for the differences between the African, Venetian and those of the Incas. We look at the position of the eyes, nose and mouth.

      Let students choose the style and material they want to use. The aluminium containers are meant for students who want to make an Inca mask, since Incas often used silver or gold. Draw with pencil the shape of the mask and cut it out. Mark the spot where the eyes should be (at half or slightly above or below the half) and cut them out. Draw a nose and cut it partly in order to create some relief. Colour the mask with oil pastels. For an Inca mask: cut the aluminum container, cut the eyes, cut a nose and paste it on, cut a mouth. Paint the mask with tempera, making sure there will be some shiny material to be seen.

      Look at each others masks at the end of this lesson and discuss what style or influence you recognize.

      Artworks made by students of grade 3

      Thanks to Ann de Naegel (Belgium) and her students

      vrijdag 4 februari 2011

      Concentric circles Like Kandinsky

      You need:
      1. drawing sheet A3 size with 12 squares of 10 by 10 cm
      2. temperea paint
      3. brushes
      4. paper towels
      5. jar with water

      Wassily Kandinsky (1866 – 1944) was a Russian-French painter. His style of painting originally belonged to expressionism, and is sometimes included in symbolism. Kandinsky was one of the artists who gave shape to the abstract art in the early twentieth century.

      Kandinsky was inspired by music. According to his own timbre theory, each colour has its own language and expression, and each colour has a soul. Kandinsky tried to convert musical compositions into paintings. He heard colours in music and he saw music in colours. This correlation between music and colour is the starting point of this lesson. Show students images of by Kandinsky. Tell that he listened to music while painting. Look at the painting 'Squares with concentric circles'. Which circle would belong to cheerful music? And what kind of music did Kandinsky hear while painting the dark circle?

      Students are going to make a painting in the style of Kandinsky while listening to classical music. During this lesson they listened to Vivaldi's Four Seasons. Each student gets a white sheet with 12 squares of 10 by 1o cm. Tell them to work from the outside to the middle. We may see no white anymore. Try to avoid two the same colours in one circle. Hang all paintings together on a bulletin board for a great group project!

      Made by students of grade 1

      dinsdag 11 januari 2011

      Colourful cows, like Peter Diem

      You need:

      1. white painting sheet A3 size or a canvas
      2. acrylic paint
      3. brushes
      4. jar with water
      5. paper towels

      Peter Diem (1945) is a Dutch painter. Diem, born from a Dutch father and a German mother, came in Amsterdam at the age of 3. He had a difficult childhood in which the people of Amsterdam showed they were not charmed by Germans so soon after the Second World War. After highschool Diem went to a school for graphic design to study graphic work. Through several European countries Diem landed in the 70's in the USA, where he married and had children. Halfway through the 90's he returned to the Netherlands and settled with his Diem Museum on the Prinsengracht Amsterdam.

      Diem is inspired by the CoBrA Group ( a group of artists from Copenhagen, Brussels and Amsterdam - see also my lesson about CoBrA artist Corneille). His style is abstract and expressive. He brings the paint thick on the canvas, sometimes directly from the tube. With brush, knife and fingers the bright coloured paint is spread across the canvas. 'Diem paints like a tornado, he lives his art'. Themes in his work are flying cows, Napoleon, Africa and Ernest Hemingway.

      Show artwork of Diem on the digital board. Pictures are to be found on Diem's website or use the Google picture viewer and look for Peter Diem. Discuss Diem's work:

      • subject, Diem paints often cows
      • use of bright colours
      • simplicity of the image
      • thick black contour lines
      • no white spots anymore
      • the cow is full screen
      Show students how to draw a simplified cow, by drawing a cow on the digital board (click on the picture to enlarge). Let the children draw a picture of a simple cow. They have to sketch thin, without drawing many details. The cow has to be painted with acrylic paint, considering the features of Diem's work. Paint a background. Outline the cow with black paint and a small brush. This will also eliminate the unevenness. And of course the work has to be signed, just like Diem does!

      All artworks are made by students grade 5