Posts tonen met het label cut and glue. Alle posts tonen

zaterdag 8 oktober 2011

Haunted house in the moonlight

Made by a student of grade 6
You need:
  1. white drawing sheet A4 size 
  2. black construction paper
  3. yellow chalk pastel
  4. scissors
  5. cutting knife
  6. lijm
  7. white pencil
  8. black marker
  9. blue and purple tempera paint
  10. sauzer
  11. sponge
This lesson is all about Halloween and haunted houses. First make a word web about haunted houses: skeletons, spiders, bats, old, tombstones, dark, scary, etc.

Tear a strip of black paper from about 5 cm and paste it on the bottom of the white sheet: the ground. Draw on black paper ahouse that looks old and cut it out.


Use a cutter for doors and windows. Paste the house on the white sheet. Draw details such as bricks, ghosts, spiders, webs with a white pencil. Use a black marker to draw things in the white window openings.
Cut a circle, the moon, from a scrap of paper and lay it on the work. Outline moon and house with a yellow chalk pastel and smudge the chalk outwards. 


Use a sponge piece to stamp the background with purple and blue tempera paint. Do not get too close to the yellow chalk. Finally paste the artwork on a yellow background sheet.

woensdag 13 juli 2011

Colour theory part two


Following Colour theory part one a lesson about the effect that colours have on each other.
The aim of this lesson is that students discover the effect of primary and secondary colours on one another.

You need:
  1. two sheets of white or black paper, A3 size
  2. coloured sheets in red, yellow, blue, orange, green and purple
  3. glue
Pre-cut squares of coloured paper. Per student you need: 5 squares of 5 by 5 cm in all six colours and five squares of 3 by 3 cm in all six colours.

Repeat the terms primary and secondary colours and name the colours. Tell students they will see today how the colours interact. What would be yellow on blue? What about red on purple? What colours would stand out well, what not? Try to discover how we can systematically investigate. Eventually you come to the following concept:

A. primary on primary.
B. primary on secundary.
C. secundary on primary.
D. secundary on secundary.
primary on primary

A. Primary on primary.
To make all combinations of primary on primary to make you need 2 large and 2 small squares of all primary colours. Ask students to find out how, or give them the solution:
- blue on yellow and red on yellow
- yellow on blue and red on blue
- yellow on red and blue on red
Paste all combinations on a sheet of white paper. Write under it: primary on primary.

secundary on primary

B. Secundary on primary.
To make all combinations of  secundary on primary, you need 3 large squares of each primary colour and three small squares of each secundary colour. Ask students to find out how, or give them the solution:
- orange on yellow, purple on yellow, green on yellow
- green on blue, orange on blauw, purple on blue
- purple on red, green on red, orange on red
Paste all combinations on a sheet of white paper. Be sure the big squares in the same colour are next to each other. Write under it: secundary on primary.


primary on secundary

C. Primary on secundary.
To make all combinations of primary on secundary, you need 3 big squares of each secundary colour and 3 small ones of each primary colour. Ask students to find out how combinations have to be made, or give them the solution:
- yellow on orange, blue on orange, red on orange
- yellow on purple, blue on purple, red on purple
- yellow on green, blue on green, red on green
Paste all combinations on a sheet of white paper. Be sure the big squares in the same colour are next to each other. Write under it: primary on secundary.

secundary on secundary

D. Secundary on secundary.
To make all combinations of secundary on secundary, you need 2 big and 2 small squares of each secundary colour. Ask students to find out how combinations have to be made, or give them the solution: 
- purple on green, orange on green
- orange on purple, green on purple
- purple on orange, green on orange
Paste all combinations on a sheet of white paper. Write under it: secundary on secundary.

Ask students after making this work to discuss see which colors are most contrasting, which you hardly see, etc.

dinsdag 12 juli 2011

Colour theory part one

By students of grade 2
You need:
  1. black cardboard 15 by 15 cm
  2. coloured paper in yellow, orange, red, purple, blue, green
  3. scissors
  4. glue
  5. pencil
Fo the first part of a lesson on colour theory, we repeated primary and secundary colours and showed how to make secundary colours out of primary colours. Students knew those colours, but didn't know the names. Tell them about the complementary colours, the colours that lie opposite each other in the circle, called complementary. Red is opposite green, yellow against purple, blue opposite orange.
The primary colors red, yellow and blue are in a triangle. The same goes for the secondary colours orange, green and purple.

Tell students to cut 6 shapes from the coloured sheets and paste them on black paper as discussed.
Use a pencil to draw triangles in dotted lines between the primary and secondary colours.

zondag 29 mei 2011

Sailboat regatta

You need:
  1. two sheets of white drawing paper
  2. sandpaper
  3. tempera paint in blue, green and white
  4. brush
  5. coloured paper
  6. brown paper (grocery bag)
  7. glue
  8. blue paper A1 size
Spray paint stripes in blue, green and white on a saucer. Lay a sheet of white drawing paper before you, with the small size up. Paint it with coloured waves. Don't mix the colours on the saucer, but dip the brush in two or three colours. Leave the sheet to dry.
Take the second white sheet and lay it before you with the small side up. Cut a piece of sandpaper as wide as the sheet and 8 cm high. Paste the sandpaper on the bottom of the sheet.
Tear the painted sheet in wavy strips. Tear the straight sides of the first and last strip too, so that all strips have two wavy sides. 
Place the strips overlapping on the white sheet. Start below. Place the second strip partly under the first one, the third under the second etc. Paste down the short sides of the waves on the left and right.
Cut boats out of a brown paper bag; bigger ones below, smaller ones at the top (perspective). Cut masts out of the paper bag and sails out of coloured paper. Paste the boats between the waves and paste the long sides of the waves at the same time. Paste sails and masts on the boats.  
Paste or staple all works together on large blue sheets (A1 size) to create a beautiful group work.

Artworks made by students of grade 4

dinsdag 17 mei 2011

Wavy weaving

Made by students of grade 3

You need:
  1. paper strips in two colours, 4 x about 50 cm
  2. black cardbaord
  3. scissors
  4. glue
  5. printed grid of 5 by 5 squares, each square is 4 by 4 cm

1. Give all students the printed grid. Cut it along the outside and paste it on black cardboard.

2. Cut 10 stripes in two colours, 4 x 50 cm. Fold the ends of the strips about one cm.

3. Paste the fold edges exactly along the lines of the squares. Use two different colours alternately. Paste the arcs from bottom to top and from left to right, alternately. Cut a piece of the strip if it's too long. You may paste small squares to the ends of the rows as a finishing touch.
 
5. Press the strips gently and your weaving will look great!

zaterdag 7 mei 2011

Puzzle drawing

Made by students of grade 5
You need:
  1. white drawing sheet A4 size
  2. markers
  3. black construction paper
  4. glue
Students draw organic shapes on a white sheet and colour them with markers. Then all shapes have to be cut out and pasted with a little space between them on a piece of black construction paper. Be sure to lay down the cut pieces directly on the right place, to avoid hours of puzzling!


maandag 4 april 2011

Chicken on a stick

You need:
  1. cardboard box
  2. tempera paint
  3. brush
  4. coloured paper
  5. wooden skewer
  6. scissors
  7. glue
Draw a chicken on cardboard. Cut it. Paint the chicken and colour the beak. Cut two wings out of cardboard and cover them with coloured paper. Paste the wings with double sided tape on the chicken to make them look 3D. Cut a comb and wattle out of coloured paper and paste them on the chicken. Use a marker to draw an eye.
Cut three pieces cardboard of 8 by 5 cm and stick them together. Paste coloured paper around it. Insert a skewer into the stand and plug the other end in the chicken.

zaterdag 26 maart 2011

The princess and the pea

You need:
  1. coloured construction paper
  2. fabrics
  3. a pea
  4. glue
  5. scissors
  6. scraps of construction paper, including gold and silver
  7. markers and/or colour pencils
Read the fairy tale 'The princess and the pea' of Hans Christian Andersen. Discuus after this what a princess bed would look like. The students make the bed of the princess in this story. The bed has to be made of stripes of paper. At the bottom of the bed is a real pea, of course. Cut strips of fabrics for the matrasses (use special scissors for fabrics) and make a princess on top of this whole pile. Maybe the bed has even curtains or a little golden crown?

Made by students of grade 1

woensdag 16 februari 2011

Winter trees glimpse

Made by a student of grade 6

You need:
  1. cardboard in three colours, 15 by 20 cm
  2. ruler
  3. pencil
  4. cutter
  5. cutting mat
  6. double sided foamtape
  7. hook

Draw a rectangle on each sheet of cardboard 2 cm from the edges. Draw wintertrees in these rectangles. The trunk must be on the bottom, the branches must reach the left, right or upper edge. Make sure the three trunks slightly stagger. Cut the parts between the branches/trunk and the frame using a cutter. Use double sided foam tape to paste the three windows together. The lightest colour in the front, the darkest colour on the back.

Attach a hook to the window to hang it.

zondag 16 januari 2011

Searching for the chameleon

You need:

  1. white drawing sheet A4 size
  2. oil pastels
  3. scissors
  4. small pieces of foam
  5. double sided tape
Start the lesson with this poem about a chameleon.
Has anyone seen my chameleon this morning?
He has to be hiding somewhere.
He asked me if we could play hide-and-go-seek,
and then disappeared into thin air.
I've looked high and low in the yard and the house
and it seems like he's nowhere around.
He's probably hiding right out in the open
but doesn't yet want to be found.
I'm guessing he looks like a leaf on a bush
or the back of a sofa or chair.
He could be disguised as a book or a bagel.
Regardless, I don't think it's fair.
If you come across my chameleon, please tell him
I give up. He beat me today.
He's clearly the champion at hiding so, next time,
it's my turn to pick what we play.
Kenn Nesbitt
Draw shapes of your choice on the sheet. Leave about 1 cm white between the shapes. Colour them with three or four different colours of oil pastels.

Draw a chameleon on another sheet and colour it the same way as the first sheet: coloured shapes with one cm white between them. Cut it out with a one cm white around it. Use small pieces of foam and double side tape to paste the chameleon on the background. The chameleon will be slightly higher.

All artworks are made by students of grade 6

donderdag 6 januari 2011

Artist Trading Cards

Some weeks before Christmas, I was contacted by Amy Baldwin, art teacher at St. Pauls Lutheran School in Millington (Michigan). She wrote me she was a fan of my weblog. We emailed for a while, wondering if we could do a little project together. I read about exchanging ATC's on many art blogs, so I proposed to let our students make those little cards for eachother. This seemed to her very nice, so we got started!

Amy's students made ATC's for my students, my Dutch students did the same for hers. A couple of days before Christmas I sent an envelope filled with 50 ATC's of my 23 students to Millington.

Yesterday we received the big envelope, full of ATC's! How exciting for my students to get those beautiful cards from the other side of the world! They admired the cards and were surprised about the Dutch words on some of them. Thank you very much Amy and thank you all, St. Paul's students!

maandag 6 december 2010

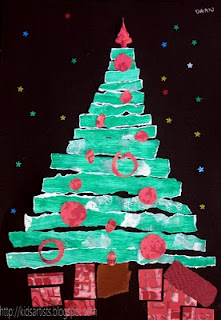
Christmas tree in strips

Made by a student of 11 years old

You need:
  1. white drawing sheet A4 size
  2. black construction paper A4 size
  3. tempera paint
  4. brush
  5. advertising leaflet with Christmas decorations or aluminum foil or scrapbooking paper
  6. glue
  7. glitter stars
  8. small piece of brown paper
Paint a white sheet with a broad brush and undiluted green tempera paint. Apply patches or streaks of different colours, to make the green sheet more vivid. Let the sheet dry.

Tear a trunk out of brown paper. Tear strips of the painted sheet that are about the same width. Place the paper strips on a black sheet in the form of a Christmas tree; the strips have to become slightly shorter. Put the trunk below the bottom strip and paste it. Paste the green strips, so that the trunk disappears partly under the lower strip.

Cut balls and a peak out of aluminium foil or advertising leaflets. You can also use scrapbooking paper. Paste balls and peak on the tree. Cut squares and rectangles (presents!) of coloured paper and paste them under the tree. Paste glitter stars around the tree.

woensdag 1 december 2010

Christmas gift paper bag

You need:
  1. brown paper bag
  2. markers
  3. scissors
  4. ruler
  5. glue
  6. pattern gift bag
  7. piece of rope of 25 cm
  8. punch

Pattern: click and print.

Print the pattern. Let students copy the pattern on a paper bag. Cut it. Make a Christmas drawing on one or both sides of the bag and colour it with markers. The snow in the example is made with correction fluid. Or make a drawing on a white sheet and paste this one on the bag. Fold the lines. Paste the bag, starting with the side and finishing with the bottom. Use a punch to make holes in the bag. Pull a rope through the holes to get two rods and tie it.

vrijdag 26 november 2010

Paper bag city

Made by a student of grade 2

You need:
  1. white drawing sheets A3 size
  2. tempera paint in blue, white and black
  3. brown paper bag
  4. scissors and glue
  5. brushes
Torn some typical city center buildings in various forms out of brown paper bags. Paste them on a white sheet. In front of the high buildings we see smaller ones (overlap). Paint a blue or grey blue sky on the sheet. Use different colours of blue and grey. Outline the buildings with black tempera paint. Paint windows and doors. Hang all artworks together to create a long street.

woensdag 3 november 2010

Cool web, big spider

You need:

  1. white drawing paper 20 by 20 cm
  2. left overs of white drawing paper
  3. yellow crayons
  4. liquid watercolour
  5. thick brush
  6. jar with water
  7. scissors
  8. glue
  9. black construction paper

Students draw a web with a yellow crayon. The easiest way is to first draw diagonal lines from the corners of the paper. Then draw more lines from top to bottom, left to right. The lines must all go through the center. After this draw circles around the center, until the sheet is full.

Paint the sheet using liquid watercolour ink in cold colours. Take two colours. Leave the work to dry.

Draw some leaves with a warm colour crayon on a white sheet. Draw the veins. Paint the leaves with warm colours liquid watercolour. Let the leaves dry.

Make a spider of black construction paper. In the example above, the spider is made of a circle with a diameter of about 4 cm. Cut the circle in to the center and stick the cutting edges on each other so the center rises. Draw a cross on the back if you want to. Cut a smaller circle for the head, draw eyes on it and paste it on the body of the spider. Cut the feet: 8 strips of 8 cm by 1/2 cm. Glue the legs on the underside of the body. Make a fold inwards on the mid of the strip, and 1 cm from the end a fold outwards.

When the work is completely dry, cut the leaves and paste them on the web. Put the spider in the web by pasting the lower parts of the legs and the head.

Paste the artwork on a black background. You may draw the spider web lines on the background too.

maandag 1 november 2010

City waterfront

You need:
  1. blue construction paper A4 size
  2. white drawing paper A3 size
  3. construction paper and/or ribbed cardboard in several colours
  4. scissors
  5. glue
  6. watercolour paint
  7. brushes
  8. jar with water

I found this lesson once on a German school website. The combination of cutting/pasting and painting is exciting! Students paste tight cut houses, and the reflection in the water is made with water colour paint, which is not tight at all - just as it should be!

Students cut rectangles of different heights and widths out of coloured paper. These are the bodies of the houses. Cut several triangles out of red construction paper, these are the roofs. Cut windows and doors.

Draw a line on 1 cm from the bottom of the blue sheet. Make a composition of the houses on this line, starting with the highest ones. Place the shorter houses in front of them (overlap). Paste the houses and roofs on the blue sheet. Paste windows and doors on them in different colours.

When ready, paste the blue sheet with houses on a white A3 size sheet. Use watercolour paint to paint the mirror image of the houses in the water. Paint as precise as possible, but don't use a ruler: reflections in water aren't that straight! Paint the water blue.

Made by students of 10-11 years old

zaterdag 30 oktober 2010

Collage of geometric and organic shapes

Made by students of 8-9 years old

A lesson I found on Artsonia. It's a great lesson to explain the different shapes and to practice cutting and pasting skills.

You need:
  1. black construction paper 18 by 18 cm
  2. four coloured sheets 16 by 16 cm in different colours
  3. scissors
  4. glue
  5. left overs black construction paper
Start this lesson with an instruction on geometric and organic shapes. A geometric shape is a shape with a name, like a rectangle, circle or square. It's shape is regular. An organic shape is a shape from nature, without a real name. The shape of a leave or animal is organic, but cloud shapes are organic too. An organic shape is a shape you can not describe, that has no name. It is irregular.

Choose four sheets with matching colours and fold them in four quarters. Cut the folding lines to get 16 squares of 4 by 4 cm. Put four rows of four squares neatly against each other on the black sheet. Do not place two of the same colours side by side. Glue the squares. Cut a number of organic shapes out of black paper. Create a beautiful composition on the sheet with squares and paste the black shapes. The shapes should not overlap.

woensdag 13 oktober 2010

Photo fun

You need:
  1. copy of a photo of the student in black/white, A4 size
  2. coloured construction paper A4 size
  3. ruler
  4. scissors
  5. glue

Take a digital photo of each student and print in black and white on A4 paper. Students draw on the back of the picture horizontal lines with 2 cm space between them. Cut the lines. Paste the strips with half a cm between the on the coloured paper.

With the name of the student and his birthday under the arwork, this is a nice birthday calendar for in the classroom.

woensdag 29 september 2010

Fine lines

You need:

  1. black construction paper 20 by 12 cm
  2. coloured construction paper A4 size
  3. pencil
  4. ruler
  5. scissors
  6. cutter and cutting mat
  7. glue

This lesson is about lines. What kind of lines do you know? Straight, wavy, curved, bumpy, broken, spiral, zig-zag. Discuss different types of lines and let students draw examples on the blackboard.

Draw with a pencil nine different lines on the black paper with 2 cm between them. Cut the sheet carefully following the lines and place the individual pieces in cut order on the coloured paper. Draw with a pencil on the left and bottom of the colored sheet lines on 1 cm from the side. Paste the first black strip on the coloured sheet against the drawn lines. Paste the other strips with about a half cm space between them against the pencil line left.

When all stripes are pasted, cut at the top and right the excess coloured paper away leaving a frame of 1 cm.