zaterdag 25 december 2010

Owls in the night

You need:

  1. blue construction paper 15 by 20 cm
  2. white tempera paint
  3. piece of cardboard
  4. brush
  5. saucer
  6. paper towel
  7. fine black marker
  8. yellow pencil

Draw a moon and colour it with yellow pencil. Paint the bottom of the blue sheet white with tempera paint.

Put a paper towel on a saucer. Put a stripe of white tempera paint on the towel. The paper towel will function as a stamp pad. Dip the edge of a piece of cardboard into the white paint and print a trunk. Drag the cardboard a bit to create a thicker trunk. Print several branches. Be sure to leave some space between the branches for the owls.

Use a fingertop and white paint to print the body of the owls. Leave the work to dry.

Draw eyes with a yellow pencil. Outline the eyes with a fine black marker. Draw details like feathers, beak and legs.

Print snow flakes using a q-tip or the end of a brush.

zaterdag 18 december 2010

Penguins and polar bears

Made by Jorine, grade 6

You need:

  1. white drawing sheet A4 size
  2. plastic wrap
  3. watercolour paint
  4. brush
  5. jar with water
  6. black waterproof marker
  7. white tempera paint
  8. orange marker
  9. glue
  10. coloured cardboard
  11. white pencil

Paint a part of the sheet with blue water paint. Use lots of water. While the paint is still wet, push plastic wrap on it to create floes and then leave the sheet to dry. Remove the wrap.

Use a waterproof black marker to draw several penguins. Colour the black parts and draw wings. Use white tempera to paint the bellies. Leave the work to dry and draw eyes and beaks.

Draw a polar bear on the ice. Trace the pencil lines with a fine black waterproof marker. Paint the bear with white tempera paint, including the black lines to make them a bit hazy. Paint the background with a mixture of white tempera and a little blue. In the example the mix is made of white tempera and the blue rinse water of the water paint.

Paste the work on a coloured background and draw ice crystals along the edges with a white pencil.

vrijdag 17 december 2010

Come on, let's make a snowman!

You need:
  1. blue construction paper A4 size
  2. oil pastels
  3. pencil
  4. white tempera
  5. brush

Students sketch a part of a snowman on blue paper. Sketch the hat and scarf and other items too. By choosing an incomplete snowman, students are forced to draw big. An additional advantage is that there remains some to imagine, because wwhat would your snowman look like if he filled the complete sheet?

Tell students that they begin to colour with white. This is to prevent the other colors will mix with white, and to be sure the white crayons will remain white! When the artwork is ready, outline everything with black oil pastel. Paint snowflakes around the snowman with white tempera paint and a sturdy brush.

Made by students of 10-11 years old

dinsdag 14 december 2010

Let it snow!

You need:
  1. black construction paper 20 by 20 cm
  2. white tempera paint
  3. saucer
  4. paper towel
  5. fine markers in black and white
  6. metallic gel pens

I found the idea of printed snowmen in one of Usborne's activity books. With music lines, I made my own lesson of it.

Draw curved music lines with a white or silver pen on the black sheet. Put a piece of paper towel on a saucer so it can serve as a stamp pad. Drip some tempera paint the paper towel. Use your thumb to stamp the bodies of the snowmen. Add a fingerprint for a head.

When the paint is dry, you can add eyes, nose, mouth, arms, buttons etc. Use gel pens and markers. Draw some music notes on the lines and write the lyrics of a winter song belof the lines.

maandag 13 december 2010

Christmas stamp

You need:
  1. brown paper bag
  2. markers
  3. correction fluid
Draw a little Christmas scene on a piece of a paper bag. Colour it with markers. Colour the white pieces with correction fluid. Outline everything with a fine black marker. Draw serrated edges with black marker or cut the stamp with pinking shears.

zaterdag 11 december 2010

Angelic students

You need:
  1. paper doily
  2. black construction paper A4 size
  3. silver thread
  4. little silver clothespins
  5. glitter
  6. glue
  7. scissors
  8. black white photograph of the face
  9. cotton wool balls
Give all students a sheet of black construction paper and a doily. Fold the doily in eight parts. Cut two wings, both 1/8 part of the doilie. Paste a photograph of your face on the black sheet. Take half of the doily and form a dress. Paste it spatial. Paste the wings behind the dress on shoulder hight. Cut two pieces of the silver thread, the legs, and paste them under the folds of the dress. Paste two clothespins, the feet. Cut arms from a scrap of white paper. Paste pieces of cotton wool on the hair. Decorate with glitter.

Made by students of 11-12 years old

Thanks to Anneriek Adema, Dokkum

dinsdag 7 december 2010

Wooden Christmas tree

Made by a student of 7 years old
You need:
  1. plywood 14 by 18 cm
  2. pencil
  3. ruler
  4. coping saw
  5. nails
  6. hammer
  7. tempera paint
  8. brush
  9. block of wood 6 by 3 by 1 cm
  10. 2 blocks of wood 5 bij 2 bij 1 cm
  11. small Christmas decorations
  12. silver cardboard
  13. glue
Draw on the narrow side of the plywood a dot on 9 cm. Draw two lines from the corners below at this dot so you get a triangle. Saw this triangle. Paint it green with tempera paint. Spike at different spots on the front and back of the tree little nails for the Christmas decorations.
Create a standard of three blocks of wood by pasting the smaller blocks with a half cm space between them on the largest block. Paint the standard. Hang the balls and garlands on the nails. Cut a double peak out of silv and paste the two pieces together. Paste the peak on the tree. Decorate the tree with little clocks, balls, socks, garlands etc.

maandag 6 december 2010

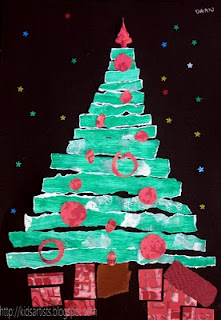
Christmas tree in strips

Made by a student of 11 years old

You need:
  1. white drawing sheet A4 size
  2. black construction paper A4 size
  3. tempera paint
  4. brush
  5. advertising leaflet with Christmas decorations or aluminum foil or scrapbooking paper
  6. glue
  7. glitter stars
  8. small piece of brown paper
Paint a white sheet with a broad brush and undiluted green tempera paint. Apply patches or streaks of different colours, to make the green sheet more vivid. Let the sheet dry.

Tear a trunk out of brown paper. Tear strips of the painted sheet that are about the same width. Place the paper strips on a black sheet in the form of a Christmas tree; the strips have to become slightly shorter. Put the trunk below the bottom strip and paste it. Paste the green strips, so that the trunk disappears partly under the lower strip.

Cut balls and a peak out of aluminium foil or advertising leaflets. You can also use scrapbooking paper. Paste balls and peak on the tree. Cut squares and rectangles (presents!) of coloured paper and paste them under the tree. Paste glitter stars around the tree.

vrijdag 3 december 2010

Christmas angel

You need:

  1. pattern angel (download picture)
  2. cardboard in pink, white and another colour
  3. carbon paper
  4. two wobbly eyes
  5. four split pins
  6. wool
  7. red marker
  8. glitter
  9. glue
  10. scissors

Pattern angel: click, enlarge and print

Use carbon paper to draw head, hands and feet on pink cardboard; draw the wings on white cardboard and the dress and sleeves on another colour. Arms should be drawn twice, the second one in mirror image. Cut all these parts. Copy the pattern of the bag of the dress on coloured paper and cut it. Paste this bag on the dress.

Paste the arms under the sleeves, about a half cm. Prick holes in the dress and the sleeves and fix the sleeves with split pens on the dress. Paste the wings on the back of the dress; be sure you don't paste the sleeves. Paste the head on the dress. Paste the eyes and draw a nose and a mouth on the head.

Cut two pieces of wire of about 7 cm. Prick two holes in the bottom of the dress and add split pens. Fix the wire legs on the split pens. Paste the feet on these legs.

Cut some short wire for the hair and paste them. Take a longer wire for that can serve as a hook. Decorate dress and wings with glitter and stars.

woensdag 1 december 2010

Christmas gift paper bag

You need:
  1. brown paper bag
  2. markers
  3. scissors
  4. ruler
  5. glue
  6. pattern gift bag
  7. piece of rope of 25 cm
  8. punch

Pattern: click and print.

Print the pattern. Let students copy the pattern on a paper bag. Cut it. Make a Christmas drawing on one or both sides of the bag and colour it with markers. The snow in the example is made with correction fluid. Or make a drawing on a white sheet and paste this one on the bag. Fold the lines. Paste the bag, starting with the side and finishing with the bottom. Use a punch to make holes in the bag. Pull a rope through the holes to get two rods and tie it.