Posts tonen met het label colour pencils. Alle posts tonen

dinsdag 30 mei 2023

A lesson in color theory

 You need:

  1. 4 cards of drawing paper, 10 by 7 cm
  2. pencil
  3. ruler
  4. felt tip pens of color pencils 
  5. black construction paper

Discuss de words primary and secundary colors using the color wheel.  
What are primary colors and why are they called so? What are secondary colors, how do you make them and why are they called so? What are the neutral colors? Discuss the word color nuance

What should you do?
  1. Draw a frame on the cards at 2 mm from the edge using a thin black marker.
  2. Draw a pattern of your choice on each card.
  3. Color the cards according to the terms discussed.
  4. Outline the patterns with a thin black marker.
  5. Stick the cards on a black background.
  6. Add the learned words.
Elements of art: color, line, nuance.

vrijdag 3 februari 2023

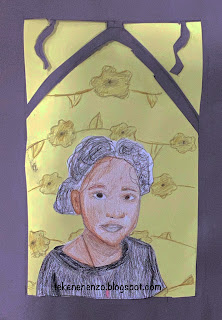
Self portrait like Alphonse Mucha


You need:
  1. portrait photo of yourself
  2. white drawing sheet
  3. brown and grey construction paper
  4. color pencil
  5. gold pencil
  6. scissors
  7. glue
Alphonse Mucha
Alphonse Mucha (Czech republic, 1860-1939) is an Art Nouveau artist. Graceful women,  shapes from nature, soft colors and stylized letters  en  are the basis of his work.
In 1887 he moves to Parijs, at that time the center of the modern world: a vibrant night life, modern department stores, wide boulevards with artificial lights that illuminate the city  after sunset. Mucha isn't quite succesfull by then, but that changes when he gets his first assignment: a poster for the  v theater show Gismonda with the famous actress Sarah Bernhardt. Mucha paints a lifesize poster of a beautiful woman surrounded by stylized flower patterns and graceful lines. With this poster Mucha establishes his name as an artist  and is assured of sufficient work in the years that follow. His posters turn Paris into an open-air museum with art for everyone to see. 
Show some artwork of Mucha and discuss them: graceful wavy lines, organic shapes, no bright colors.


Task
Draw the picture of yourself  and color it with pencils. Cut out and stick on brown paper. Decorate the background with organic shapes using a gold color pencil. Cut a frame for you portrait and stick it on your artwork.  

Artworks are made by students of grade 5 and 6. 

woensdag 20 oktober 2021

One pumpkin, four materials


You need:

  1. drawing sheet
  2. color pencils
  3. watercolor paint
  4. oilpastels
  5. soft pastels
Fold the sheet in four. Draw 4 pumpkins. Color them with different materials. 

zondag 7 februari 2021

Design a chips bag


 You need:
  1. drawing paper 
  2. pencil
  3. pictures of chips bags 
  4. color pencils
  5. black marker 
Look at chips bags and discuss what stands out. 
  • the name of the chips is usually at the top of the bag
  • the name is large and sometimes in 3D letters 
  • bright colors
  • taste and weight is on it
  • it has an image of one or more chips 
  • special features can be on it, like New, Party Pack or Less Fat 

Draw the wavy outlines of a chips bag. Think of a name and flavor for your chips. Draw the name on the bag in large 3D letters. Draw some chips on the front. Write the weight on the bag and some details. 
Color with color pencils or aquarel pencils. Outline letters and details with a fine black marker. 

Thanks to Pascal Cuijpers and his students (Connect College, Echt - NL) for this lesson. 

donderdag 21 januari 2021

Covid haircut


made by a student of grade 5

You need:

  1. white drawing sheet 
  2. pencil
  3. color pencils
Hairdressers have been closed for a while because of the epidemic …. what consequences does that have? 


How do you look now? Or your parents? Or a famous person? 

Assignment: 
Draw a portrait of yourself or someone else with a Covid haircut. 
Choose which materials you use and whether you draw in black and white or in color.  
Difficult to draw a portrait? No, watch this video about face proportions. 

Beeldaspecten: vorm, lijn, ruimte. 

woensdag 6 november 2019

Op art - like Henrique Matos

You need:
  1. white drawing sheet A4 size
  2. liquid water colour
  3. jar with water
  4. compasses
  5. ruler
  6. pencil
  7. black waterproof markers
Henrique José Teixeira Matos is a Portugese painter. He is born in 1961 in Oporto.  Matos painted landscapes, portraits and abstract works, but is best known for his op-art work.
Show pictures of Matos's work on Wikimedia Commons. Look especially the op-art works and discuss what you see.

More op-art lessons on this blog can be seen following the link Op-art.

Paint a white sheet of paper with liquid watercolour and a lot of water a plain background.


Drip some liquid water colour on the surface while it is still wet. Use more water if the colours won't flow. Leave the sheet to dry.


Use compasses to draw some small circles (2 cm average) on the sheet. Draw wider circkels around them. Fill the sheet with those circles and half ones near the edges.


Draw lines from the middle of the circles to the edges. Be sure it's an even number of lines and  Kkeep the lines as much as possible equidistant from each other. Color the squares alternating with a black marker or pencil.


maandag 3 december 2018

Silver and white Xmas tree

Made by a student of grade 4

You need:
  1. green construction paper
  2. silver marker
  3. white pencil
Draw the trunk of a tree in the middle of a sheet, starting at the bottom and ending about 2 inches from the top. Color the trunk with silver marker. 
Draw lines from the trunk to the right and left. Don't use a ruler! The lines become shorter to create a triangle.  
Draw Xmas decorations on the branches using a white pencil. 

vrijdag 24 juni 2016

A day at the beach


Artworks made by students of grade 5

You need:
  1. drawing sheet A3 size
  2. white drawing sheets
  3. tempera paint
  4. brushes
  5. scissors
  6. markers and/or pencils
  7. glue
  8. pencils
Talk about a day at the beach: things (to do) on the sand, things (to do) in the water and things (to do) in the air. Talk about people standing in the water: they seem to have half legs!

Cover four tables with newspaper and put three containers with paint on it:
  • yellow and a little brown besides (beach) + two big brushes
  • blue and a little green (seawater) + two big brushes
  • blue and white (air) + two big brushes 
  • white (surf) + two brushes to stamp
Show how to paint the beach: a lot of yellow on the brush and a little brown for the beach (do not mix!). Do the same with blue and white for the air, and blue with green for the sea. Make wavy motions with the brush to accentuate the water. Finish with a white stamping brush for the surf.
While four students are painting, the others can start with the drawing part of this lesson: draw people and things you see on the beach. Color with markers or color pencils. Cut those little drawings and paste them on the beach, the water or in the air.


vrijdag 13 mei 2016

Patterned peacock

Artworks made by students of grade 4

You need:
  1. drawing sheet 20 by 20 cm
  2. color pencils
  3. markers
  4. colored construction paper
  5. glue
Draw a small peacock on the bottom of the white sheet. Draw lines from peacock to the sides and top of the sheet. Color patterns with color pencils or markers or a combination of them. Outline peacock and 'feathers' with a black marker.
Cut the peacock (look at the pictures) and paste it on a colored sheet.

vrijdag 8 april 2016

The sky is the limit

Golden Gate Bridge, made by Elize, grade 6

You need:
  1. grey paper A4 size
  2. white and black pencils
  3. pictures of famous skylines
During a visit to the Museum in The Hague, I saw an artwork that Escher had made on gray paper. The only colours he had used were black and white. Together with the gray, you do have a lot of colours at your disposal. The Escher drawing I saw then, was the inspiration for this lesson.


Show photos of some famous skylines. Discuss skylines, skyscrapers and remarkable buildings. Ask children to search a skyline on the internet. Print this in black and white and then copy it so you can see the shadows of the buildings (settings light - dark on copyer). Students draw with just white and black pencil on the grey sheet.

Sydney skyline by Adnan, grade 6

donderdag 15 mei 2014

Johooo a dodo!!


Made by Neil, one of my students, who is very interested in the Mauritian dodo's.
He used markers and colour pencils  for this artwork. Thanks Neil!

maandag 13 januari 2014

Patterned tree


Made by a student of grade 6
You need:
  1. drawing sheet 21 by 27 cm 
  2. ruler
  3. pencil
  4. colour pencils
  5. fine black marker 
Draw a grid from 3 by 3 cm. Trace a sourcer for a circle. Draw a tree and be sure the branches are within the cirle. Draw patterns in the the tree using a fine black marker. Colour the squares in the circle in warm colours and the other squares in cool colours. Be sure the difference between under and above the horizon line is visible.

Source: Tiny Artroom

dinsdag 1 oktober 2013

One colour city - group work like Alisa Burke

You need:
  1. drawing sheet A1 size
  2. drawing sheets 10 by 20 cm (A4 size cut in three) 
  3. various colouring materials: crayons, oilpastel, colour pencils, watercolour paint, markers, tempera etc. 
  4. fine black marker 
  5. liquid water colour paint 
  6. big brush
  7. scissors
  8. glue
An artwork I came across on Pinterest from Alisa Burke was the inspirations for this lesson. Show Burke's work and discuss it: all houses in the same colour, windows are white, everything is outlined with black marker, houses uizen hebben één kleur, de ramen zijn wit, alles is zwart omrand, the houses aren't just next to each other but behind each other and (overlap). That means you cannot see the bottom of the houses that are not on the first row. 

Students form groups of four and discuss together the colour they'll choose. One of the students paints the background: use white crayon to draw stars or clouds and then paint the entire sheet with with liquid watercolor. Leave about one inch white along the edges.

On the smaller sheets students draw high houses, with windows and doors and decorations. Colour with the material of you choice. Outline the house and windows with black fineliner and cut it out. Be sure the group draw together about 15 houses.
Lay the painted houses on the large sheet to get a beautiful collage. Note that you do not see undersides of the houses that are not in the front row.

Made by students of grade 5/6

donderdag 5 september 2013

Eyecatcher


You need:

  1. drawing sheet A5 size
  2. colour pencils

See each other's eyes. What components does an eye have? How is the shape of an eye? What colours do you see in the iris? How can you do this in a drawing? What is characteristic for the pupil? How can you draw the highlight in the eyes? 
See videos on YouTube, How to draw an eye / How to draw eyes.

Kids drawing one eye and colour it in with colour pencil. Wipe the colors with your fingers to mix them. Accents can be applied with a black fineliner. 

Artworks are made by students of grade 7. 

donderdag 10 mei 2012

Art cows

 
Artworks made by students of grade 2

You need:
  1. 3 sheets of drawing paper 15 by 15 cm
  2. colour pencils
  3. coloured paper for background
  4. glue
Students have to draw three different cows: a realistic one, a cubistic one and a cow in just blue colours like the Dutch pottery from Delft.
Paste those three works on a strip of coloured construction paper.

zondag 21 augustus 2011

Sunflowers in five different materials

You need:
  1. sunflowers or pictures of them
  2. white drawing sheet A1 size, cut in strips of 30 by 65 cm
  3. five different colouring materials, like colour pencils, tempera paint, watercolour paint, oil pastels, crayons, coloured ink, aquarell pencils etc.
  4. brushes
  5. pencil, ruler
  6. coloured paper
  7. scissors
Look with the students at some sunflowers or pictures of them. How thick is the stem, what can you tell about the leaves, how are the petals divided, what colours do you see in the heart of the flower, etc.

Divide the sheet with thin lines into five strips of 13 cm high. Draw some sunflowers. Make sure the flowers themselves are drawn at the demarcation of the strips. Make sure too that in each compartment at least half a sunflower or leave is drawn.
Choose five different colour materials. Use in every compartment a different material. Consider yourself the order of the materials, for example from bright (markers) to less bright (aquarelle pencils).
Paste the work on a coloured background. Or cut the five compartments and paste them with some space between on a coloured background.
Made by students of grade 5

vrijdag 8 juli 2011

Portrait of your schoolmate

 
Made by students of grade 5
  
You need:
  1. drawing paper A4 size
  2. colour pencils
  3. watercolour paint
  4. brushes
  5. coloured ribbed cardboard
  6. stapler
After an instruction about proportions of a head, students draw their classmate who is sitting in front of him. The portraits are coloured with colour pencils, the background is painted with watercolour paint. The frames are made from coloured ribbed cardboard strips.

vrijdag 13 mei 2011

MOMA

Made by Debbie, grade 6
You need:
  1. drawing sheet A4 size
  2. colour pencils
  3. ruler
A lesson about drawing one point perspective.

Students draw a square in the middle of their sheet and draw four lines from the corners to the middle, see schedule. These are the floor and ceiling lines. Draw two lines from both short sides to the middle. Between these two lines the paintings has to be drawn. Draw lines from the bottom to the middle for tiles or parquet.
It's nice to draw artworks that students have made this schoolyear or to choose for artworks of famous painters.
Colour with colour pencils.

donderdag 5 mei 2011

Three spring flowers, three materials

 
Made by students of grade 3

You need:
  1. three white drawing sheets 10 by 10 cm
  2. coloured origami sheets 12 by 12 cm
  3. coloured cardboard 14 by 38 cm
  4. tempera paint
  5. brushes
  6. crayons
  7. colour pencils
  8. tulips, daffodils, bluebonnets or pictures of them
  9. glue
Students scetch three different spring flowers on three sheets of 10 by 10 cm: bluebonnet, tulip and daffodil. Colour the flowers with three different materials: crayons, tempera paint and colour pencils. Paste the drawings on coloured origami sheets and paste them then on coloured cardboard.

donderdag 21 april 2011

Easter eggs with lines


You need:
  1. cardboard egg shape 10 cm high
  2. pencil
  3. white drawing sheet
  4. several colour materials, like markers, colour pencils, crayons, chalk pastel 
  5. coloured paper 20 by 14 cm
  6. gekleurd papier 14 cm hoog, 20 cm breed
  7. glue
  8. scissors
  9. fine black marker 
What kind of lines do we know? Let students draw them on the blackboard: straight - horizontal, vertical, diagonal; angular, like zig-zag and curved lines.
Students have to make four Easter eggs. Ouline the template with a pencil. Draw straight lines in the first egg, curved lines in the second one and zig-zag lines in the third one. The fourth egg may is made with lines of their own choice. Trace the lines with a fine black marker. Colour them with four different materials: colour pencils, markers, chalk pastel and crayons. Cut the eggs and paste them on a coloured sheet.


Made by students of grade 3