Tuesday, May 30, 2023

A lesson in color theory

What do you need?

  • 4 cards of drawing paper, 10 by 7 cm
  • pencil
  • ruler
  • markers of color pencils 
  • black construction paper
Instruction
Discuss the words primary and secundary colors using the color wheel.  
What are primary colors and why are they called so? What are secondary colors, how do you make them and why are they called so? What are the neutral colors? Explain also the word nuance

What should you do?
  1. Draw a frame on the cards at 2 mm from the edge using a thin black marker.
  2. Draw a pattern of your choice on each card.
  3. Color the cards according to the terms discussed.
  4. Outline the patterns with a thin black marker.
  5. Stick the cards on a black background.
  6. Add the learned words.

Thursday, May 25, 2023

Selfportrait like Roy Lichtenstein

In my school we keep artwork at school until the of the school year. Students make a portfolio in june to take their work home. On front of it is a drawing in the style of one of the art movements we studied that year. 
These are the grade 6 Popart portfolio folders with a self portrait in the style of Roy Lichtenstein. 

What do you need? 
For the folder: paper A1 size, folded in half
For the drawing

  • white drawing sheet 
  • markers
  • skin color pencils 
  • fine black marker 
About the artist
Show artwork of Lichtenstein and discuss the important features: use of primary colors (sometimes with green), grid dots, black outlines, speech bubbles and slogans (onomatopoeia).

contents portfolio folder grade 6

What should you do?
  1. Draw a self portrait on the small sheet. 
  2. Add a text in a speech bubble that suits you. 
  3. Color your face using skin color pencils. Use markers for the rest of your drawing. 
  4. Fill one part of your drawing with dots. 
  5. Fill the background with a pattern. 
  6. Outline everything with a black marker. 
  7. Paste your work on the large sheet. 
  8. Draw in large letters: portfolio + your name + the school year. 


Artworks are made by students of grade 6.

    Sunday, May 21, 2023

    A field full of daisies

    What do you need?
    • white drawing sheet 
    • tempera paint in blue, green, white, yellow and red
    • brushes
    • jars with water
    • colored paper for background
    Instruction 
    1. Make your own green colors by mixing blue, white and yellow. Paint the entire sheet with small vertical strokes and let dry.
    2. Paint the daisies; in the front of they are larger  then further away. Use a small brush and a lot of paint, to make sure the grass is really covered with the paint of the flower. Use a different color green for the stalks or take the unmixed color green directly from the bottle. Paint the hearts of the flowers with big yellow blobs.
    3. Paste the artwork on a dark green background.

    Artworks made by students of grade 4 and 5. 

    Tuesday, May 2, 2023

    Prisoners in World War II


    What do you need?
    • white drawing sheet 
    • ribbed cardboard
    • pencil
    • watercolor paint
    • brushes
    • jar with water
    • black wool 
    • glue
    In Holland we remember the victims of World War II on the 4th of May. The 5th of May we celebrate the day of liberation. In schools World War II is an important part of the history lessons. 

    "We had to draw one or more people in a concentration camp. Our drawings should show the fear and powerlessness of the prisoners. Most of all did well and the artworks were really beautiful. When the drawing was finished, we had to paint it with watercolour paint, using sad colours. We used black wool to make barbed wire and pasted it in front of the drawing. Finally we pasted the artworks on ribbed cardboard. It was an intense task, and it made us really think about that terrible time."

    Artworks made by students of grade 6.

    Thursday, April 13, 2023

    Tulips; spring is coming!

    You need:
    1. a bunch of tulips
    2. vases or glasses
    3. drawing paper A4 size
    4. white crayons
    5. water paint
    6. brushes
    7. jar with water
    8. colored paper for background
    9. glue

    What does a tulip look like? What can you tell about the stem and the leaves? What do the petals look like? 
    Every group gets a vase with some tulips. Students todraw a horizon line about a third from the bottom. 
    Draw tulips with a white crayon. Look carefully at the tulips in the vase. The tulips must overlap.
    Colour them with water paint, the white lines will remain. Paint the lawn and the air. Stick the artwork on a colored background.


    Thursday, March 30, 2023

    Like Romero Britto

    Dutch tulips like Britto 

    This was one of my most successful lessons so far; students enjoyed it and the results were amazing. But hello copycats: Britto never painted tulips! So please don't copy this lesson (I saw a lot of them already on art blogs and  Pinterest), but create one yourself. Or at least: mention your source, kidsartists.blogspot.com! 

    What do you need?
    • white drawing sheet 
    • permanent marker
    • color markers
    • ruler
    Paris
    About the artist
    Brazilian artist Romero Britto was born in 1963 and grew up with eight brothers and sisters. He drew and painted on any scrap of paper he could find and filled them with colorful images of a beautiful world.  
    In 1983 Britto travelled to Europe to study the old masters. Then he went to the USA where popart was flourishing. He opened a gallery in Miami. In 1989 a famous vodka brand selected Britto to design an artwork with their logo. From that moment the name Britto was known to a greater public. His artworks are now represented in galleries and museums across five continents.
    Meet his work
    Look at artworks of Britto on his gallery. Discuss the salient features: 
    • bright colors
    • simple shapes
    • work is divided into sections that are filled with patterns
    • thick black outlines
    Discuss how you see the difference between the drawn picture and the background. Ask about the stylistic characteristics and where to classify this artist (popart).
    What should you do? 
    1. Draw a picture of a subject of your choice - no details, just the main lines.
    2. Divide the sheet with pencil and ruler in several sections. 
    3. Trace all lines with a waterproof black marker.
    4. Color the whole sheet with markers like Britto did.
    For the background we stamped circles with toilet rolls on a colored sheet and pasted the artwork on it.
    Artworks made by students of grade 4 and 6. 

    Op art around an eye


    You need: 

    1. drawing sheet 20 by 20 cm
    2. ruler
    3. pencil
    4. post it 
    5. black markers

    Step 1
    Draw an eye in the middle. 
    Draw lines from the eye to the edges. Important: this must be an EVEN number of lines, otherwise you won't be able to color a checkerboard pattern later.  


    Step 2
    Put a post-it on the eye. Be sure there will be place for another one later.  Draw dots on the cornors with a pencil and connect them.  

    Step 3
    Do the same on another part of the sheet. 


    Step 4
    Trace all lines with a fine black marker. Draw alternately dots in the shapes that must become black. Color them with a bigger black marker

    Stap 5
    Color the iris of the eye with pencil. 

    Sunday, February 5, 2023

    Art Noveau tiles


    You need: 

    1. colored paper 10 by 10 cm
    2. linoleum 10 by 10 cm
    3. colored cardboard karton 25 bij 25 cm
    4. carbon paper
    5. lino knife
    6. flat piece of glass
    7. block printing ink
    8. lino roller
    9. lino press
    10. glue
    Art Nouveau or Jugendstil is an art style that was practiced from 1890 and abruptly stopped with the start of World War 1 in 1914.  t die werd beoefend vanaf circa 1890 en abrupt stopte met de start van WO1 in 1914. 

    Art Noveau was mainly applied to everyday products (for emample furniture, glassware, jewellery), in architecture, graphic art and painting. Artists were inspired by nature: patterns with birds, flowers, plants. clouds, rocks, women.  Graceful moving lines express emotion. 

    Show Art Noveau tiles: with 2 mirror lines or tiles that form a tableau in a group of 4. 


    Explain we are going to print tiles of 20 by 20 cm with linoleum and ink. Ask how you can print an entire tile with an piece of linoleum from only 10 cm: by turning the same stamp 90 degrees each time you make a print.  
    Explain how a two-color print works: information here.

    What should you do?
    Step 1: Draw a quart of a tile on a sheet. 
    Step 2: Copy the drawing with the carbon paper on the linoleum. 
    Step 3: Cut the background away: the image remains.   
    Step 4: Make 8 prints on sheets of 10 by 10 cm and let dry.
    Step 5: Wash the linoleum and let dry. 
    Step 6: Cut extra details out of the image.
    Step 7: Print on the previous prints with a different color.   
    Step 8: Choose the best prints. Stick them on the cardboard while making a quarter turn each time. 

    All artwork is made by students of grade 6. 

    Friday, February 3, 2023

    Self portrait like Alphonse Mucha


    You need:
    1. portrait photo of yourself
    2. white drawing sheet
    3. brown and grey construction paper
    4. color pencil
    5. gold pencil
    6. scissors
    7. glue
    Alphonse Mucha
    Alphonse Mucha (Czech republic, 1860-1939) is an Art Nouveau artist. Graceful women,  shapes from nature, soft colors and stylized letters  en  are the basis of his work.
    In 1887 he moves to Parijs, at that time the center of the modern world: a vibrant night life, modern department stores, wide boulevards with artificial lights that illuminate the city  after sunset. Mucha isn't quite succesfull by then, but that changes when he gets his first assignment: a poster for the  v theater show Gismonda with the famous actress Sarah Bernhardt. Mucha paints a lifesize poster of a beautiful woman surrounded by stylized flower patterns and graceful lines. With this poster Mucha establishes his name as an artist  and is assured of sufficient work in the years that follow. His posters turn Paris into an open-air museum with art for everyone to see. 
    Show some artwork of Mucha and discuss them: graceful wavy lines, organic shapes, no bright colors.


    Task
    Draw the picture of yourself  and color it with pencils. Cut out and stick on brown paper. Decorate the background with organic shapes using a gold color pencil. Cut a frame for you portrait and stick it on your artwork.  

    Artworks are made by students of grade 5 and 6. 

    Thursday, February 2, 2023

    Art Nouveau flower tiles


    Art Nouveau or Jugendstil is an art style that was practiced from 1890 and abruptly stopped with the start of World War 1 in 1914.  t die werd beoefend vanaf circa 1890 en abrupt stopte met de start van WO1 in 1914. 

    Art Noveau was mainly applied to everyday products (for emample furniture, glassware, jewellery), in architecture, graphic art and painting. Artists were inspired by nature: patterns with birds, flowers, plants. clouds, rocks, women.  Graceful moving lines express emotion. 

    Famous Art Nouveau artists are Alphonse Mucha,  Gustav Klimt, Gaudi, Berlage. 

    You need:

    1. folding sheets 10 by 10 cm in several colors
    2. pencil
    3. scissors
    4. glue
    5. colored construction paper 30 by 20 cm

    Show pictures of  Art Nouveau tiles: organic shapes of flowers and plants. 

    Tell students they are going to build a litte wall of tiles in Art Nouveau style.  Every wall has six tiles. Flowers have to be cut out of the folding sheets. Try to use as much as possible of those sheets, so what you cut you glue on the wall. 

    Artworks made by students of grade 2 

    Wednesday, February 1, 2023

    Op art paper weaving like Victor Vasarely


    Victor Vasarely, 1906-1997, was a French-Hungarian artist and one of the most important representives of Op Art.  Vasarely studied in Budapest and left for Paris in 1930 to work as a decorator. 

    Op-art, short for optical art. The word optical is used to describe tings that relate to how we see. Artists use shapes, colours and patterns in special ways to create images that look as if they are moving or blurring. Op art started in the 1960. Op-art is a style of visual art that uses optical illusions. The artwork gives the viewer the impression of movement, hidden images and vibrating patterns.

    You need: 

    1. black construction sheet  (23 by 33 cm,)
    2. white or colored paper in strips of 2 cm 
    3. ruler
    4. pencil
    5. scissors
    6. glue 
    Stap 1
    Fold the black sheet in half. Put the fold down in front of you. Draw a line at the top at 3 cm from the edge. Draw a center line from top to bottom. Mark a dot every cm on the fold from the center line. Make a dot every 1 cm at  the top starting from the center line. Draw lines between the dots. 

    Stap 2
    Leave the sheet folded in half. Cut the lines up to the 3 cm strip.   
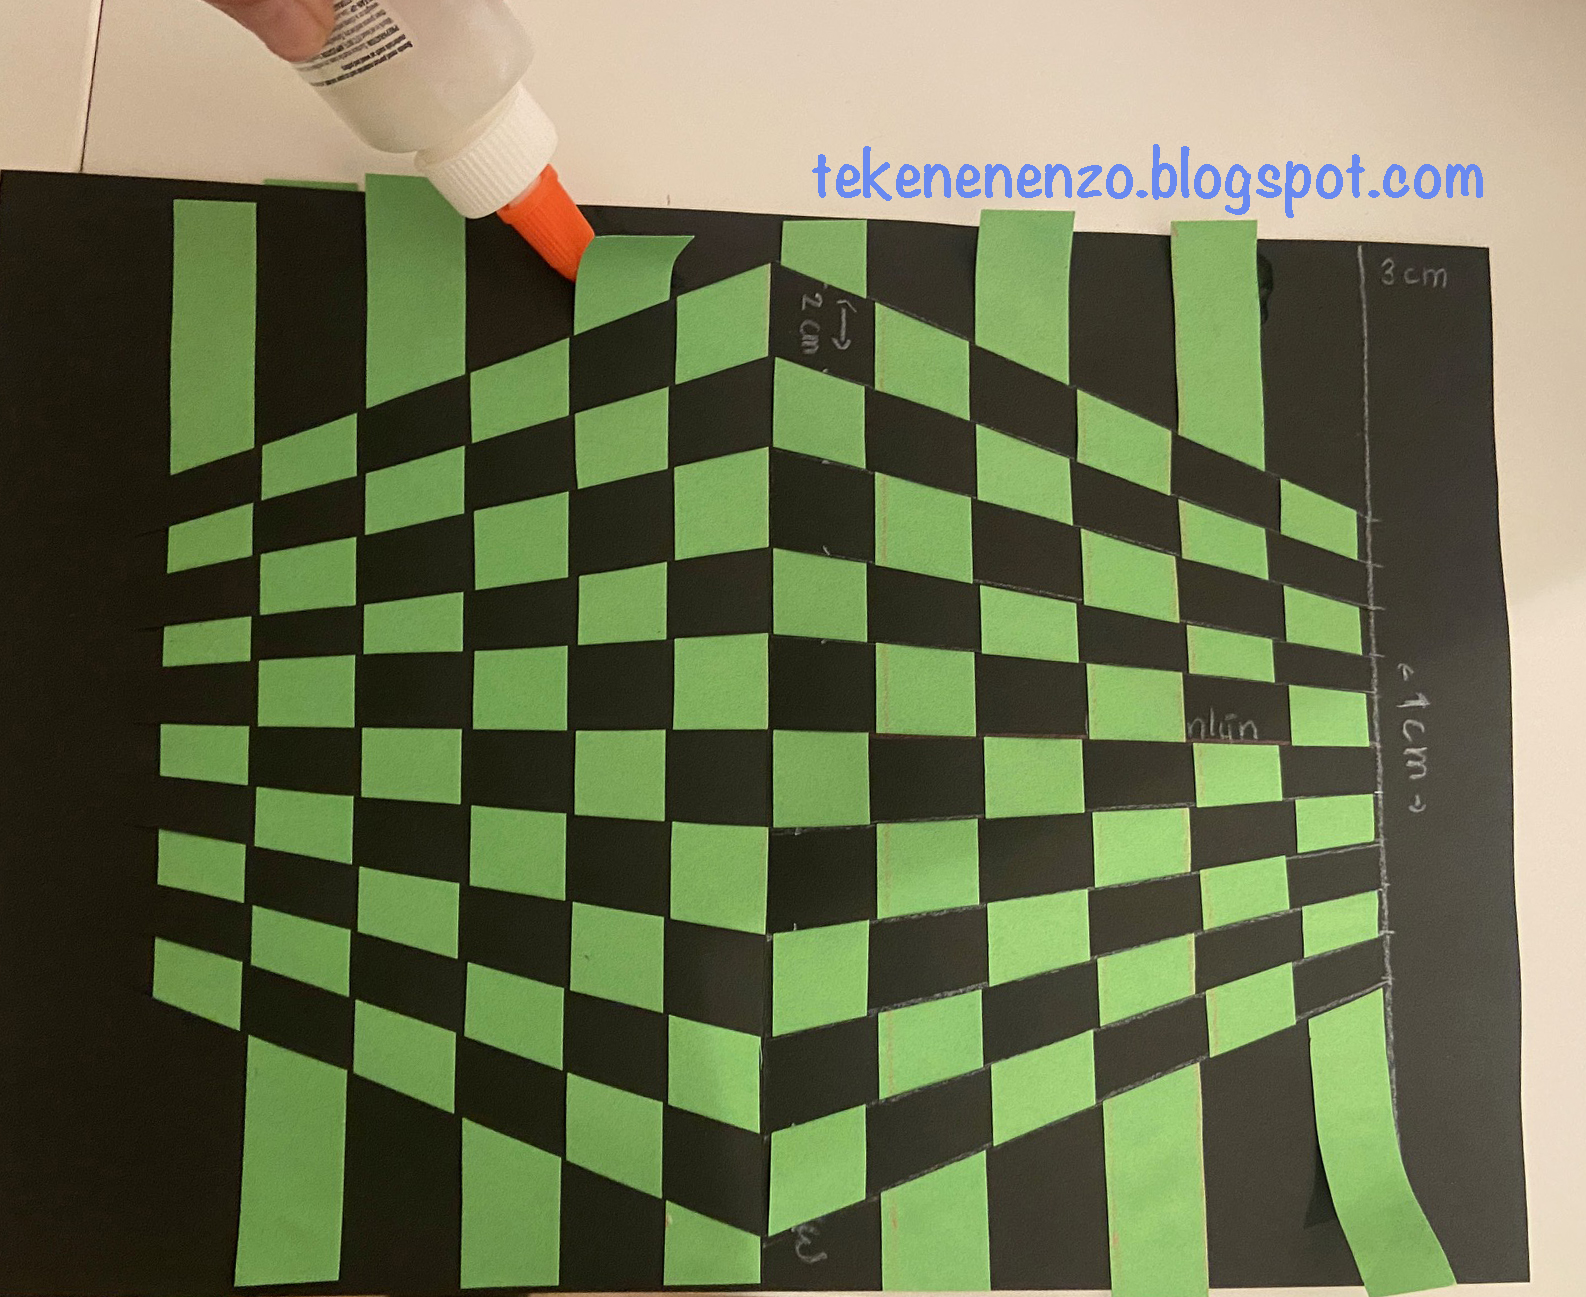
    Stap 3
    Weave the strips into the frame. Start in the middle: press the strips agaiinst the fold on  both sides. Press the next strips against the previous ones.  

    Stap 4
    Glue the loose ends on one site. 
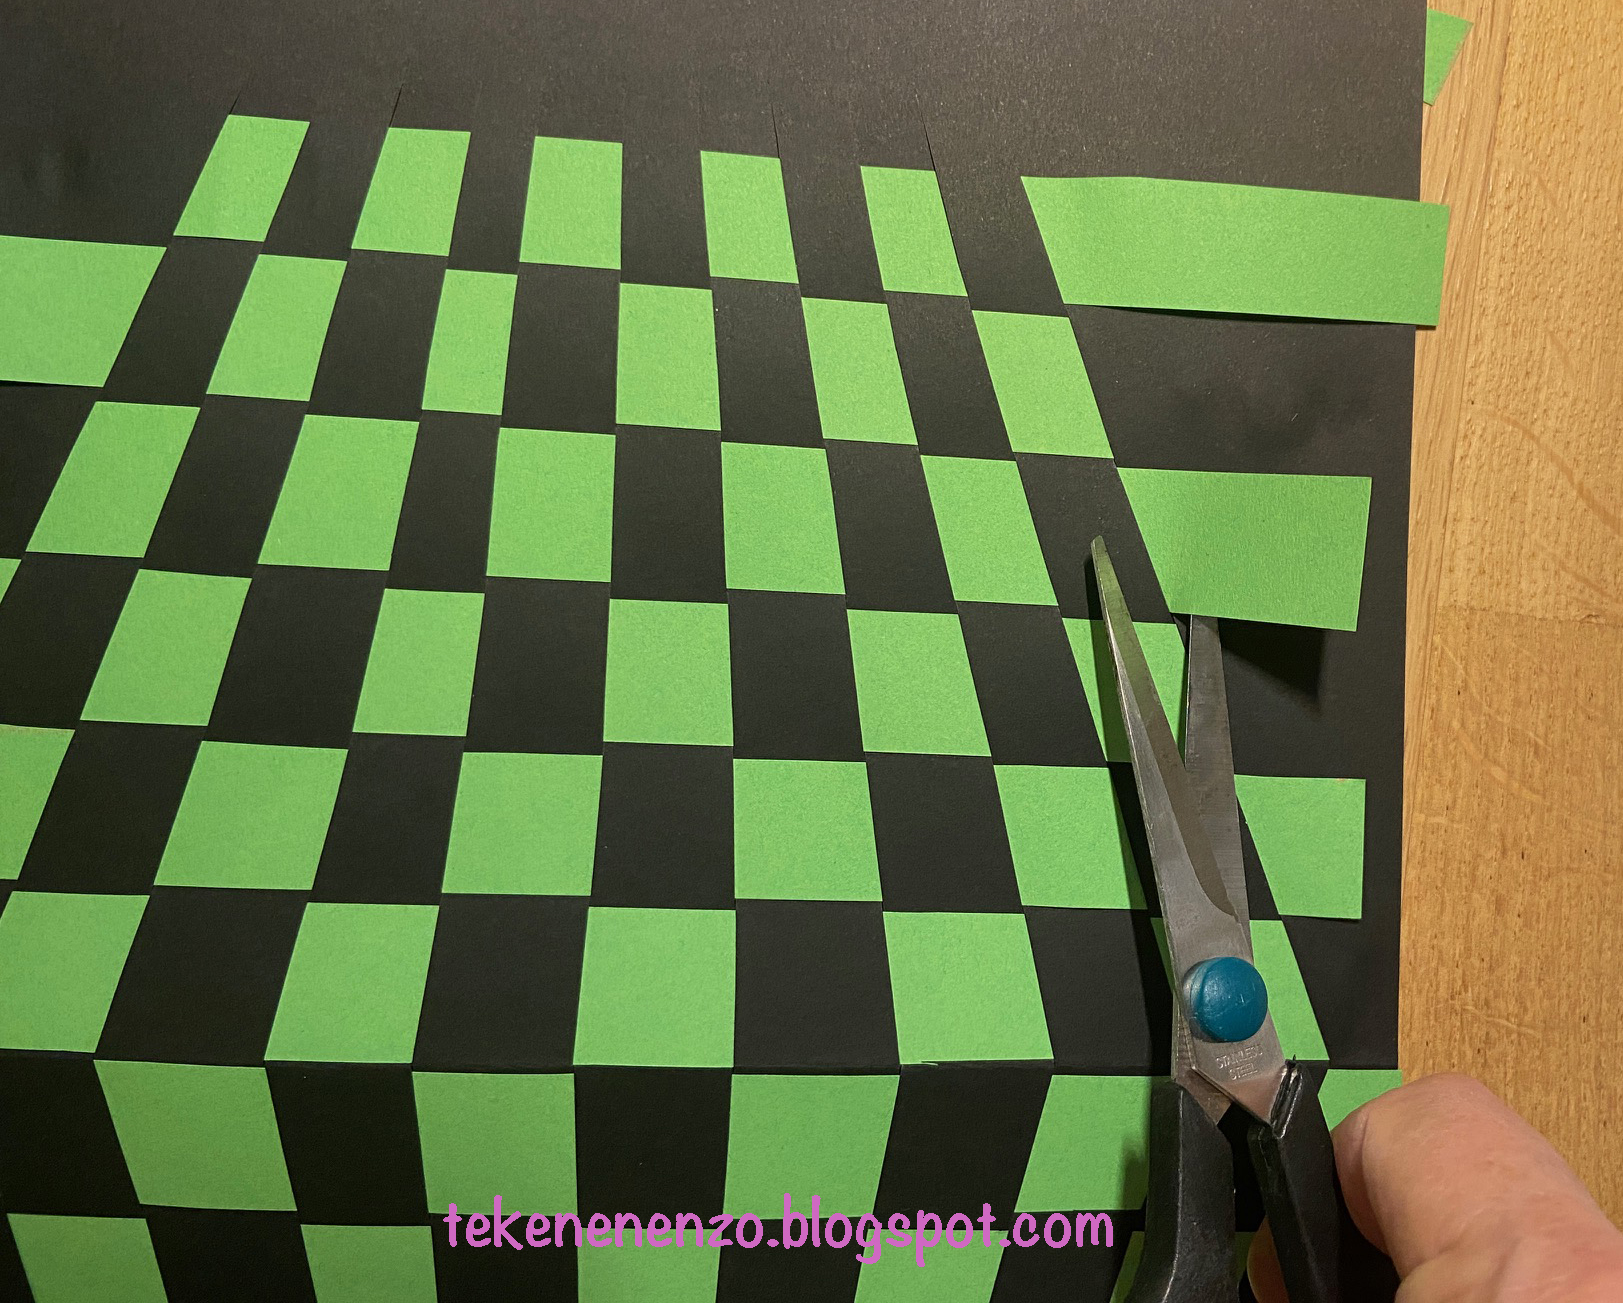

    Stap 5
    Turn your work over and cut the loose ends of the strips.  


    by students of grade 6