- white drawing sheet A3 size
- ruler
- pencil
- black markers
- colored markers or pencils
After drawing their grid, students design their own alphabet and trace them with markers.
A site with school-tested lessons for the Arts.
Made by students of grade 6
You need:
Group work 'Awesome alphabet'
Made by a student of 7 years old
You need:Draw a 5 cm grid and copy it on drawing sheets. Give every student a grid sheet. Students use crayons to write big handwriting letters in the squares. Trace the lines of the squares with crayon too using one colour. Paint the squares with liquid watercolour.
In Holland we call those letters 'lusletters', 'letters with loops' if I translate is. The first letters children learn, at the same time as they start learning to read, are called 'blokletters'. Block letters?
How do you call those letters? Blockletters? Writing letters? Who can help me?
Our Dutch calligrams; do you recognize the meaning?
You need:A calligram is a phrase or word in which the typeface, calligraphy or handwriting is arranged in a way that creates a visual image. The image created by the words expresses visually what the word or words say.
Show some calligrams on the smartboard. Discuss them with the students. How was the calligram made? What word(s) do you see? What kind if image is it? Students choose something they want to draw. With a pencil they draw the outlines of it on a sheet. Using a fine marker they write their drawing full with the words that belong to it. Erase the pencil lines when the ink has dried. There are two ways to do it: fill the drawing completely with words, or write the words only on the outlines of the drawing.
Sometimes it is better, and/or nicer, to colour your calligrams. In the example above, the food calligram, you won't probably recognize the food on the plate. With some colour (colour pencils) it is clear! The butterfly is coloured with coloured ink.
You need:
Each student selects a words to illustrate. The design for the word must reflect what the word represents. Someone who doesn't know the meaning of the word, has to understand what it means by looking at the design of it.
Use colour pencils or markers to colour the letters of the word. Use a fine black marker to outline the letters.
Well: although you don't know the meaning of the Dutch words in the examples my students made, you'll know what they mean thanks to the design! If not, they did a bad job?
You need:
This is a great lesson for the beginning of the school: a name tag in the style of painter Paul Klee. This drawing can also be used for the birthday calendar that each group makes at the beginning of the school year.
Paul Klee
Paul Klee (1879 – 1940) is a German/Swiss painter. His work belongs to the modern art. Klee developed mainly as an autodidact and left more than 9000 artworks. In 1912 he saw the work of Picasso and Malevich, and he met Robert Delaunay, who believed colour is the most important element in a painting. After a trip to Tunisia in 1914 Klee started to paint more colorful and abstract. He painted many subjects : landscapes, portraits, animals, mythology, mysterious machines. In his work he combined abstract and figurative shapes. Klee 's work cannot be described in one single word. Surrealism, cubism, abstraction are terms which are applicable to his paintings. He is classified by expressionism. (Source: Wikipedia)
Lesson
Show some artworks of Paul Klee and discuss them. What do you see? Wat zie je? What does strike you? Show finally the work 'Blue Night' and discuss this. Is this like the other works you 've seen? Do you recognize the painting style? What colours are used in Blue Night? How do we call those colours? Students have to make a drawing in Paul Klee style. Divide the sheets of paper. The sheet must be up with the short side. Using a gray pencil and ruler students divide the sheet into three strips of 5 to 21 cm.
Starting top left, write the first letter of your name in capital. The letter must be 5 cm high and touch the first line and the side and top of the sheet. Write the second letter. Be sure the second letter hits the first one, as well as the writing line and the top of the sheet. Do the same with the rest of the letters of your name. If you're ready with your name, start over again.
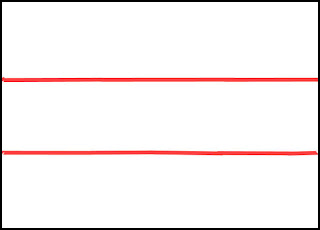
Writing lines are pink in this example. Click to enlarge.
Proceed on the second line and make sure the letters touch the top of the first line. The third line goes the same way, but the letters should touch the bottom of the sheet and the letters on the second line. See example above. Use an eraser to remove the writing lines. Beware: the letters must stay! So: with an E the bottom line is part of the letter, and should therefore not be erased.
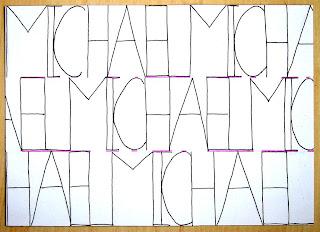
The writing lines are erased. Click to enlarge.
Choose four colours markers. Colour the white spots who are completely surrounded by lines. This might be small spots from the letters, but they could be tall as well because of open letters. Make sure won't get twice the same color side by side. You can prevent this by colouring from top to bottom or from left to right. Choose cool colours just like Klee, or let the kids choose themselves. Just four colours!
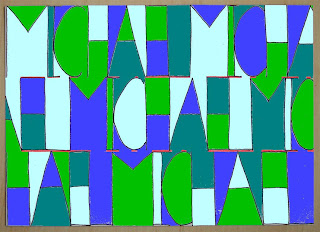
Four colours. Example is made with Paintshop. Click to enlarge.
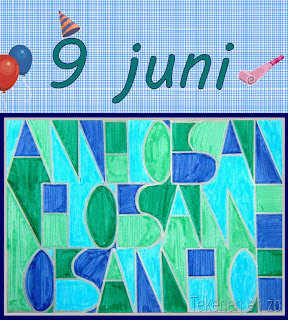
When it is finished, outline with a thick marker. In this example is chosen for silver, because it fits well with the cold colours of the work. To make a birthday calendar for the class, the work has to be pasted on a calendar sheet. This can be drawn, but can also be made on the computer as shown below.Made by children of 10-11 years old
You need:Fold the paper in half lengthways. Write your name in bubbly letters against the fold. Then cut carefully around the outsides of the name. Keep the paper folded at all times. Use a cutter for the negative areas. When finished, unfold the paper to reveal the name in reverse. Paste the name on a black paper. Dan knippen ze de naam uit - pas op dat je de vouw niet doorknipt--, vouwen de dubbele naam open en plakken deze op een zwart vel papier. Turn the sheet a quarter. What do you see? A special skeleton? You name in Chinese? Or an alien?
In this lesson one point perspective is combined with an optical illusion.
Place the paper horizontally. Draw a small dot on the right side of the sheet, about half way. Take a ruler and draw five lines from the dot to the left side of the sheet.Draw five lines from the dot to the top of the paper and five lines to the bottom. Use a compass to draw increasing circles around the dot until the sheet is full. Draw your name in blockletters between the lines; use the width of three blocks. Make the letters threedimensional by drawing shadows on the left sides and undersides. Colour the front of the letters. Colour the shadows with a darker colour. Colour the blocks alternately with two colours, like a checker board. You may also use one colour and leave the resting blocks white. Outline the letters with a fine marker to be sure letters will really pop out of the sheet.
Write your name with a black marker several times on a white sheet. Upside down, from the top to the bottom, it doesn't matter. Write your names disorderly, taking care the letters will mix up.
When your sheet is full enough, choose a couple of colours you like. Colour just the white spots who are completely surrounded by black lines. This might be small spots from the letters, but they could be tall as well because they are between the names.
Glue your work on a black background.
Another fun idea with your own name!
Draw four diagonal lines on your white sheet to make five compartments. Use capital letters to write your name in the compartments, and take there that the upper and bottom side of the letters will touch the lines.
Colour the letters with a black marker. Colour the compartments with crayons. Glue your drawing on a black sheet.
You need:
There are many fun things to do with your own name! Draw a spot in the middle of the sheet (use a ruler!) and draw an even amount of lines to the sides of the sheet. In the example are ten lines, producing nine compartments. Write your name in capitals within a compartment, while the bottom and upper side of the characters reach the lines. Colour the characters with a black marker.
Then write your name with a fineliner as often as you can in small characters in the next compartment. You may write horizontally of diagonally, as you wish. You can even write in squares.
Fill the compartments alternate with big and small names. If you like it, you can colour the compartments with the big names with wasco crayons.
Juf Lisette is the maker of this lesson! You need:
Graffiti is the name for images or lettering scratched, scrawled, painted or marked in any manner on property. Graffiti is sometimes regarded as a form of art and other times regarded as unsightly damage or unwanted. All children get a grey sheet and some white sheets. To get a wall texture, use wall bricks to scratch over with wasco crayons. Cut those bricks and glue them on the grey paper sheet.
Design your own name in graffiti characters and colour it with felt pens. Cut it out and glue it on your brick wall. Of course children can choose for a slogan of a pop artist instead of their name.
Graffiti, made by children from 10-11 years old