Posts tonen met het label animals. Alle posts tonen

vrijdag 15 maart 2024

Tamponing an Easter bunny

 You need:

  1. colored paper
  2. tamponing brushes 
  3. white tempera paint
  4. pencil and color pencils  

A lesson to learn the technique of tamponing with a tamponing brush: do not move the brush back and forth, but stamp. Result will be a softer texture than when using normal brushes.  


No tamponing brushes in school? Give students a cotton ball in a cloth spin. 


Wat moet je doen?
Schets de contouren van een paashaas. Druk zo zacht mogelijk op je potlood, want dikke potloodlijnen blijven zichtbaar onder de witte verf. 
Tamponneer de haas en laat drogen. 
Teken met zwart potlood streepjes rondom.
Versier de tekening eventueel met lentebloemen. 

Alle kunstwerken zijn gemaakt door leerlingen van groep 4. 

Beeldaspecten: nuance, textuur. 


woensdag 29 maart 2023

Animals in spring like Hans Innemee


by students of grade 1-2
You need:

  1. grey construction paper 21 bij 21 cm 
  2. oilpastels
This lesson is for grade 1-2. In 2012 I wrote a lesson for grade 3-4 about Hans Innemee. 

Hans Innemee (1951) is a Dutch artist. View artwork of him with the students. Discover the small stories in his work. Can you tell a small story while looking at these two birds? 


Discuss the artworks: 
  1. subject: animals
  2. few colors
  3. frame
  4. simple background
Task for today: draw young animals in spring. Color them with oilpastels. Outline with black around the drawing. 

donderdag 21 oktober 2021

Painting with scissors like Matisse

made by students of grade 4

You need per student:

  1. 1 sheet white drawing paper
  2. 1 sheet colored construction paper 
  3. 1 sheet colored construction paper from which you cut 7 cm 
  4. 1 sheet blue construction paper 
  5. leftovers of colored paper
  6. glue
  7. scissors
  8. black marker

Who is Matisse?

Matisse (1869 –1954) was a French artist, known for both his use of colour and his fluid and original draughtsmanship. He was primarily known as a painter.

Matisse didn't care if stones were blue, he just chose the colors he liked. Some people thought is art was very ugly: someone who paints blue faces and green noses is a fool and Matisse was called 'Fauve', which means: wild. This is how the word Fauvism came into being for this art movement, art with bold colors. 

After a surgery Matisse spent the rest of his life in a wheelchair. He wasn't able to paint anymore, but could still paint with his scissors.

View various artworks of Matisse. 


Then few the artwork Oasis. What stands out? 

  • no straigh lines 
  • organic shapes
  • bright colors
  • What is an oasis and why is this artwork called so?  
How to make it 

Step 1
Take the two colored sheets: a whole one and one with 7 cm cut off. Paste the smaller sheet on the large one. The strip at the bottom is the table for the fishbowl. 

Step 2
Cut Matisse shapes and glue them on the small sheet. Let them fall of the sheet and cut away the outer pieces.

Step 3
Fold a white sheet in half on the long side and cut out a fishbowl. The center line of the bowl is the fold of the sheet. Trace around the bowl with a thick black marker.   

Step 4
Cut 'water' out of the blue sheet, slightly smaller than the bowl. Paste it in the bowl. Paste the bowl on the colored sheet with organic shapes. 

Step 5
Cut two or three fishes and some water plants and paste them in the bowl.


Elements of art: shape, color. 


woensdag 4 augustus 2021

Insects

 You need:

  1. crayons
  2. black construction paper 20 by 20 cm
  3. black paint
  4. brush
  5. toothpick
Color a drawing sheet with crayons. Paint the entire sheet black and let it dry.  Scratch insects with a toothpick. 

 Paste the artwork on a coloured background.

zaterdag 8 mei 2021

Tropical birds in chalk pastel


You need:

  1. black construction paper
  2. black oil pastels
  3. chalk pastels
  4. fixative spray
View photo's of tropical birds and discuss them. 
Draw on the black sheet a bird on an branch using black oil pastel. Color with chalk pastels and finish it with fixative spray. 


maandag 28 december 2020

Stained glas animals

 
made by students of grade 5

You need:

  1. black construction paper 
  2. wax paper in several colors
  3. white pencil
  4. ruler
  5. cutting mat 
  6. cutting knife
  7. glue

A stained glass window is a window in which several pieces of (mostly colored) glass are stuck in frames of lead. Stained-glass windows were made in times when it wasn't possible yet to make a window in one piece. We see those stained glass windows in old houses, but especially in churches. The light from outside enters in multiple colors into the church. 

View stained glass windows and tel about their origin and the effect of the colored light.  

Use a white pencil to draw an animal on the black sheet. Draw at least three lines from the animal to all edges of the sheet. Divide the animal into some surfaces. 
Make all lines 1 cm wide. Hatch the surfaces between the 1 cm lines with the white pencil.
Cut the white area's. When ready, use the black sheet as a template to draw the pieces of wax paper. Cut them out with an extra 0,5 cm and stick them behind the window. Make sure that there are no two same colors next to each other. 

Elements of art: line, shape, color. 
Technique: cutting.
Connecting with: history. 

zondag 8 november 2020

Same insect - different colors


made by student of grade 1

You need:
  1. drawing sheets A5 size
  2. crayons
  3. liquid watercolor paint 
  4. brush
Draw two the same insects and color them with crayons: one with cool colors, the other with warm colors. 
Paint the background with dilluted watercolor paint: warm colors for the 'warm' insect, cool colors for the 'cool' insect. 


Element of art: color.

zaterdag 12 september 2020

The birds of George Braque lesson 2

artworks are made by students of grade 4

This is lesson 2 about George Braque. First lesson: click here.  

You need:

  1. blue construction paper 
  2. colored paper
  3. scissors
  4. glue

George Braque (1882-1962) was a French painter and sculptor. Together with Picasso he was founder of cubism.
After is cubist time, Braque painted simplified figurative paintings of landscapes and still lifes with musical instruments and bottles. Remarkable are the letters and nummers Braque added to his works.
When Braque became ill, he was no longer able to paint. He turned to making color litographs of simple bird silhouettes. The same birds you that can also be seen in one of the ceiling paintings of the Louvre in Paris.

Look at the artwork Les oiseaux of George Braque.  

  • simple shapes (silhouet)
  • white outlines
  • blue background
  • geometrical shapes: stars and moon 

What do you have to do: 
Draw at least three silhouettes of birds on colored paper. Cut them. Cut geometrical shapes out of paper scraps. Paste everything on the blue sheet.  


Elements of art: shape, space.
Techniques: drawing, making a collage, cut and glue 

zondag 23 augustus 2020

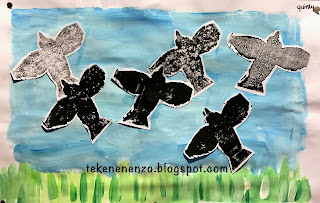
The birds of George Braque


You need:
  1. white drawing sheet A3 size
  2. white drawing sheet A6 size 
  3. linoleum
  4. lino knife
  5. lino press
  6. lino roller
  7. tempera paint
  8. brushes
  9. scissors and glue
George Braque (1882-1962) was a French painter and sculptor. Together with Picasso he was founder of cubism.
After is cubist time, Braque painted simplified figurative paintings of landscapes and still lifes with musical instruments and bottles. Remarkable are the letters and nummers Braque added to his works.
When Braque became ill, he was no longer able to paint. He turned to making color litographs of simple bird silhouettes. The same birds you that can also be seen in one of the ceiling paintings of the Louvre in Paris.

View the lithographs of birds and discuss the artwork:

  • simple shapes (silhouettes) 
  • background is often blue
  • few colors in the artwork
  • birds are black or white
  • birds are painted or printed 

Process: 
Draw a silhouette of a bird on A6 sheet and copy it to the linoleum. Cut away the background, so the bird stands out. Paint or stamp a background on the A3 sheet. Make some prints of the bird in black and/or white and let dry. Be sure to get birds in several color nuances by not rolling the lino every time.
Cut the printed birds and paste them on the background.

door Quinty, groep 7

Elements of art: form, space, nuance, color
Techniques: printing, painting, cut&glue

maandag 10 augustus 2020

Zebra


You need:

  1. drawing sheet A3 size 
  2. drawing sheet A3 size
  3. tea
  4. glue
  5. sand
  6. brush
  7. charcoal
  8. wool in black and white
  9. scissors
After reading The zebra who ran too fast fro Jenni Desmond we did this lesson. 

Dillute glue with a cup of strong tea and add some sand. Paint the large sheet with this. Color and texture will emphasize the natural habitat of the zebra. 
Fold the other two sheets in half and cut a neck and head (oval). 
Use charcoal to draw vertical lines on the head and horizontal lines on the body. Cut ears and draw lines on them. Cut pieces of white and black wire and paste them. 

Elements of ard: line, shape and texture.
Techniques: cut and glue, draw with charcoal

zaterdag 12 januari 2019

Cat on head - like Corneille


Made by a student of grade 3
You need:
  1. drawing sheet A3 size
  2. oil pastels
  3. liquid watercolor paint
  4. brushes
Corneille painted often cats, birds and women. There are some paintings where he painted the cat on the head of a woman!
Show Corneille paintings on the digital board or use google: 'Corneille woman cat'.

Who of you has a cat at home? Does it ever lie with you? Does your cat ever lie on your head?
Look at these artworks. What do you see? Why would the painter left the cat's eyes white?  Do the women on the paintings have hair? 

Draw a head on your sheet with oilpastel (dark color). Maybe your own head, but you may choose another head too. Draw a cat sitting, standing or lying down on the head. The cat looks like hair! What hairstyle it is, had to do with the position of the cat. 
Color your drawing with bright colors. Trace the outlines with a dark color if necessary and paint the background with liquid watercolor paint. 

Made by a student of grade 3

There are more lessons about Corneille on this blog! Use the search function. 

vrijdag 11 januari 2019

Corneille China

Made by a student of grade 1
You need:
  1. paper plates)
  2. black markers
  3. acrylic paint
  4. small brushes 
  5. jars with water and paper towels
Show some pictures of animals in Corneille's artwork. What do you see? What can you say about the colors? Do you like it? Why or why not? What animals do you see on the china?

Choose an animal. Use a black marker to draw it on your plate. You can also decide to draw just the head of the animal. Your drawing has to be large, it has to fill almost the entire plate. Can you think of anything else? Does the moon shine? Is your animal with others? Or is it in the grass? You can make it!

Color your drawing with acrylic paint and a brush. Choose bright colors and make sure it's opaque. Rinse your brush with each new color and dry it well in a paper towel; the acrylic paint shound not get wet.

Trace the marker lines again if necessary but only if the paint is really dry.

More information about Corneilla and the Cobra group on this blog:  Lesson 1 en lesson 2.

donderdag 23 augustus 2018

The very lonely firefly


You need:

  1. black construction paper
  2. tempera paint
  3. brushes
  4. gold and silver markers
  5. pencils
Book: The very lonely firefly from Eric Carle (also to be found on YouTube)

Students use white tempera to paint two or more jars at the bottom of the black sheet. They mix yellow and blue to paint grass in different shades of green over the jars. Draw fire flies with gold and silver markers and color them with pencils. 


donderdag 16 juni 2016

Oscar the Octopus


You need:
  1. drawing sheet A2 size
  2. oilpastels
  3. liquid watercolor paint
  4. jar with water
  5. brushes
  6. salt
After a story about Oscar the Octopus and viewing some pictures of squids, students draw a squid in the sea. Big head, big eyes at the bottom of the head, eight tentacles that go over and under each other. These things should be seen in the drawing.

Color with oil pastels and draw patterns. Be sure the tentacles are going over and under each other - this has to be seen in the patterns.  Outline when necessary with a dark color.
Drip some liquid water color on the background after you made it wet. Sprinkle salt  for a great 'watery' effect.
All artworks are made by students of grade 3

vrijdag 13 mei 2016

Patterned peacock

Artworks made by students of grade 4

You need:
  1. drawing sheet 20 by 20 cm
  2. color pencils
  3. markers
  4. colored construction paper
  5. glue
Draw a small peacock on the bottom of the white sheet. Draw lines from peacock to the sides and top of the sheet. Color patterns with color pencils or markers or a combination of them. Outline peacock and 'feathers' with a black marker.
Cut the peacock (look at the pictures) and paste it on a colored sheet.

vrijdag 29 april 2016

Birdies on a branch

Made by a student of grade 1

You need:
  1. liquid water color paint
  2. brushes
  3. crayons
  4. white sheet
  5. feathers
  6. glue
Draw a branch with some birdies on it. Their eyes should be big and white! Color the birds with crayons using bright colors. Paint the branch and background with water color paint. Let dry. Draw feet and paste feathers. 

vrijdag 11 maart 2016

Printing African animals


You need:
  1. styrofoam
  2. pencil
  3. block printing ink
  4. paint roller
  5. flat piece of plexiglass
  6. coloured paper
Explain the principle of printing. Why is it that people started to print texts and pictures?


Draw an African animal with a pencil on the styrofoam. Press to get a print in the foam. Squeeze out “toothpaste” amount of ink on plexiglass. Roll ink out. The ink is ready when lines appear. Ink should look wet.
Put the styrofoam on a newspaper. Roll one colour ink onto the foam, working quickly to cover all areas. Lay a sheet on top of foam and press with a flat hand. Take away the sheet and your print is ready. Let dry and cut it with about 1 cm around. Paste one or more prints on a white sheet. 


All artworks made by students of grade 6

donderdag 11 december 2014

Rudolph with his red nose


All credits for this great lesson and a full step by step instruction on ArtVenturous. I made these cute Rudolphs last year with my grade 1 students.

woensdag 3 september 2014

Giraffes can't dance


You need:
  1. white drawing sheet
  2. soft pastel
  3. oilpastel
  4. scissors
  5. glue
Gerald would love to join in with the other animals at the Junge Dance, but everyone knows that giraffes can't dance ... or can they?

This lesson can be used by the book  'Giraffes can't dance' by Giles Andeae and Guy Parker-Rees.

Read the book of Gerald the Giraffe. After this children draw a giraffe that's trying to dance. Colour with oilpastels. Colour a background with soft pastel. Cut the giraffe and paste it on the background.

Made by students of grade 1 and 2. 

zondag 31 augustus 2014

Buzzzzzing bees


Made by a student of grade 2.

You need:
  1. bubblewrap
  2. paint roller
  3. drawing sheet 
  4. yellow and brown tempera 
  5. yellow pencil
  6. fine black marker 
Roll a piece of bubble wrap in with yellow paint and print it. Let dry.
Make fingerprints in brown paint and let dry.
Draw lines with yellow pencil on the body of the bee.
Draw wings and legs with black fine liner.