Posts tonen met het label oil pastel. Alle posts tonen

vrijdag 31 maart 2023

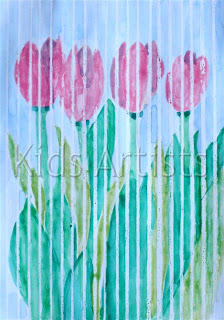
April showers will bring us flowers

You need:
  1. white drawing sheet
  2. water colour paint
  3. ruler
  4. white crayon or oil pastel
  5. paint brush
  6. water
Characteristicly Dutch weather in spring is a weather type with showers, alternated with sunny periods. We call those typical spring showers 'Maartse buien' (March Showers), while English meteorologists speak about 'April showers who bring us flowers'. 

In this lesson children draw spring flowers (tulips, daffodils etc.) during a rain shower.
 
Sketch some spring flowers on a white sheet. Make sure your lines are extremely thin. Use your ruler to draw white crayon lines with one centimeter between them. Make sure your crayon has a sharp point. Paint your drawing with watercolour paint. Use a lot of water to make bright colours. The crayon will resist the water paint, so your shower will be very clear!

woensdag 29 maart 2023

Animals in spring like Hans Innemee


by students of grade 1-2
You need:

  1. grey construction paper 21 bij 21 cm 
  2. oilpastels
This lesson is for grade 1-2. In 2012 I wrote a lesson for grade 3-4 about Hans Innemee. 

Hans Innemee (1951) is a Dutch artist. View artwork of him with the students. Discover the small stories in his work. Can you tell a small story while looking at these two birds? 


Discuss the artworks: 
  1. subject: animals
  2. few colors
  3. frame
  4. simple background
Task for today: draw young animals in spring. Color them with oilpastels. Outline with black around the drawing. 

dinsdag 23 augustus 2022

Sunflowers in pieces

by Neil

This lesson shows we can do more with our artworks dan stick them on a colored background. Pretty scare to tear or cut your drawing, but the effect is great! 

You need: 

  1. white drawing sheet 
  2. black construction paper for background 
  3. pencil
  4. oilpastels
  5. liquid water color paint
  6. brush
  7. scissors
  8. glue

Draw at least four sunflowers. Be sure three of them are over  the edges.  Color them with oilpastels. Paint the backgrond with liquid water color paint. 

Neil's drawing is torn in pieces. Those pieces have been re-glued for a spatial effect. Before tearing check which side of the paper is best. One side gives nice white tear lines, the other side does not.  

by Lyan

Lyan and Jurre have pasted black strips over their artword, creating a window through which you look outside. 

by Jurre

Elements of art: color, space.

woensdag 20 oktober 2021

One pumpkin, four materials


You need:

  1. drawing sheet
  2. color pencils
  3. watercolor paint
  4. oilpastels
  5. soft pastels
Fold the sheet in four. Draw 4 pumpkins. Color them with different materials. 

vrijdag 6 augustus 2021

Sail with the VOC

 
by students of grade 6

 You need:

  1. drawing sheet A3 size
  2. drawing sheet A4 size
  3. liquid water color
  4. brush
  5. oil pastel crayons
  6. scissors and glue
  7. ice cream sticks
  8. boxcutter
  9. cutting plate
  10. newspapers 
  11. paper towels
Towards the end of the Golden Age, the Netherlands are at war with England, a battle that is being fought at sea. 
In this lesson students draw a sea ship from that time. 

Study paintings of ships in a battle. What stands out? How do you recognize the Dutch and English ships? Which flags do you see more? What do you see in the foreground of the first painting? What can you tell about the sails? How can you see those ships are in combat? 

Naval battle Anglo-Dutch war(1666). Painter: Abraham Storck

Burning of a part of the English fleet (1667). 
Painter: Pieter van de Velde 

What should you do?
Step 1
First you paint the background on the largest sheet with liquid water color paint. At the bottom (near by) the water is dark, further away it becomes lighter (add water). 

Step 2
Draw on the A4 sheet a VOC-ship with oil pastel and color it. Draw and color extra things which you also see in the water during a naval battle, such as fire,, aa life boat, an anchor etc. Do not forget tho color the sails white!


Step 3
Paint your drawing with blue water color paint. Wipe the excess paint off the white sails with a paper towel. Let dry. 

Step 4
Cut out all parts, leaving a blue edge. Stick ice cream sticks behind the loose parts. Take the large blue painted sheet and decide where you want hour ship and the other things. Cut slices of about 3 cm in this sheet. Insert the sticks into the background and the artwork is done. 

Source: Laatmaarleren.nl 

woensdag 28 april 2021

On Monet's bridge


You need: 

  1. drawing sheet A3 size
  2. tempera paint
  3. brushes
  4. white construction paper
  5. scissors
  6. oilpastels
  7. glue
Claude Monet (1840-1926) is considered one of the most important painters of Impressionism. 

 Typical for Impressionists:

  • they choose subjects from ordinary life 
  • special attention for light and color
  • work in the open air
  • smooth brushstrokes
  • dashes resemble a sketch
  • it's about the impression!
Discuss the term impressionism. Show some paintings by Monet and zoom in on a work with water lilies in Arts & Culture. Do students see the characteristics of impressionism in this artwork?

Monet had a large garden with a pond and a Japanese bridge in Giverny France. He liked to paint in that garden. His works of water lilies are therefore famous and are the basis of this lesson.


Lesson 1
Draw a horizon line above the middle of your sheet. Paint the pond and the sky with short brush strokes, like Monet did. Do not mix the paint, but take two colors on your brush.  Make sure the blue color of the pond is not the same color as the sky.
Paint trees on both sides of the sheet in the same way. Paint water lilies in the pond. Be sure that they are larger in the front of the pond than in the back.  

Lesson 2
Have someone take a picture of you that shows you all the way. Print the photo and cut it out. 
Cut three parallel arcs from about 1,5 cm wide from the construction paper.  Then cut four straight pieces of 1,5 cm wide. Paste the photo on the work and paste the bridge over it. 

All artworks are made by students of grade 6

Source: MaryMaking.blogspot.com

zondag 4 april 2021

Starry Night like Vincent van Gogh


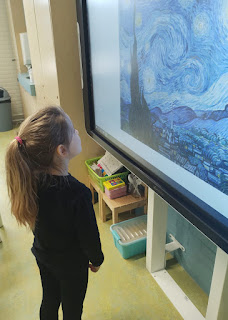
Show during both lessons hVan Gogh's painting Starry Night.  


Tell about Vincent van Gogh. Show Starry Night. Zoom in on the painting with Arts & Culture

The artwork students are going to make, will take two lessons.  

You need for the 1st lesson:
  1. black construction paper 
  2. aluminium foil
  3. piece of cardboard or a clay plate
  4. painter's tape
  5. tempera paint in blue and white 
  6. cotton swab
  7. brushes
  8. plate

Lesson 1
Wrap the cardboard/clay plate with aluminum foil and tape it on the back side. 

Step 1: For each pair of students there is a palette with blue and white paint. Students paint spiral shapes ons the aluminum foil with a brush and / or cotton swabs.


Stap 2: Make a print by placing a black sheet on top of your painting and pressing it.  

Stap 3: Remove the black sheet and let dry. 


 You need for the 2nd lesson:

  1. oilpastels in black, grey and purple
  2. tempera paint in yellow and white 
  3. black construction papier
  4. brushes
  5. scissors
  6. glue
  7. plate
Step 4: Draw and color the mountains with oilpastels. Draw the wavy movements in the air. The lines must run parallel to each other and also go in the same direction during a movement.
Show students that you can fade the colors by smearing the oil pastel. This way you can also make the colors darker or lighter.


Step 5: Determine where the large dark cypress should be and cut it out of black paper. (In grade 3 we gave students a shape to trace for the cypress.)


Step 6: Cut houses and glue them on tje painting. Draw lighted windows with oilpastels.  


Step 7: Paint moon and stars with tempera. 

Artworks are made by students of grade 3.

Elements of art: color, line, nuance, texture.


maandag 15 maart 2021

Snowdrops

 You need:

  1. white construction paper 10 by 10 cm and 15 by 15 cm
  2. oilpastel
  3. soft crayons
  4. white drawing sheet
Draw a frame around the drawing sheet at 1 cm from the edge. Color the background with oil pastel, pastels or a combination of these. Only use the colors yellow, green and blue.
Draw two flower stems with green oil pastel. 
Fold two snowdrops from the white sheets. Stick them on the work. 


Elements of art: color, nuance. 

vrijdag 27 november 2020

Scratch a Christmas ball

You need:
  1. drawing sheet
  2. oli pastels or crayons
  3. black tempera paint 
  4. brush
  5. alufoil 
  6. ribbon
  7. toothpick or skewer
Color the sheet with crayons. Paint it over with black tempera paint and let dry. Scratch with a toothpick or skewer a Christmas ball and fill it with patterns. 
Cut a small piece of aluminumfoil and paste it on the ball with a folded ribbon under it. 

made by students of grade 6

Elements of art: line (pattern)


zaterdag 21 november 2020

Winter tree in warm-cool colors

 You need:

  1. drawing sheets 25 x 32,5 cm
  2. crayons
  3. watercolor paint
  4. black tempera 
  5. brushes
  6. jar with water
With crayon: draw a horizonline and a tree trunk from the bottom of the sheet. Draw branches that touch the edges of the sheet. Draw a pattern in the landscape below the horizon. 
With watercolor paint: paint the sky. Paint the surfaces between the branches in warm or cool colors. Paint the surfaces in the landscape: warm if you first chose cool, cool if you first chose warm. 
With tempera: paint the branches and trunk black. 

Elements of art: color (warm and cool), space, line (pattern)

artworks made by students of grade 4

zaterdag 12 januari 2019

Cat on head - like Corneille


Made by a student of grade 3
You need:
  1. drawing sheet A3 size
  2. oil pastels
  3. liquid watercolor paint
  4. brushes
Corneille painted often cats, birds and women. There are some paintings where he painted the cat on the head of a woman!
Show Corneille paintings on the digital board or use google: 'Corneille woman cat'.

Who of you has a cat at home? Does it ever lie with you? Does your cat ever lie on your head?
Look at these artworks. What do you see? Why would the painter left the cat's eyes white?  Do the women on the paintings have hair? 

Draw a head on your sheet with oilpastel (dark color). Maybe your own head, but you may choose another head too. Draw a cat sitting, standing or lying down on the head. The cat looks like hair! What hairstyle it is, had to do with the position of the cat. 
Color your drawing with bright colors. Trace the outlines with a dark color if necessary and paint the background with liquid watercolor paint. 

Made by a student of grade 3

There are more lessons about Corneille on this blog! Use the search function. 

zondag 11 november 2018

Catching leaves

Made by students of grade 4
You need:
  1. white drawing sheet A3 size
  2. oil pastels
  3. liquid water color paint
  4. brushes
Students trace their hands (thumbs point to each other) on the bottom of the sheet and color them with oil pastels. They draw swirling autumn leaves above the hands and color them with oil pastels too. Paint the background with diluted liquid water color paint and leave some space on the edges.


woensdag 12 september 2018

Portfolio: Bad Hair Day

You need:
  1. white sheets
  2. liquid watercolor paint
  3. straws
  4. oil pastel crayons
How to draw a face? We used the website Wikihow. Students draw their own face on a large white sheet and color it with oil pastels. Drop liquid water color in several colors above the head and blow it in different directions using straws. 


On the photo our proud third grade students with their portfolio's in which we collected all the artwork of this school year.

woensdag 30 november 2016

Landscape with chalk pastels

Made by students of grade 5

You need:
  1. black construction paper
  2. black oil pastels
  3. soft pastels
  4. hairspray
Show several hillsides and discuss what you see:  light/shadow, depth, overlapping, colours, pointed/rolling. 

Students draw with pencil a simplified hillside on the black sheet. In the blogpost 'Peaks and Valleys' a step by step explanation how to draw this. Give students a maximum of 5 minutes for this part of the lesson, to prevent them of drawing all kinds of details.

Trace the pencil lines with black oil pastel. Colour the hills and sky using chalk pastels. Color and mix, smear and blend until you're satisfied. Be sure the difference can be seen between the light-iluminated parts of the hills and the parts that are in shadow. 
Trace after coloring the black lines again if necessary. Fix the artwork with hairspray. 

donderdag 16 juni 2016

Oscar the Octopus


You need:
  1. drawing sheet A2 size
  2. oilpastels
  3. liquid watercolor paint
  4. jar with water
  5. brushes
  6. salt
After a story about Oscar the Octopus and viewing some pictures of squids, students draw a squid in the sea. Big head, big eyes at the bottom of the head, eight tentacles that go over and under each other. These things should be seen in the drawing.

Color with oil pastels and draw patterns. Be sure the tentacles are going over and under each other - this has to be seen in the patterns.  Outline when necessary with a dark color.
Drip some liquid water color on the background after you made it wet. Sprinkle salt  for a great 'watery' effect.
All artworks are made by students of grade 3

donderdag 12 mei 2016

Fruit in complementary colors


You need:
  1. white sheets 20 by 20 cm
  2. pencil
  3. ruler
  4. oilpastels
  5. watercolor paint
  6. brushes
  7. jar with water

This lesson is originally from Miriam Paternoster's fantastic art lesson website: Arteascuola. 
Follow the link for a description of this lesson and be sure to look around there for more great art lessons!

By students of grade 4

zaterdag 13 december 2014

Christmas trees in the snow


By students of grade 2

You need:
  1. large drawing sheets 
  2. liquid watercolour green and red 
  3. oilpastel crayons 
  4. brushes
Draw a wavy line, the ground. Draw several christmas trees. Simple triangles are okay, this lesson is about overlap - not all the trees next to each other. Decorate the trees with balls and garlands and draw presents under the trees. Colour with oil pastels. Use white oilpastel for snowflakes.
Paint with liquid watercolor, the ground has to stay white.

woensdag 3 september 2014

Giraffes can't dance


You need:
  1. white drawing sheet
  2. soft pastel
  3. oilpastel
  4. scissors
  5. glue
Gerald would love to join in with the other animals at the Junge Dance, but everyone knows that giraffes can't dance ... or can they?

This lesson can be used by the book  'Giraffes can't dance' by Giles Andeae and Guy Parker-Rees.

Read the book of Gerald the Giraffe. After this children draw a giraffe that's trying to dance. Colour with oilpastels. Colour a background with soft pastel. Cut the giraffe and paste it on the background.

Made by students of grade 1 and 2. 

donderdag 6 februari 2014

The best nest


  1. drawing sheet
  2. oilpastel
  3. liquid watercolour paint
  4. brushes
  5. 3D tape
The best nest for birds in winter is a colourful one! This birdhouse will protect birdies against snow and cold.

Students draw a birdhouse and colour it in with oil pastels. Perhaps there's also a  peanut pendulum on the house. Draw  snowflakes (white oil pastel) and also a layer of snow on the house.
Paint the background with liquid watercolor. Leave about 1 cm white on the edges for an extra winter look. Draw (or print) a bird on another piece of paper and cut it. Paste it in the house using 3D tape for a spatial effect (the pads that are used to create 3D cards).

Made by students of grade 1/2