- white drawing sheet A4 size
- compasses
- pencil
- oil pastels
zondag 6 oktober 2024
Autumn leaves mandala
Pumpkin, like Burton Morris
You need:
- several colors construction paper
- black cardboard 20 by 20 cm
- colored cardboard 20 by 20 cm
- scissors
- glue
- black marker
I came across your blog and saw your student's artworks. I am truly touched that you honored my artwork in your teaching lessons and hope it was a success and inspired the children!
I hope to show again in the Netherlands one day and feel free to keep in touch.
Your friend,
Burton Morris
woensdag 25 september 2024
Haunted house in the moonlight
- white drawing sheet A4 size
- black construction paper
- yellow chalk pastel
- scissors
- cutting knife
- glue
- white pencil
- black marker
- blue and purple tempera paint
- sponge
- saucer
- Tear a strip of black paper from about 5 cm and paste it on the bottom of the white sheet: the ground.
- Draw a old house on black paper and cut out.
- Use a cutting knife for doors and windows.
- Paste the house on the white sheet.
- Use a white pencil for details such as bricks, ghosts, spiders, spider webs etc. Use a black marker to draw things in the open window.
- Cut and paste a moon.
- Outline moon and house with yellow chalk pastel and smudge the chalk outwards.
- Stamp the background with purple and blue tempera and a sponge.
- Finally paste the artwork on a yellow background sheet.
zondag 15 september 2024
Sunflowers in pieces
You need:
- white drawing sheet
- black construction paper for background
- pencil
- oilpastels
- liquid water color paint
- brush
- scissors
- glue
Draw at least four sunflowers. Be sure three of them are over the edges. Color them with oilpastels. Paint the backgrond with liquid water color paint.
Neil's drawing is torn in pieces. Those pieces have been re-glued for a spatial effect. Before tearing check which side of the paper is best. One side gives nice white tear lines, the other side does not.
Lyan and Jurre have pasted black strips over their artwork, creating a window through which you look outside.
zondag 21 juli 2024
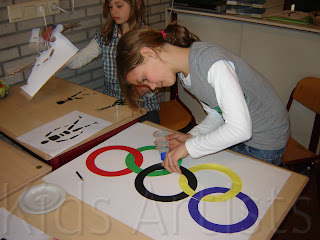
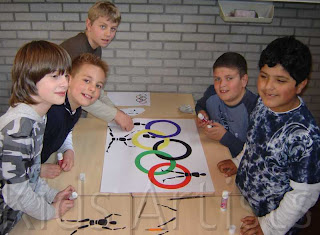
Olympic athletes
- scissors
- glue
- white drawing paper A1 size
- cardboard in Olympic colors
- compasses
 Start this lesson with the symbol of the Olympics: the colored rings. What do these rings mean? What colors do they have? How are they placed together?
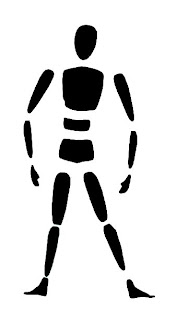
 Ask one or two children to take the position of an athlete. What is the position of the legs, arms and body? Ask another student to show another position and discuss it again.
This is a group work for five students. Every group gets a big white sheet, five sheets of colored cardboard (colors of the rings: black, yellow, red, blue, green) and at least five copies of the athlete.
Step one: each group member cuts an Olympic ring, using compasses and scissors. Paste this five rings on the big white sheet. Look carefully which ring has to be pasted in front or back, and which ones have to be pasted through each other. Be sure the little cutting line is pasted underneath another ring.
 Step two:
Every student takes a copy of the body and cuts every part of it. Then these bodyparts have to be pasted around, in, behind and in front of the Olympic rings.
woensdag 17 juli 2024
Stamping with Mondrian
- black cardboard
- sponges cut in different sizes (squares and rectangles)
- tempera paint in red, blue and yellow
- brushes
- white crayons
Also talk about Victory Boogie Woogie, the painting in which you can see part of the map of New York. Tell students we are going to make our own Mondrian map. Discuss the terms primary colors, square, rectangle, vertical and horizontal lines.
zaterdag 15 juni 2024
Monet's waterlilies pond
You need:
- drawing paper A3 size
- tempera paint in green, blue, white, red and yellow
- two brushes per student
- two spunges per student
- paper towels
- oil pastel crayons
- schotels
Typical for Impressionists:
- they choose subjects from ordinary life
- special attention for light and color
- work in the open air
- smooth brushstrokes
- dashes resemble a sketch
- it's about the impression!
dinsdag 2 april 2024
Mexican amate
- brown paper bag
- tempera paint in fluoresecent colours and white
- brushes
- jar with water
- black marker
- coloured paper for background
- glue or stapler
Paste or staple the artworks on coloured construction paper.
vrijdag 15 maart 2024
Tamponing an Easter bunny
You need:
- colored paper
- tamponing brushes
- white tempera paint
- pencil and color pencils
dinsdag 12 maart 2024
Pretty tulip prints
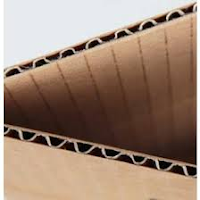
- corrugated cardboard or a cardboard box
- scissors
- roller
- blockprint or tempera paint*
- colored or white sheets
donderdag 7 maart 2024
Mix and match with Mondrian
by students of grade 3
You need:
- white sheets 21 by 21 cm
- black sheet 23 bij cm
- paper strips 3 by 6 cm in yellow, red and blue
- black squares 3 by 3 cm
- glue
I did this lesson in grade 5, students worked in pairs. The figures are cut before class. Per art work you need 4 black squares and 16 colored rectangles
- make a composition of 4 squares, each consisting of 4 colored rectangles and a black square in the middle. Make sure there are no 2 of the same colors next to each other
- paste the composition on the white sheet, keeping a small white edge visible around each shape.
- finally paste the art work on a black surface
dinsdag 5 maart 2024
Grey, like Theo van Doesburg
Theo van Doesburg (1883-1931) was a Dutch painter, architect and writer. He was charmed by the abstract art of Kandinsky and the cubism of Picasso. In 1917 he founded the magazine De Stijl (The Style), in which he and other artists could publish their innovative ideas. Well-known artists who also belong to De Stijl are Piet Mondriaan, Bart van der Leck and Gerrit Rietveld.
Characteristics of the Stijl artists:
- use of primary colors and non-colors
- horizontal and vertical lines
- use of geometric shapes
- strive for balance and harmony in the artwork
- no color, only non-colors
- geometric shapes with some rounded corners
- suggestion of depth: some surfaces appear to rise through the use of light and
- dark next to eachother
- only horizontal and vertical lines


.jpg)


