donderdag 25 november 2010

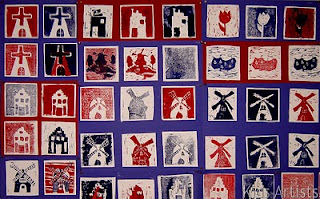
I love Holland

Made by students of grade 6

You need:

  1. two pieces of linoleum of 12 by 12 cm
  2. white drawing paper
  3. lino knives
  4. block printing ink in red and blue
  5. flat piece of glass
  6. linoleum roller
  7. lino press
  8. cardboard in red and blue
  9. scissors
  10. glue
What are typical Dutch things? Make a word web with the children. Think about cheese, canal houses, tulips, wooden shoes, cows etc. The children create a drawing on a scrap of paper with the theme I love Holland. Not too many details, because the drawing will be printed. The drawing has to be copied on both pieces of linoleum. It doesn't matter if they don't match exactly; this is even fun while making a two colour print, because the drawing seems to shift a bit. Use different linoleum knives. Cut the drawing from the first piece of linoleum. Cut the background from the second piece of linoleum, leaving the object. Lines within the object should be cut too.
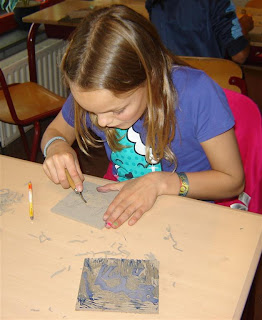
Shake the bottle of blockprint carefully to be sure oil will mix with the rest. Drip some red paint on the glass and roll it out with the lino roller. Make 2 prints of your work on a white sheet. Rinse the linoleum clean and make 2 prints in blue in the same way.

Repeat this process with the second piece of linoleum: 2 prints in red and 2 in blue. There will be 8 prints if you're finished.
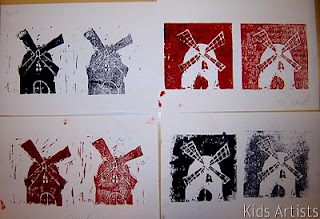
2 pieces of linoleum, 2 colours, 8 prints

Finally use one or more of those prints to make a two colour print. This has to be done by inking piece 1 red and printing it on a blue print of piece 2. See picture below. Let students choose their best prints and let them decide how many prints they want to use for their final artwork. Cut the prints with 1 cm white aound them. Make a composition on blue or red cardboard and paste the prints with 1 cm between them.
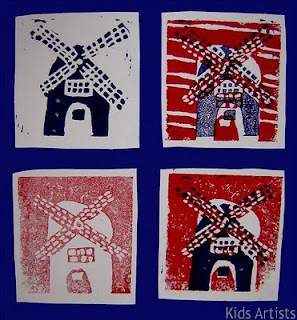
Final composition I love Holland, by Malou, grade 6

zondag 21 november 2010

Transport yourself

You need:
  1. piece of linoleum of 16 by 12 cm
  2. white paper towel from a towel dispenser
  3. mat
  4. block printing ink
  5. flat piece of glass
  6. linoleum roller
  7. lino press
What kind of transport do you know? Think of cars, limosines, trucks, airplanes, but also of skateboards, strollers etc. Everything with wheels can be used to transport persons!

Draw a mean of transportation on a piece of linoleum and cut it out. Shake the bottle of blockprint carefully to be sure oil will mix with the rest. Drip the paint on the glass and roll it out with the lino roller. Make several prints of your work on textured towel paper. Choose the best one to be your artwork.

maandag 15 november 2010

Neon leaves

You need:

  1. black construction paper A3 size
  2. pencil
  3. coloured chalk pastel

Neon light tubes form coloured lines with which a text can be written or a picture drawn, including various decorations. Neon is often used in advertising and commercial signage. Show some neon advertising or ask children if they know some. Discuss the features of neon light and the restrictions you have to deal with when you use neon lights.

Draw the outlines of some leaves onto a dark paper using a pencil. Let some of the leaves overlap. Choose a colour chalk pastel and carefully go over the lines of one leave. Make nice thick lines that follow the original. Do the same with the other leaves, using different colours. Then carefully go over all the lines with your finger. Just follow the direction of the lines rubbing backwards and forwards. Try not to smudge the lines outwards!

Now to turn the neon lights on: take a white chalk and go over all the lines again with the sharp edge. Use the sharp edge just to create a thin bright white line down the middle of the existing lines. Fixate the drawing with hairspray, or laminate it to create your own neon placemat!

zondag 14 november 2010

Printed leaves

You need:

  1. black construction paper A4 size
  2. flat dried autumn leaves
  3. white tempera and another cool colour
  4. brush
  5. colour pencils
  6. piece of sponge

I found this project on Artsonia. Ask students to take some autumn leaves for this lesson. The leaves should be dried flat, for example in a phone book.

Paint the veined side of a leaf with thick white tempera. Press the leaf on black paper; use a clean sheet to cover the leaf and press on it with flat hand. Do this with several leaves. Then pick an additional cool colour to blend with the leftover white paint and sponge paint the background. Be sure to leave a little black around each leaf for contrast. Add some autumn colour to each leaf using coloured pencils.

woensdag 10 november 2010

Treasure map

Made by a student of 11 years old

You need:
  1. white drawing sheet A4 size
  2. strong brewed tea
  3. wide, flat brush
  4. colour pencils
  5. candle

Drawing a treasure map is always exciting! A treasure map is a map that leads to a treasure or secret place. Little drawings tell you what you say on your way, and the road is often indicated by a dotted line. Treasure maps look often crumpled or discoloured, as if they have been well hidden. Students know treasure maps from books and comics. If not, show them some treasure maps on the digital board.

To make the treasure map look old and yellowed, the drawing sheet has to be painted with strong brewed tea. Do this at an earlier time so that the sheets have dried well before the drawing starts.

If the sheet is dry, a map that will lead the seeker to the treasure has to be drawn. Students have to make clarifying little drawings on the map and then colour everything with colour pencils. The treasure map has to contain a compass rose.

A job that is too dangerous for the children themselves to do, but that gives a nice weathered appearance: burning away the edges. Do this, being a teacher, yourself!

To give the treasure map something extra, students can create their own cryptography. This cryptography has to be rolled up and pasted on the map.

Also nice: seal the treasure map using drops candlewax. Press a coin in it, just before the fat has solidified!

zondag 7 november 2010

Fall things

You need:
  1. white drawing sheet 30 by 20 cm
  2. pencil
  3. ruler
  4. crayons
  5. liquid watercolour
  6. brush
  7. jar with water
  8. coloured paper for background
  9. glue
Practice the student's measuring skills by letting them draw a 5 cm grid on the drawing sheet, using a ruler and pencil. Trace the pencil lines with crayons. Draw crayon lines along the outer edges of the paper. Create a pattern of returning autumn drawings in the squares. In this lesson is chosen for diagonal lines. Trace the outlines and details of the drawings with crayon. Paint the drawings and background of the squares with liquid watercolour. Be sure the regular pattern is also to be seen in the colours.. Paste the artwork on a coloured background.

Made by a student of 11 years old

vrijdag 5 november 2010

Totem poles

Made by three students of grade 6

You need:

  1. drawing paper A4 size
  2. coloured markers
  3. coloured cardboard
  4. pencil
  5. potlood
  6. scissors
  7. glue
A totem pole is a wooden statue that was made by native tribes and was seen as a sanctuary. The pole was usually made of wood from the cedar tree and was often painted in bright colors. Show different pictures of totem poles. View and discuss the images that are cut in the totem poles.

In this lesson groups of students draw a totem pole together. To make one drawing together, some appointments should be made: the width, the colours, which drawing on which place etc.

Create groups of three or four students. Each student draws a portion of the totem pole and colours it in with coloured markers. Outline each colour with a thick black marker. Each student cuts his totem pole piece. The parts should be pasted into a whole picture on coloured cardboard. Finally, outline the exterior of the totem pole with a thick black marker.

woensdag 3 november 2010

Cool web, big spider

You need:

  1. white drawing paper 20 by 20 cm
  2. left overs of white drawing paper
  3. yellow crayons
  4. liquid watercolour
  5. thick brush
  6. jar with water
  7. scissors
  8. glue
  9. black construction paper

Students draw a web with a yellow crayon. The easiest way is to first draw diagonal lines from the corners of the paper. Then draw more lines from top to bottom, left to right. The lines must all go through the center. After this draw circles around the center, until the sheet is full.

Paint the sheet using liquid watercolour ink in cold colours. Take two colours. Leave the work to dry.

Draw some leaves with a warm colour crayon on a white sheet. Draw the veins. Paint the leaves with warm colours liquid watercolour. Let the leaves dry.

Make a spider of black construction paper. In the example above, the spider is made of a circle with a diameter of about 4 cm. Cut the circle in to the center and stick the cutting edges on each other so the center rises. Draw a cross on the back if you want to. Cut a smaller circle for the head, draw eyes on it and paste it on the body of the spider. Cut the feet: 8 strips of 8 cm by 1/2 cm. Glue the legs on the underside of the body. Make a fold inwards on the mid of the strip, and 1 cm from the end a fold outwards.

When the work is completely dry, cut the leaves and paste them on the web. Put the spider in the web by pasting the lower parts of the legs and the head.

Paste the artwork on a black background. You may draw the spider web lines on the background too.

maandag 1 november 2010

City waterfront

You need:
  1. blue construction paper A4 size
  2. white drawing paper A3 size
  3. construction paper and/or ribbed cardboard in several colours
  4. scissors
  5. glue
  6. watercolour paint
  7. brushes
  8. jar with water

I found this lesson once on a German school website. The combination of cutting/pasting and painting is exciting! Students paste tight cut houses, and the reflection in the water is made with water colour paint, which is not tight at all - just as it should be!

Students cut rectangles of different heights and widths out of coloured paper. These are the bodies of the houses. Cut several triangles out of red construction paper, these are the roofs. Cut windows and doors.

Draw a line on 1 cm from the bottom of the blue sheet. Make a composition of the houses on this line, starting with the highest ones. Place the shorter houses in front of them (overlap). Paste the houses and roofs on the blue sheet. Paste windows and doors on them in different colours.

When ready, paste the blue sheet with houses on a white A3 size sheet. Use watercolour paint to paint the mirror image of the houses in the water. Paint as precise as possible, but don't use a ruler: reflections in water aren't that straight! Paint the water blue.

Made by students of 10-11 years old

zondag 31 oktober 2010

Which witch is this?

I saw this lesson on Artsonia in several variations.

You need:

  1. drawing sheet A4 size
  2. pencil
  3. markers
  4. white pencil or silver gel pen
  5. black paper for background

Start this the lesson with a class discussion about witches. How can you recognize a witch? What things belong to a witch? What can you say about the clothing of a witch?

Students draw with pencil the lower half of the body of a witch: skirt and legs. Around this body they draw things that belong to witches. Draw a horizon line at about 1/3 part from the bottom. The drawing should be coloured with markers. Colour the background with markers or chalk pastel. The latter is obviously faster than colouring the background with markers.

Paste the drawing on a black background and decorate the rim with theme-related little drawings. Use a white pencil or a silver gel pen.

In the debriefing should be clear that you only need a half drawing to recognize a witch: Which witch is this?

Made by students of grade 3

zaterdag 30 oktober 2010

Collage of geometric and organic shapes

Made by students of 8-9 years old

A lesson I found on Artsonia. It's a great lesson to explain the different shapes and to practice cutting and pasting skills.

You need:
  1. black construction paper 18 by 18 cm
  2. four coloured sheets 16 by 16 cm in different colours
  3. scissors
  4. glue
  5. left overs black construction paper
Start this lesson with an instruction on geometric and organic shapes. A geometric shape is a shape with a name, like a rectangle, circle or square. It's shape is regular. An organic shape is a shape from nature, without a real name. The shape of a leave or animal is organic, but cloud shapes are organic too. An organic shape is a shape you can not describe, that has no name. It is irregular.

Choose four sheets with matching colours and fold them in four quarters. Cut the folding lines to get 16 squares of 4 by 4 cm. Put four rows of four squares neatly against each other on the black sheet. Do not place two of the same colours side by side. Glue the squares. Cut a number of organic shapes out of black paper. Create a beautiful composition on the sheet with squares and paste the black shapes. The shapes should not overlap.

zondag 24 oktober 2010

Whirling leaves

You need:
  1. white drawing sheet A4 size
  2. watercolour paint
  3. brushes
  4. jar with water
  5. small and broad black marker
  6. col0ured construction paper for background
  7. glue

Ask students a week before this lesson to take some flat dried leaves. Every student chooses one of his own leaves and outlines it several times with a pencil. Remember to draw not all the leaves in the same way on the paper, because they whirl down from the tree. Make sure some leaves go over the edge; those leaves will later be finished on the background.

Paint the leaves with watercolour paint. Use water to dillute the paint less or more. Choose real warm fall colours and try to make transitions in the colours by using wet in wet technique.

Paint the background blue. Use again the wet in wet technique, and/or choose for wet on dry. You don't have to paint exactly against the leaves, because they will be outlined with a marker.

Leave the work to dry and paste in on a coloured background. Outline the leaves with a thick black marker. Use a fine black marker for drawing the veins, while observing carefully the real leaves. Don't stop with outlining and drawing veins when you reach the background, but go on with it there.

Both artworks are made by students of 11 years old

vrijdag 22 oktober 2010

Autumn leaves in cubist style

You need:
  1. white drawing paper A4 size
  2. pencil
  3. ruler
  4. tempera paint
  5. brushes
  6. gold colour marker

Ask students to take autumn leaves. Watch them together, paying particular attention to the form: heart-shaped, oval, round, oblong, etc. The composition of the leaves may vary: a leave can be single or composed of several leaflets (pinnate or palmately).

Students draw several leaves on their sheet. The leaves should not overlap. Draw parts of leaves against the edges. Only the outer form of the leaves have to be drawn, so no veins. If the leaves are drawn and the sheet is largely filled, draw four diagonal lines with pencil and ruler: two lines from left to right and two lines from top to bottom. Make sure these lines pass through the leaves. Do not press too hard with the pencil, otherwise they'll come through the paint!

The drawing has to be painted with four warm colours tempera: two colours for the leaves and two for the background. Paint the leave parts within a square in one colour and the background in a different colour. In the box next paint the leaves in a third colour and the background with colour four. See diagram below.

When the artwork is dry, trace the contour lines of the leaves and the diagonal lines with a gold marker.

Made by a student of 11 years old

zaterdag 16 oktober 2010

Awesome alphabet

Made by students of grade 6

You need:

  1. drawing paper A6 size (postcard)
  2. markers
  3. fine black marker
  4. black cardboard
  5. glue
Arrange which students makes which letter of the alphabet. The I and J have to be drawn on one sheet, to make a group work of five by five drawings. Each student draws one big letter, with about 1 cm free space around. Colour the letter as you like, using patterns. Colour the background as well. Outline the letter and the details with a fine black marker. Make sure the letter 'pops up' from the background, by choosing different colours and patterns. Paste all letters on a big black cardboard, five by five with 2 cm space between them.

Group work 'Awesome alphabet'

woensdag 13 oktober 2010

Photo fun

You need:
  1. copy of a photo of the student in black/white, A4 size
  2. coloured construction paper A4 size
  3. ruler
  4. scissors
  5. glue

Take a digital photo of each student and print in black and white on A4 paper. Students draw on the back of the picture horizontal lines with 2 cm space between them. Cut the lines. Paste the strips with half a cm between the on the coloured paper.

With the name of the student and his birthday under the arwork, this is a nice birthday calendar for in the classroom.

dinsdag 12 oktober 2010

Reflected canal houses

You need:

  1. white drawing sheet A4 size
  2. white crayons
  3. watercolour paint
  4. brushes
  5. jar with water
Dutch canal houses are famous for their facades: stepped gable, neckgable, bell gable, clockgevel or spoutgable. Draw those five gables on the blackboard and discuss them. Search the internet for photographs of canal houses or let the students search them (search canal house or grachtenhuis).

Draw a line at 12 cm from the bottom of the sheet. Draw some low canal house with a white crayon. Draw windows, treps and doors in them. Paint every house with a different colour of watercolour paint. The crayon will resist the paint and become visible. Paint a simplified reflection of the house under the line. Paint water and air.

zondag 10 oktober 2010

Learning letters

Made by a student of 7 years old

You need:
  1. drawing sheet 20 by 20 cm
  2. crayons
  3. liquid watercolour
  4. brushes
  5. jar with water

Draw a 5 cm grid and copy it on drawing sheets. Give every student a grid sheet. Students use crayons to write big handwriting letters in the squares. Trace the lines of the squares with crayon too using one colour. Paint the squares with liquid watercolour.

In Holland we call those letters 'lusletters', 'letters with loops' if I translate is. The first letters children learn, at the same time as they start learning to read, are called 'blokletters'. Block letters?

How do you call those letters? Blockletters? Writing letters? Who can help me?

maandag 4 oktober 2010

Calligram

Our Dutch calligrams; do you recognize the meaning?

You need:
  1. drawing sheet A6 size (postcard size)
  2. pencil
  3. fine black marker

A calligram is a phrase or word in which the typeface, calligraphy or handwriting is arranged in a way that creates a visual image. The image created by the words expresses visually what the word or words say.

Show some calligrams on the smartboard. Discuss them with the students. How was the calligram made? What word(s) do you see? What kind if image is it? Students choose something they want to draw. With a pencil they draw the outlines of it on a sheet. Using a fine marker they write their drawing full with the words that belong to it. Erase the pencil lines when the ink has dried. There are two ways to do it: fill the drawing completely with words, or write the words only on the outlines of the drawing.

Sometimes it is better, and/or nicer, to colour your calligrams. In the example above, the food calligram, you won't probably recognize the food on the plate. With some colour (colour pencils) it is clear! The butterfly is coloured with coloured ink.

zaterdag 2 oktober 2010

Word art

You need:

  1. drawing sheet A6 size
  2. colour pencils or markers
  3. black fine marker

Each student selects a words to illustrate. The design for the word must reflect what the word represents. Someone who doesn't know the meaning of the word, has to understand what it means by looking at the design of it.

Use colour pencils or markers to colour the letters of the word. Use a fine black marker to outline the letters.

Well: although you don't know the meaning of the Dutch words in the examples my students made, you'll know what they mean thanks to the design! If not, they did a bad job?

Made by students of 11-12 years old

woensdag 29 september 2010

Fine lines

You need:

  1. black construction paper 20 by 12 cm
  2. coloured construction paper A4 size
  3. pencil
  4. ruler
  5. scissors
  6. cutter and cutting mat
  7. glue

This lesson is about lines. What kind of lines do you know? Straight, wavy, curved, bumpy, broken, spiral, zig-zag. Discuss different types of lines and let students draw examples on the blackboard.

Draw with a pencil nine different lines on the black paper with 2 cm between them. Cut the sheet carefully following the lines and place the individual pieces in cut order on the coloured paper. Draw with a pencil on the left and bottom of the colored sheet lines on 1 cm from the side. Paste the first black strip on the coloured sheet against the drawn lines. Paste the other strips with about a half cm space between them against the pencil line left.

When all stripes are pasted, cut at the top and right the excess coloured paper away leaving a frame of 1 cm.